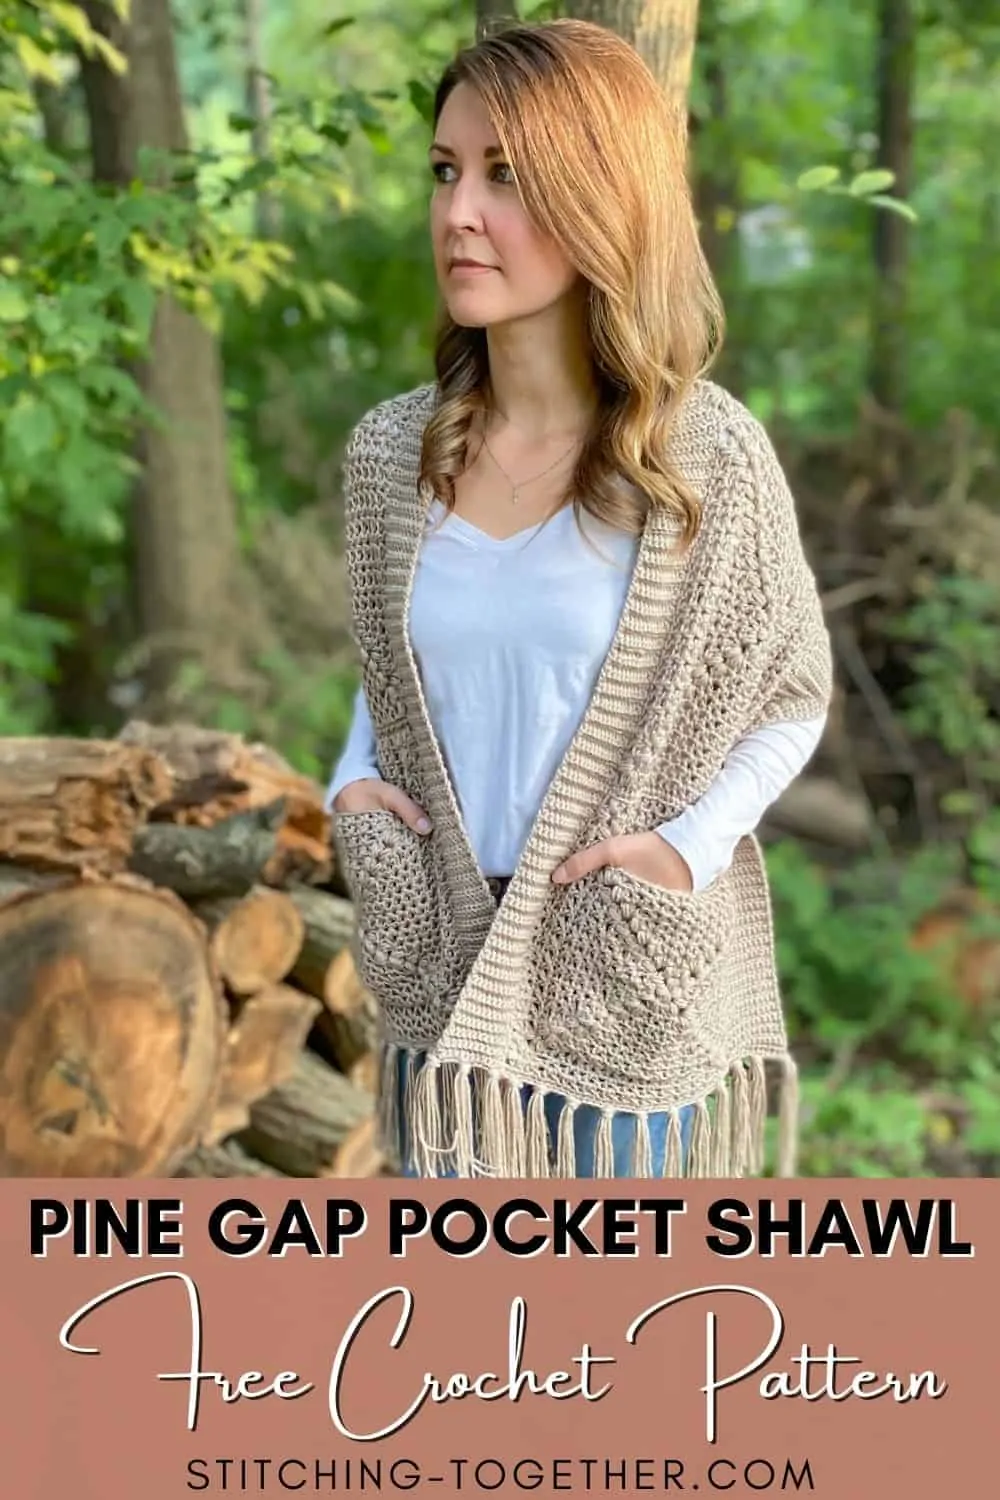
Pine Gap Pocket Shawl Crochet Pattern
Disclosure: This post may contain affiliate links. As an Amazon Associate, I earn from qualifying purchases. Please visit my Privacy Policy for disclosures and more information.
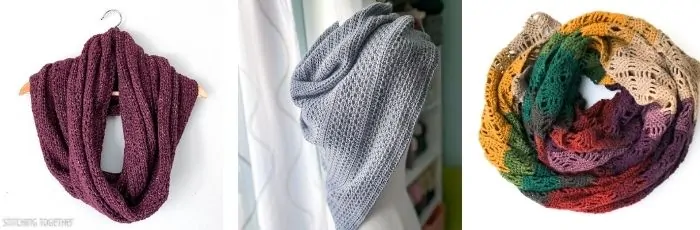
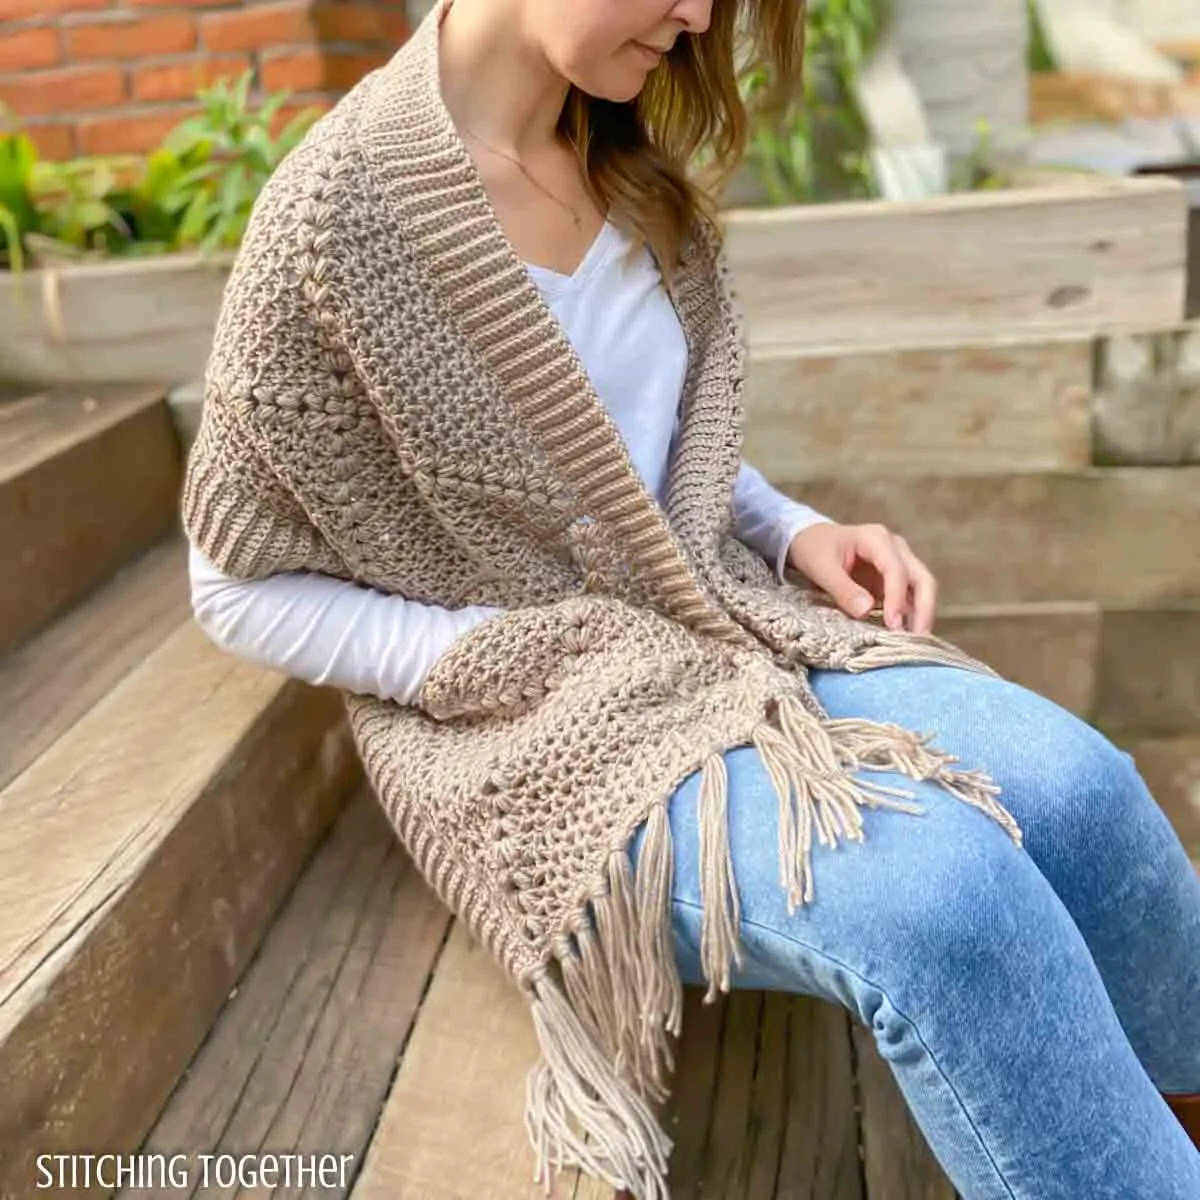
Are you ready to jump on board with the hottest trend of the season, but want something that’s unique? The Pine Gap Pocket Shawl Crochet Pattern is the project you’re hook has been waiting for. Who knew granny squares could look so modern?

Keep reading to find all the details for this pocket shawl crochet pattern free, or purchase the pocket shawl pattern PDF.
How do you make a crochet pocket shawl?
So we’ve already established that shawls and wraps with pockets are the hottest items of the season, but how do you make a pocket shawl?
Most of the shawl patterns I’ve seen work the body of the shawl in rows or lengthwise, maybe add some sort of ribbing and then add pockets.
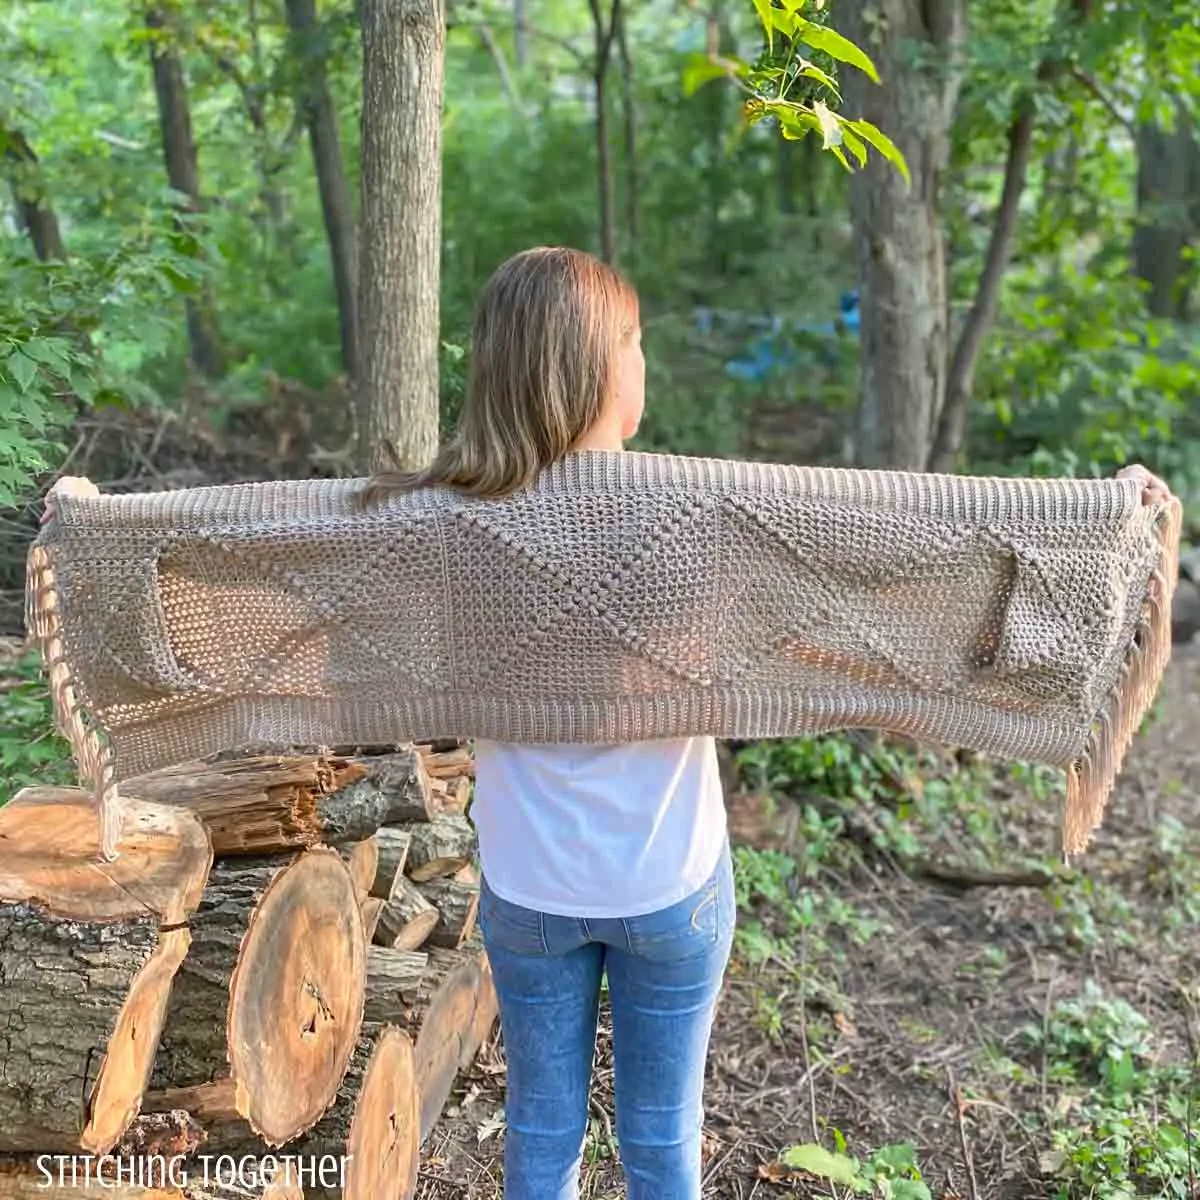
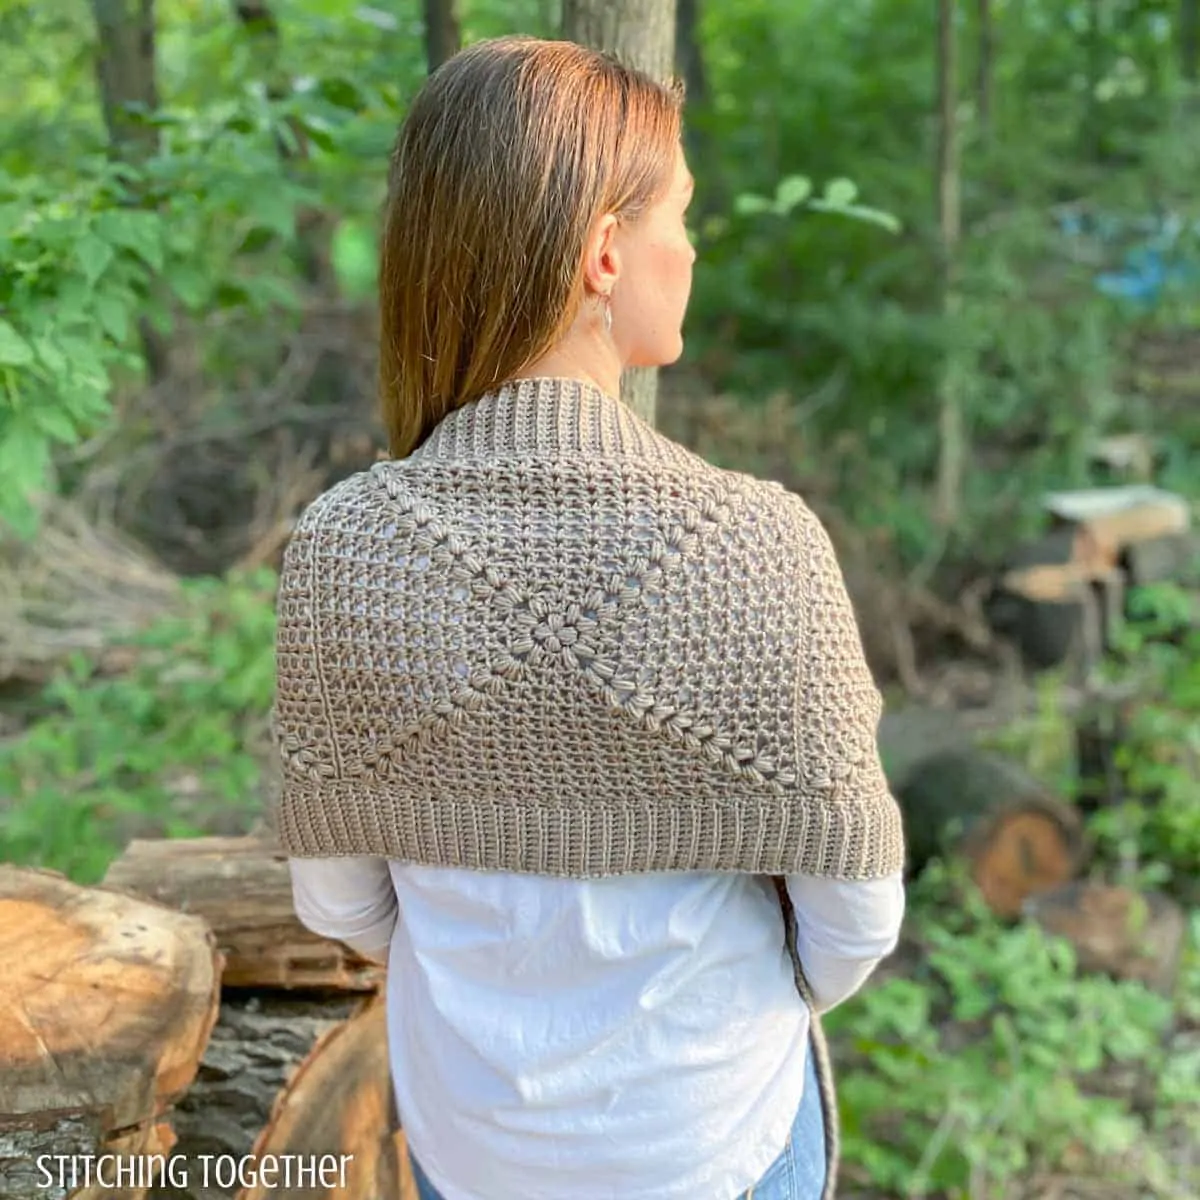
The Pine Gap Pocket Shawl is a little different in that you’ll make 7 granny squares, 5 large ones, and 2 a bit smaller, join 5 of them in a row, add cozy sweater-like ribbing and then add the 2 smaller squares as pockets.
You’ll be surprised how quickly it actually works up. And you’re probably going to need to be prepared to make more than one because once your friends see it, they’ll want one too!
More about the Squares and Stitches in the Pocket Shawl
Shawl Squares
Just like the Caldwell Crochet Market Bag, the Pine Gap Pocket Shawl uses squares based on the Grandview Granny Square.
These squares have 2 extra double crochets in the corner of every other round, compared to the Grandview Grannies. (This is only important information if you’ve already followed Grandview Granny Square tutorials.)
The grannies themselves use a combo of double crochet v-stitches and puff stitches. Since the Grandview Granny post has more information about the squares, I’ll let you head there and read about them instead of going on and on here.
To join the squares and to add the pockets, I used a simple whip stitch, but you can use whatever joining stitch you like best. I like how the whip stitch doesn’t stand out much and how it creates a secure seam.
Shawl Ribbing
The ribbing is the same type of ribbing and technique that was used in the Toddler Crochet Cocoon Shrug and joining as you go is my favorite way to add ribbing.
Simply working the single crochets in the back loop gives you a great texture that’s cozy enough for a heavy sweater.
Do you have a different granny square pattern you’d think would look great for this crochet shawl?
Use it! You just need to be able to know how to make the squares large enough for the body of the shawl.
You can also use smaller squares and make this more of a pocket scarf instead of a shawl.
What yarn to use in the pocket shawl crochet pattern?
For the coziest pocket shawl, I used one of my favorite acrylics, Premier Anti-Pilling Everyday Worsted yarn, already knowing I love how it works up.
I wasn’t disappointed. Everything I’ve made with this yarn has turned out so soft and cozy with great drape.
Premier also has a wonderful referral program you can sign up for and earn points which can be used to receive discounts on yarn! If you sign up through my referral link, you earn a discount and I earn points. Tell your friends, and you get more points!
Yarn Substitution
Premier Anti-Pilling Everyday Worsted yarn is a category 4, medium, worsted weight yarn so you will want to stick to a yarn that is the same.
Heartland, Basic Stitch anti-pilling, or Jeans yarn, all by Lion Brand would be great substitutes. I Love This Yarn from Hobby Lobby would also work well.
I’m a beginner, can I make a crochet pocket shawl?
The short answer is no. This isn’t a beginner project. HOWEVER, I don’t want to discourage you from trying something new.
Head over to the Grandview Granny Square Pattern and give it a try. If you can get used to making that smaller square and understand how I write patterns, you’ll be able to make this pocket shawl.
The squares themselves aren’t super hard, but you need to be able to follow complex pattern instructions which is why I don’t even have this pattern marked as easy but as an intermediate project.
Like I said, give the grannies a try and continue to grow in your pattern reading skills then you’ll be able to tackle this crochet shawl with pockets with no problem.
Make sure you save this Pocket Shawl Free Crochet Pattern on Pinterest!
Pine Gap Pocket Shawl Crochet Pattern Free
Skill Level: Intermediate
Materials:
US size J/10, 6.0 mm crochet hook
Premier Antipilling Everyday Worsted Yarn
- 960 yds (18.65 oz) in Chinchilla
Large Eye Yarn Needle
Stitch Markers (optional)
.
Everything you need for this project can be ordered right on Amazon.
Save time and shop online!
.
Abbreviations:
Puff: Puff Stitch (see notes)
ch: chain
st: stitch
sl st: slipstitch
sp: space
dc: double crochet
sc: single crochet
BLO: back loop only
Gauge: square will measure approximately 4.75” after round 5
Finished Size: 16” wide by 62” long
small square (pockets) = 8.5” large square = 11.5”
Notes:
The first 4 puff stitches of the pattern have an extra yarn over compared to the rest of the puff stitches.
1st puff stitches: [yo, pull up a loop] 4 times (9 loops on the hooks), yo, pull through all 9 loops on the hook. (Only used for Round 1.)
puff stitch: [yo, pull up a loop] 3 times (7 loops on the hooks), yo, pull through all 7 loops on the hook. (Used for all puff stitches after Round 1.)
After round 2, stitches are either worked in the ch-3 space between 2 puff stitches or in the ch-1 space between 2 double crochets.
Brackets [ ] and { } are used on sections that will be repeated the indicated number of times.
Parenthesis ( ) are used to include additional information, stitch counts, and a group of stitches worked in the same stitch.
Pocket Shawl Crochet Pattern Instructions:
Large Squares
Make 5 squares total
Start with a magic circle
Round 1: [Puff (see notes), ch 3] 4 times, tighten to close, join with a sl st in the 1st puff.
Round 2: [(Puff, ch 3, puff, ch 1) in ch-3 sp, (dc, ch 1, dc) in puff] 4 times, join with a sl st in the 1st puff.
Round 3: (Puff, ch 3, puff, ch 1, dc, ch 1, dc) in ch-3 sp, (dc, ch 1, dc) in ch-1 sp, [(dc, ch 1, dc, puff, ch 3, puff, ch 1, dc, ch 1, dc) in ch-3 sp, (dc, ch 1, dc) in ch-1 sp] 3 times, (dc, ch 1, dc) in 1st ch-3 sp (the same ch-3 sp you started the round in), join with a sl st in the 1st puff.
Round 4: (Puff, ch 3, puff, ch 1, dc,) in ch-3 sp, [(dc, ch 1, dc) in ch-1 sp] 3 times, [(dc, puff, ch 3, puff, ch 1, dc) in ch-3 sp, {(dc, ch 1, dc) in ch-1 sp} 3 times] 3 times, dc in 1st ch-3 sp (the same ch-3 sp you started the round in), join with a sl st in the 1st puff.
Round 5: (Puff, ch 3, puff, ch 1, dc, ch 1, dc) in ch-3 sp, [(dc, ch 1, dc) in ch-1 sp] 3 times, [(dc, ch 1, dc, puff, ch 3, puff, ch 1, dc, ch 1, dc) in ch-3 sp, {(dc, ch 1, dc) in ch-1 sp} 3 times] 3 times, (dc, ch 1, dc) in 1st ch-3 sp, join with a sl st in the 1st puff.
Round 6: (Puff, ch 3, puff, ch 1, dc,) in ch-3 sp, [(dc, ch 1, dc) in ch-1 sp] 5 times, [(dc, puff, ch 3, puff, ch 1, dc) in ch-3 sp, {(dc, ch 1, dc) in ch-1 sp} 5 times] 3 times, dc in 1st ch-3 sp, join with a sl st in the 1st puff.
Round 7: (Puff, ch 3, puff, ch 1, dc, ch 1, dc) in ch-3 sp, [(dc, ch 1, dc) in ch-1 sp] 5 times, [(dc, ch 1, dc, puff, ch 3, puff, ch 1, dc, ch 1, dc) in ch-3 sp, {(dc, ch 1, dc) in ch-1 sp} 5 times] 3 times, (dc, ch 1, dc) in 1st ch-3 sp, join with a sl st in the 1st puff.
Round 8: (Puff, ch 3, puff, ch 1, dc,) in ch-3 sp, [(dc, ch 1, dc) in ch-1 sp] 7 times, [(dc, puff, ch 3, puff, ch 1, dc) in ch-3 sp, {(dc, ch 1, dc) in ch-1 sp} 7 times] 3 times, dc in 1st ch-3 sp, join with a sl st in the 1st puff.
Round 9: (Puff, ch 3, puff, ch 1, dc, ch 1, dc) in ch-3 sp, [(dc, ch 1, dc) in ch-1 sp] 7 times, [(dc, ch 1, dc, puff, ch 3, puff, ch 1, dc, ch 1, dc) in ch-3 sp, {(dc, ch 1, dc) in ch-1 sp} 7 times] 3 times, (dc, ch 1, dc) in 1st ch-3 sp, join with a sl st in the 1st puff.
Round 10: (Puff, ch 3, puff, ch 1, dc,) in ch-3 sp, [(dc, ch 1, dc) in ch-1 sp] 9 times, [(dc, puff, ch 3, puff, ch 1, dc) in ch-3 sp, {(dc, ch 1, dc) in ch-1 sp} 9 times] 3 times, dc in 1st ch-3 sp, join with a sl st in the 1st puff.
Round 11: (Puff, ch 3, puff, ch 1, dc, ch 1, dc) in ch-3 sp, [(dc, ch 1, dc) in ch-1 sp] 9 times, [(dc, ch 1, dc, puff, ch 3, puff, ch 1, dc, ch 1, dc) in ch-3 sp, {(dc, ch 1, dc) in ch-1 sp} 9 times] 3 times, (dc, ch 1, dc) in 1st ch-3 sp, join with a sl st in the 1st puff.
Round 12: (Puff, ch 3, puff, ch 1, dc,) in ch-3 sp, [(dc, ch 1, dc) in ch-1 sp] 11 times, [(dc, puff, ch 3, puff, ch 1, dc) in ch-3 sp, {(dc, ch 1, dc) in ch-1 sp} 11 times] 3 times, dc in 1st ch-3 sp, join with a sl st in the 1st puff.
Leave a long tail to use for joining the squares.
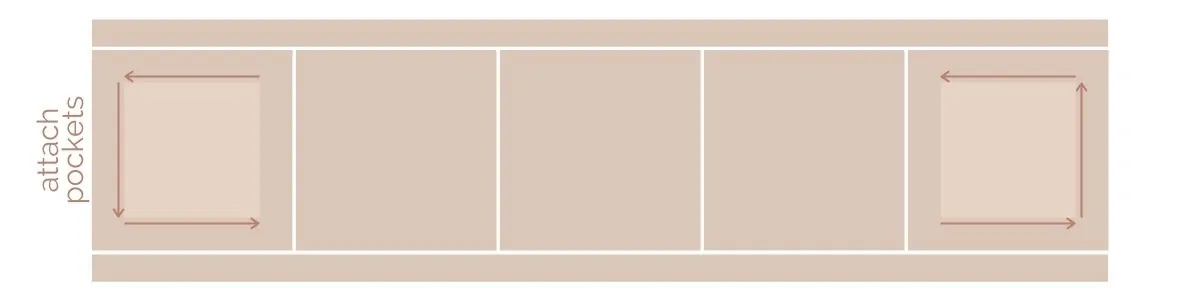
Join Squares
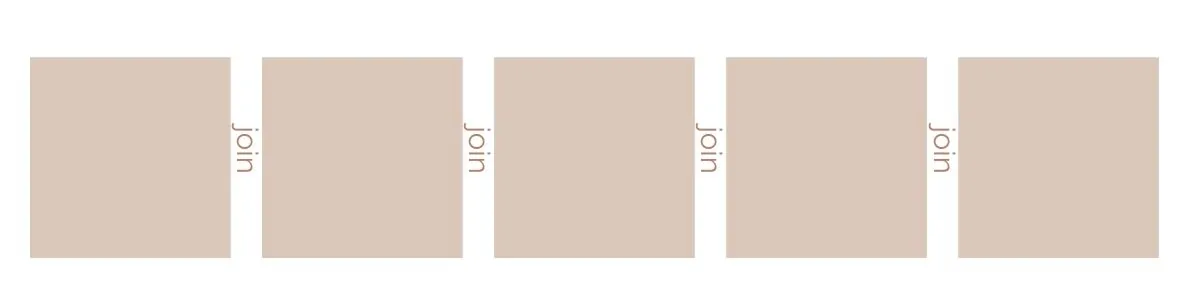
Line up your squares in a single line. Using a whip stitch or other favorite join, connect the squares together.
Border
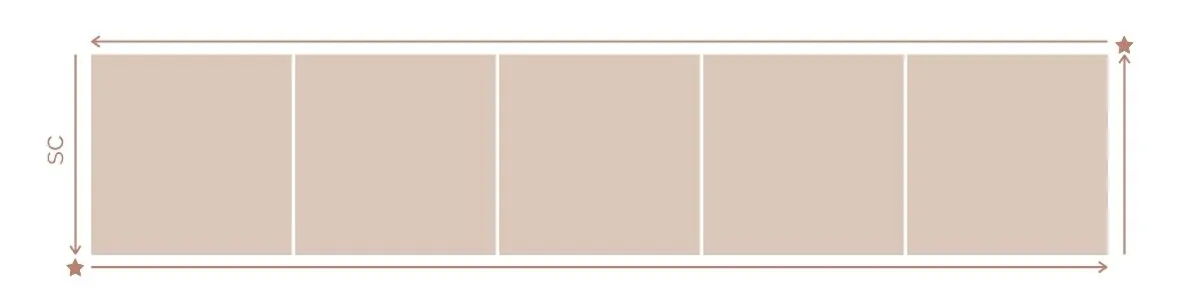
Next, we’ll add a single crochet border around all the joined squares. Join yarn in ch-3 space in one of the starred corners (see diagram) and 2 sc in the ch-3 space.
Working around, place 1 sc in each st, 2 sc in each ch-3 space along the sides, 1 sc in each join, and (2 sc, ch 1, 2 sc) in each ch-3 space in each corner. When you reach the corner where you started, 2 sc then join with a sl st to the first sc. Do not cut yarn.
As you work your ribbing in the next step, you’ll be working slip stitches into the single crochet border to join the ribbing as you go.
Ribbing
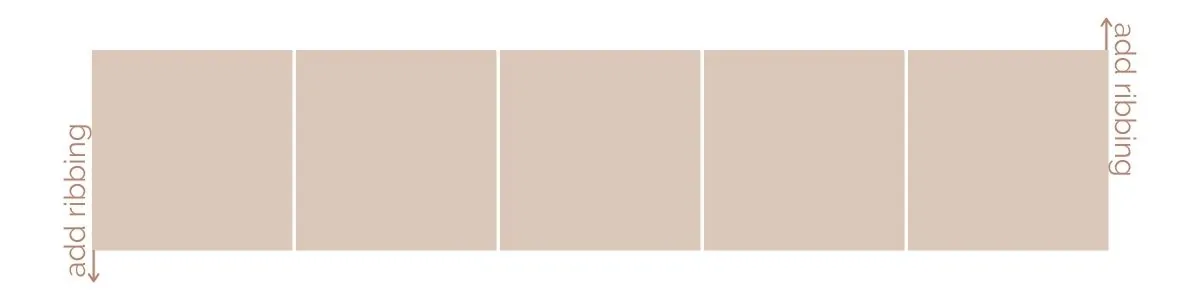
Ch 12,
Row 1: sc in 2nd ch from hook and in each ch, join with a sl st in the next sc of border. (11)
Row 2: Sl st in the next sc of the border, turn, sc BLO in each st, turn. (11)
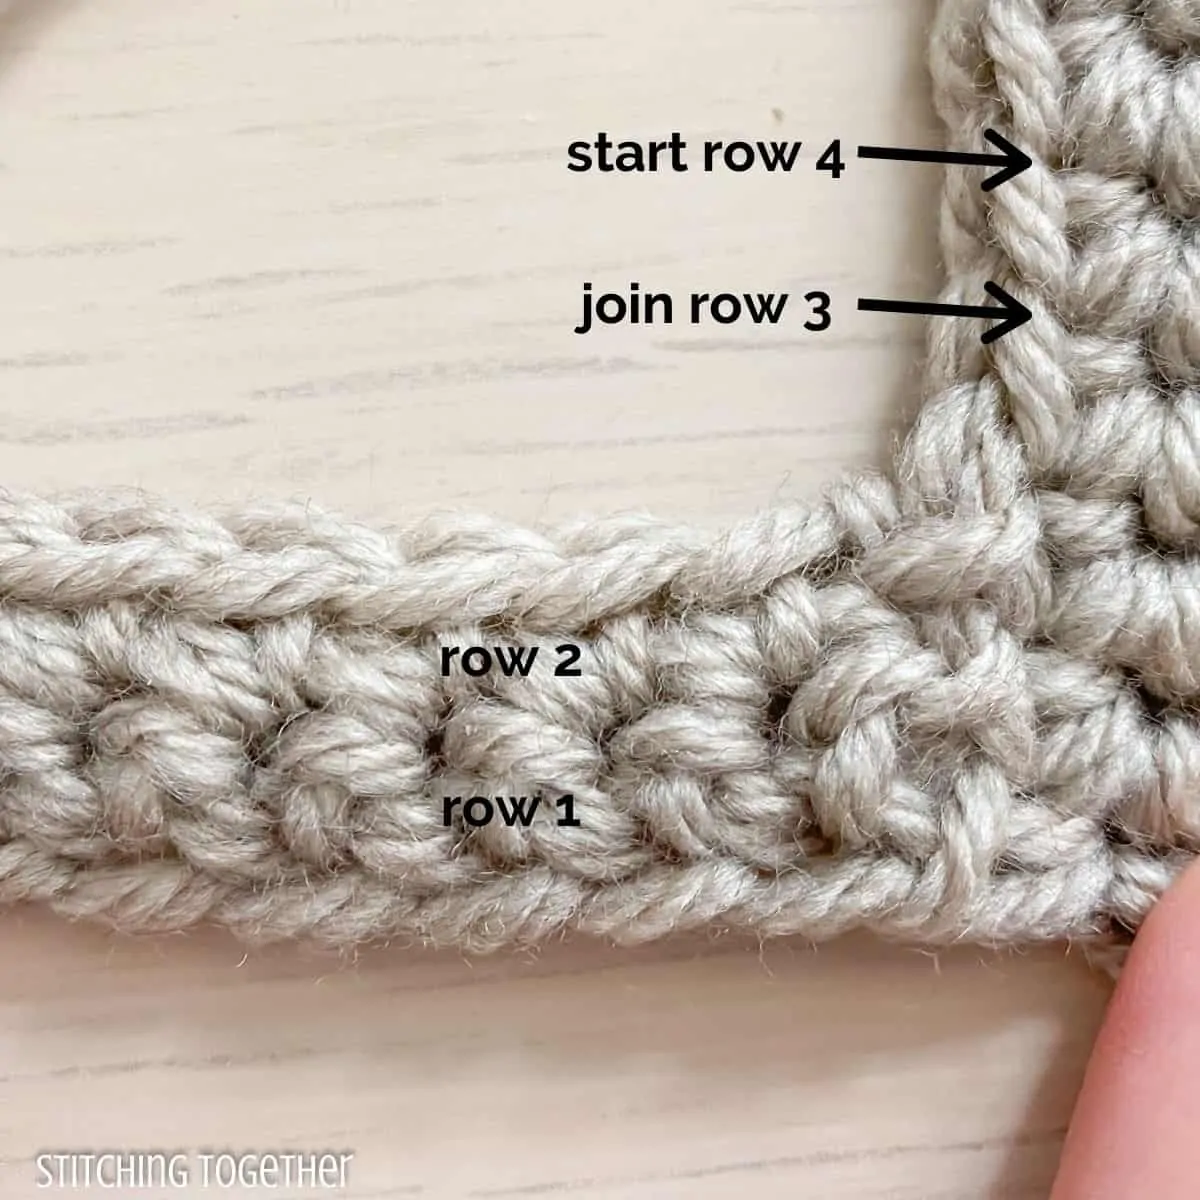
Row 3: ch 1, sc BLO in each st, join with a sl st in the next sc of the border. (11)
Repeat Rows 2 and 3 until you reach the other end of the shawl ending on a row 2 repeat. Do not cut yarn (this will be used to add an additional sc border along the bottom of the shawl when both sides of ribbing are completed.)
Using a different skein of yarn, join yarn on the opposite side from where you just ended. Follow the Ribbing instructions to create ribbing for the other side.
Bottom Border
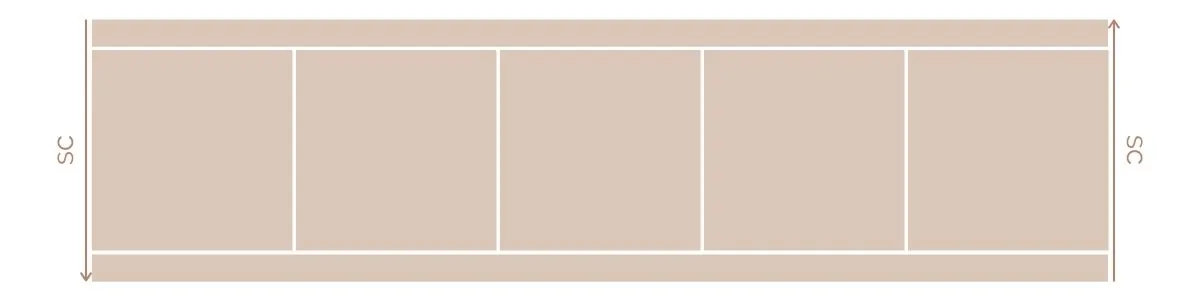
Ch 1, sc in each st across the bottom. Fasten off and weave in ends (66).
Repeat for the other side.
Pockets
Follow the instructions for the large squares up to Round 9 and make 2 pocket squares.
Line up the pocket so that the middle of the pocket granny square is directly on top of the middle of the bottom granny square of the shawl. Using a whip stitch, join 3 sides of the pocket to the shawl, leaving the top of the pocket open. Fasten off and weave in ends.
Repeat for the other side.
Fringe
Cut 140 strands yarn approximately 13 inches in length. Holding 5 strands of yarn together at a time, add fringe to each corner and every 5th stitch.
Blocking You’re finished but your shawl may benefit from a light blocking. I laid out my shawl and steamed it gently to smooth out the ribbing, fringe, and joins. (If you use acrylic yarn do not touch it with an iron as it could melt!)
Photo Help Crochet Pocket Shawl
Squares:
Start with a magic circle
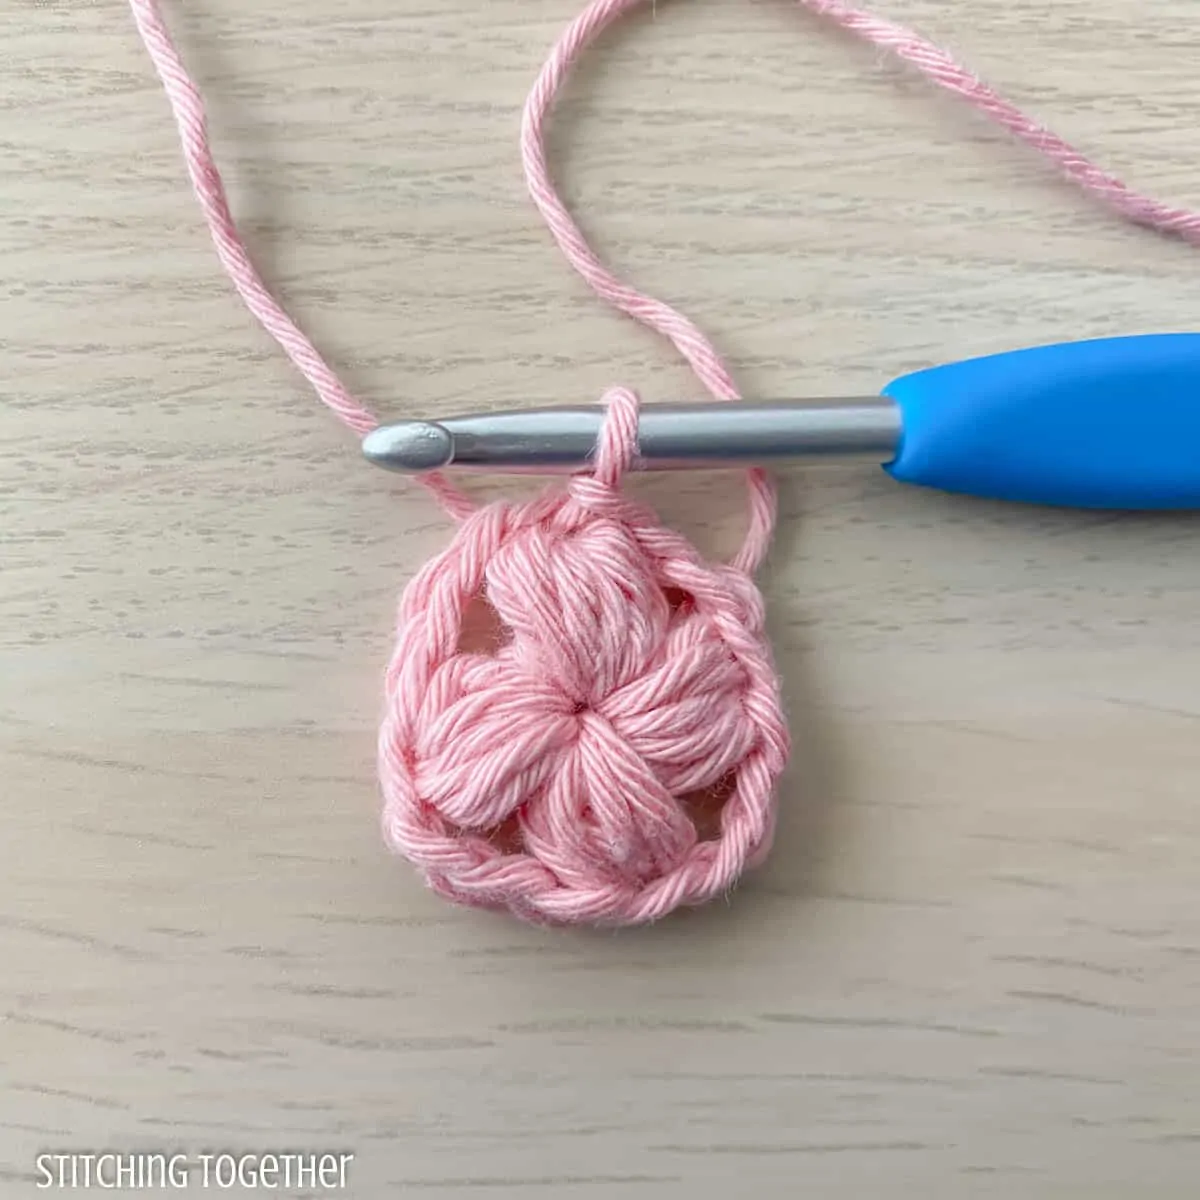
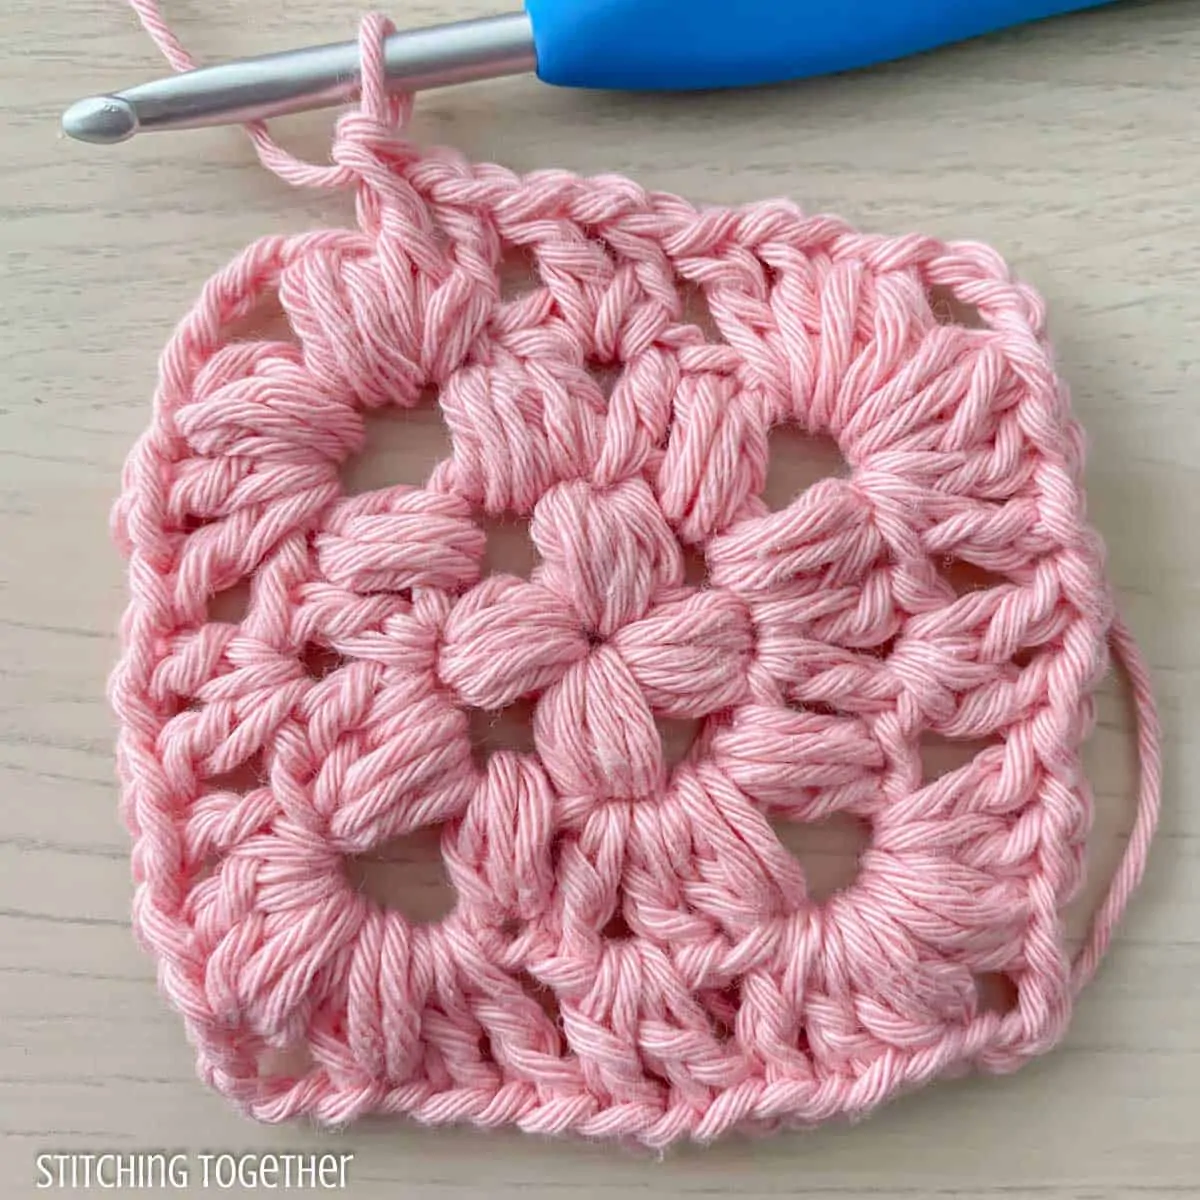
Round 1:
[Puff (see notes), ch 3] 4 times, tighten to close, join with a sl st in the 1st puff.
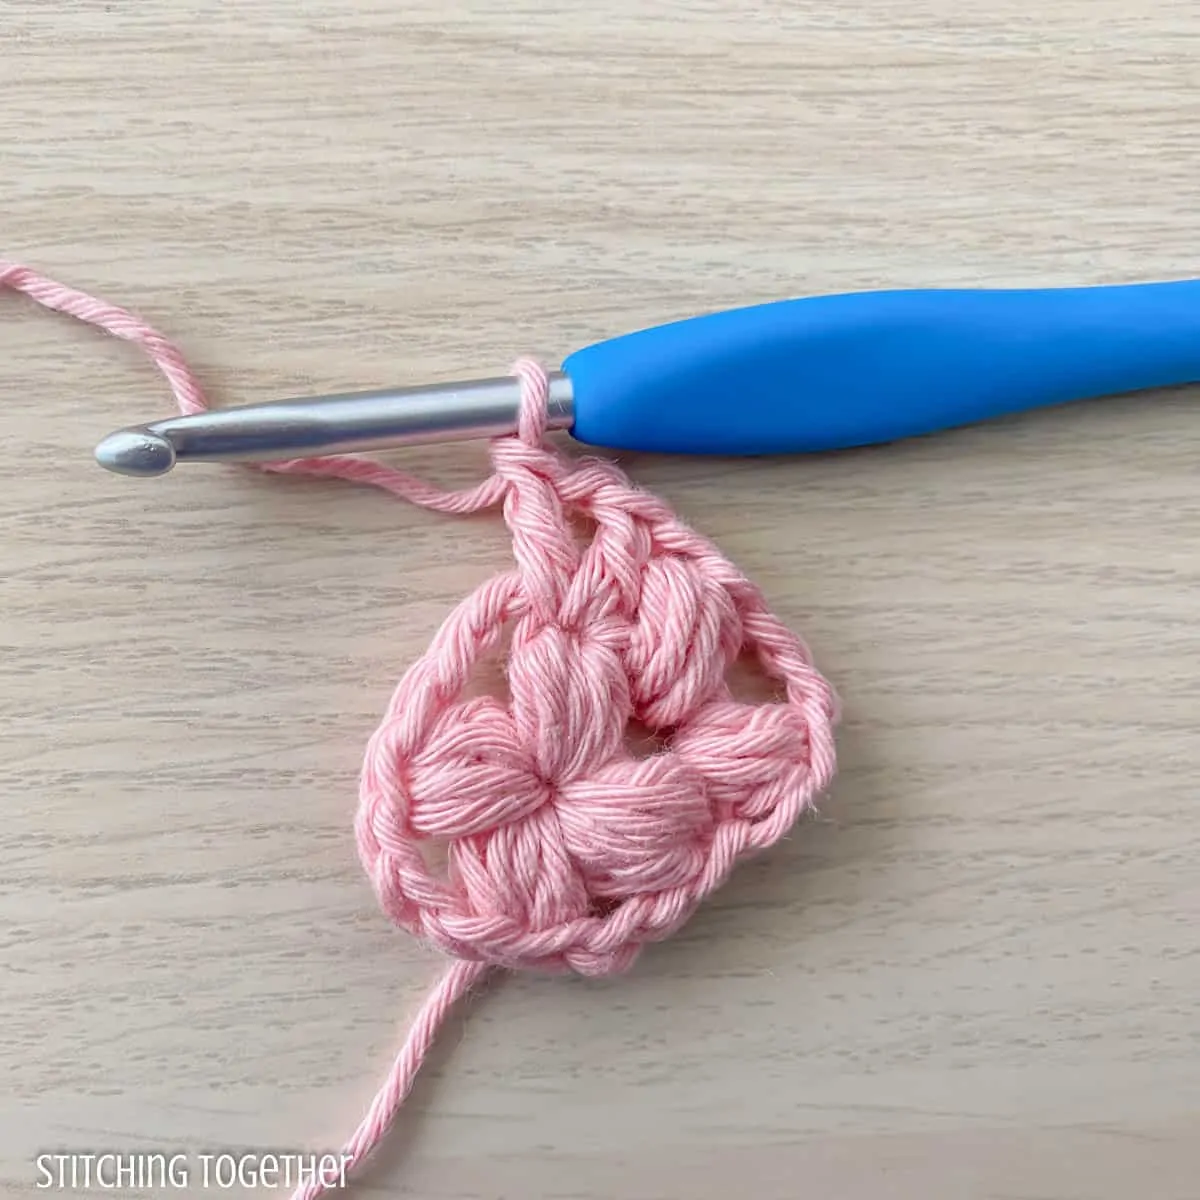
Round 2:
[(Puff, ch 3, puff, ch 1) in ch-3 sp, (dc, ch 1, dc) in puff] 4 times, join with a sl st in the 1st puff.
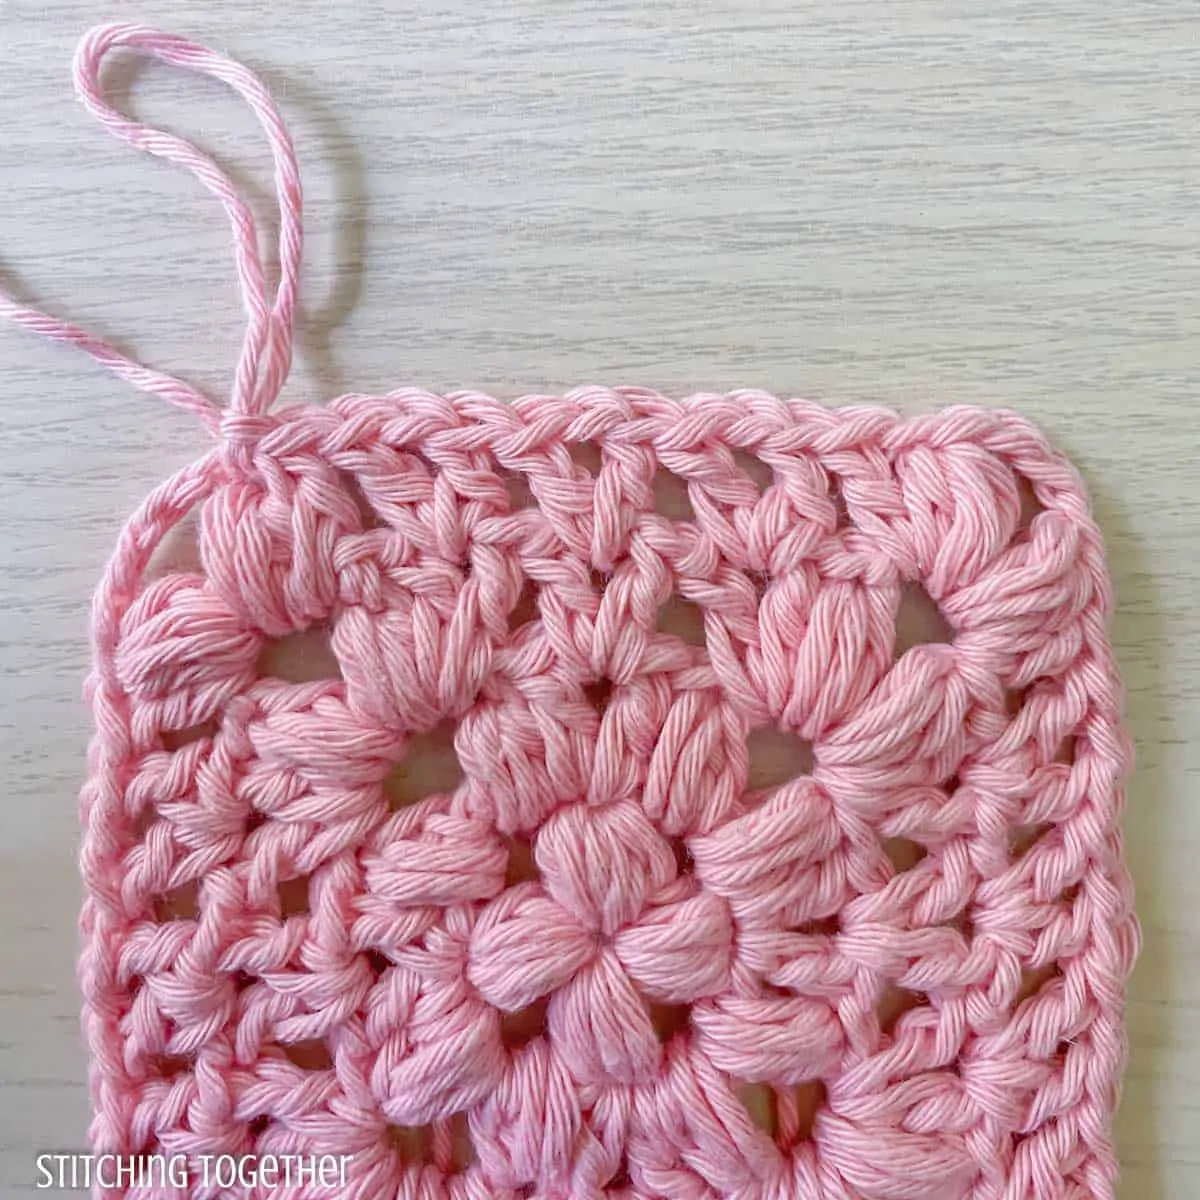
Round 3:
(Puff, ch 3, puff, ch 1, dc, ch 1, dc) in ch-3 sp,
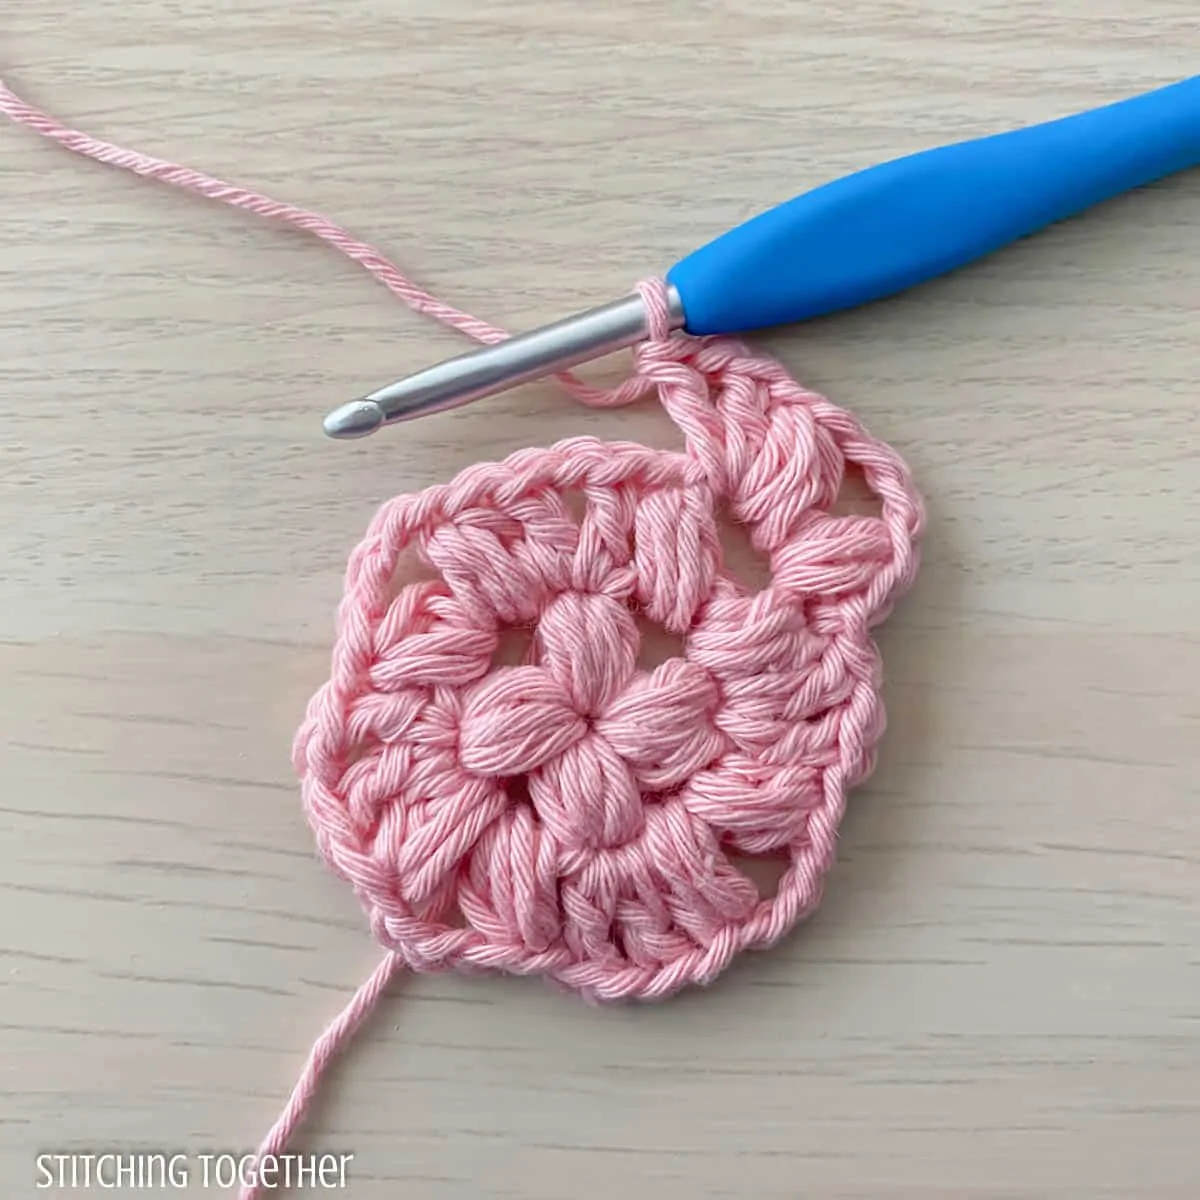
(dc, ch 1, dc) in ch-1 sp,
[(dc, ch 1, dc, puff, ch 3, puff, ch 1, dc, ch 1, dc) in ch-3 sp, (dc, ch 1, dc) in ch-1 sp] 3 times,
(dc, ch 1, dc) in 1st ch-3 sp, join with a sl st in the 1st puff.
Round 4:
(Puff, ch 3, puff, dc,) in ch-3 sp, [(dc, ch 1, dc) in ch-1 sp] 3 times, [(dc,puff, ch 3, puff,dc) in ch-3 sp, {(dc, ch 1, dc) in ch-1 sp} 3 times] 3 times, dc in 1st ch-3 sp (the same ch-3 sp you started the round in), join with a sl st in the 1st puff.
Ribbing:
Ch 12
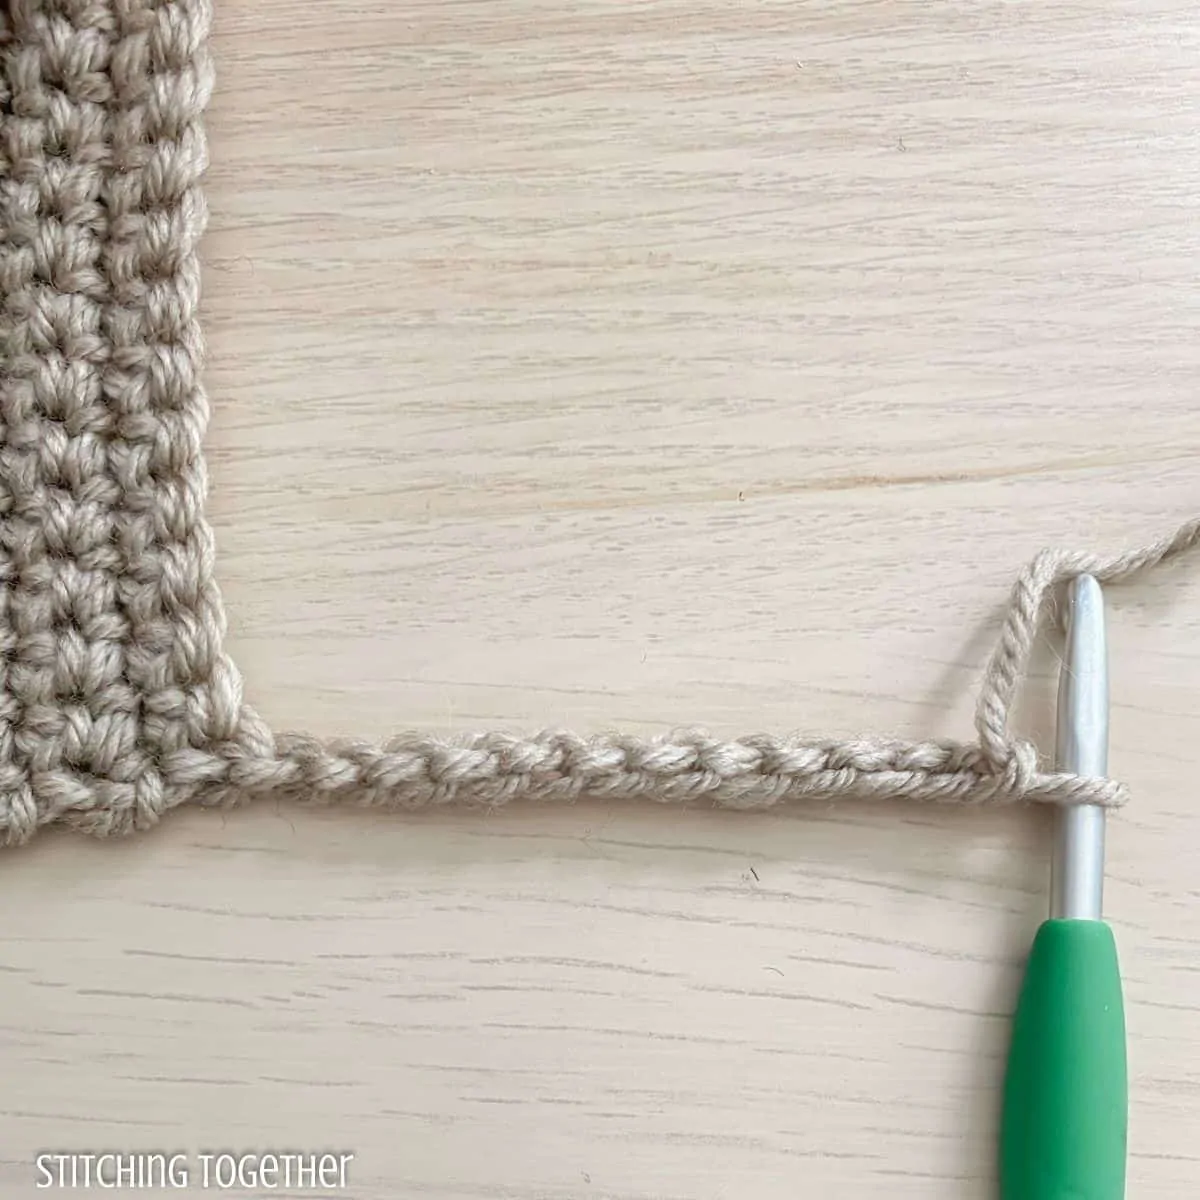
Row 1: sc in 2nd ch from hook and in each ch, join with a sl st in the next sc of border. (11)
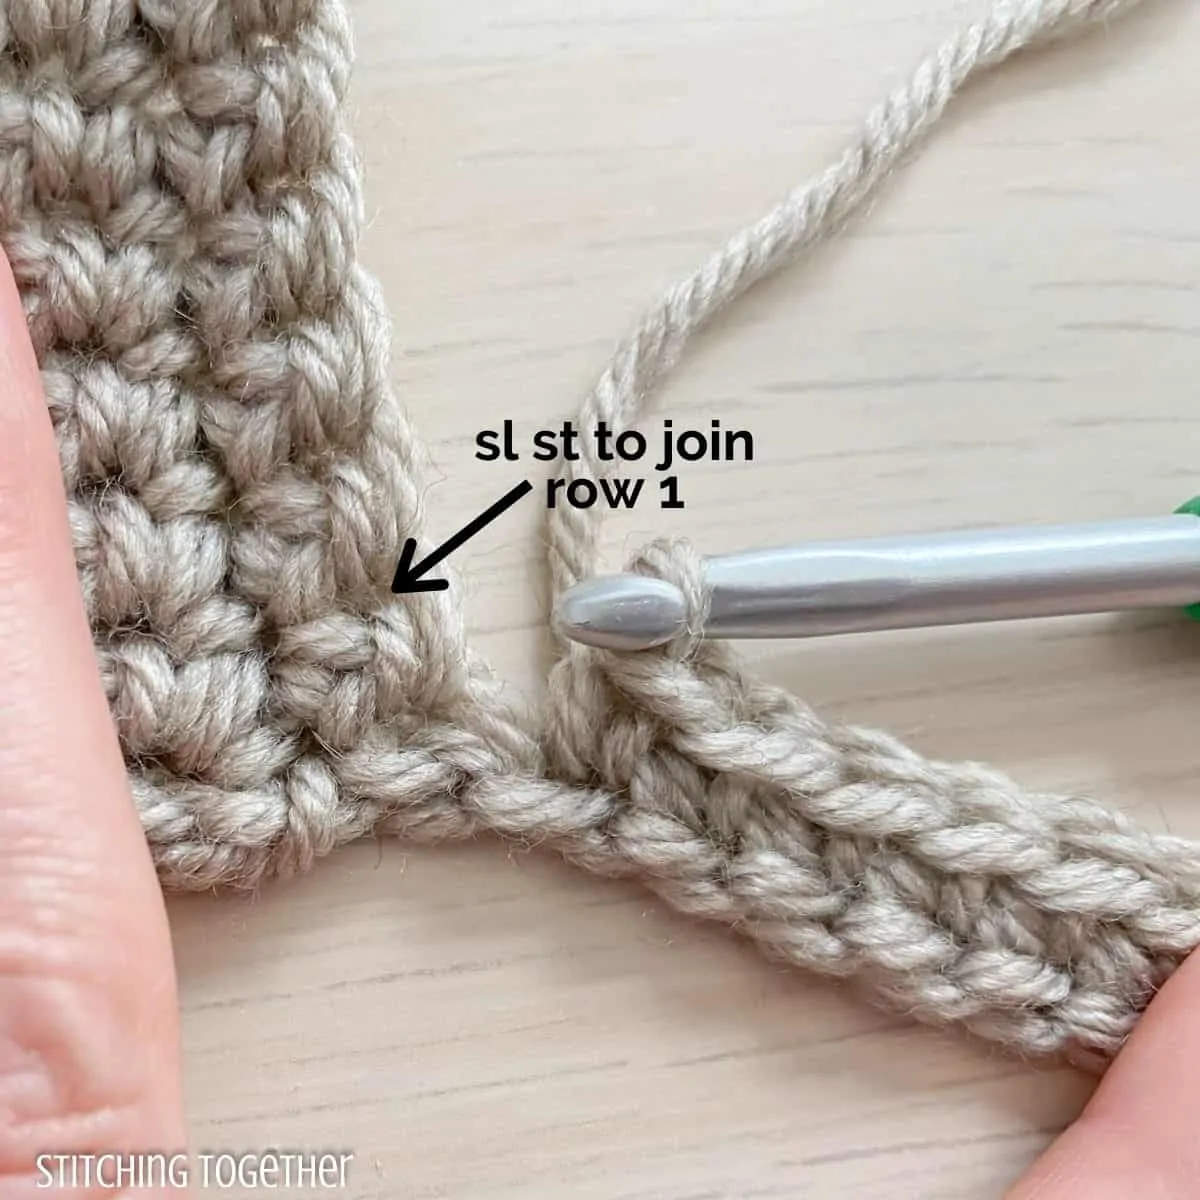
Row 2:
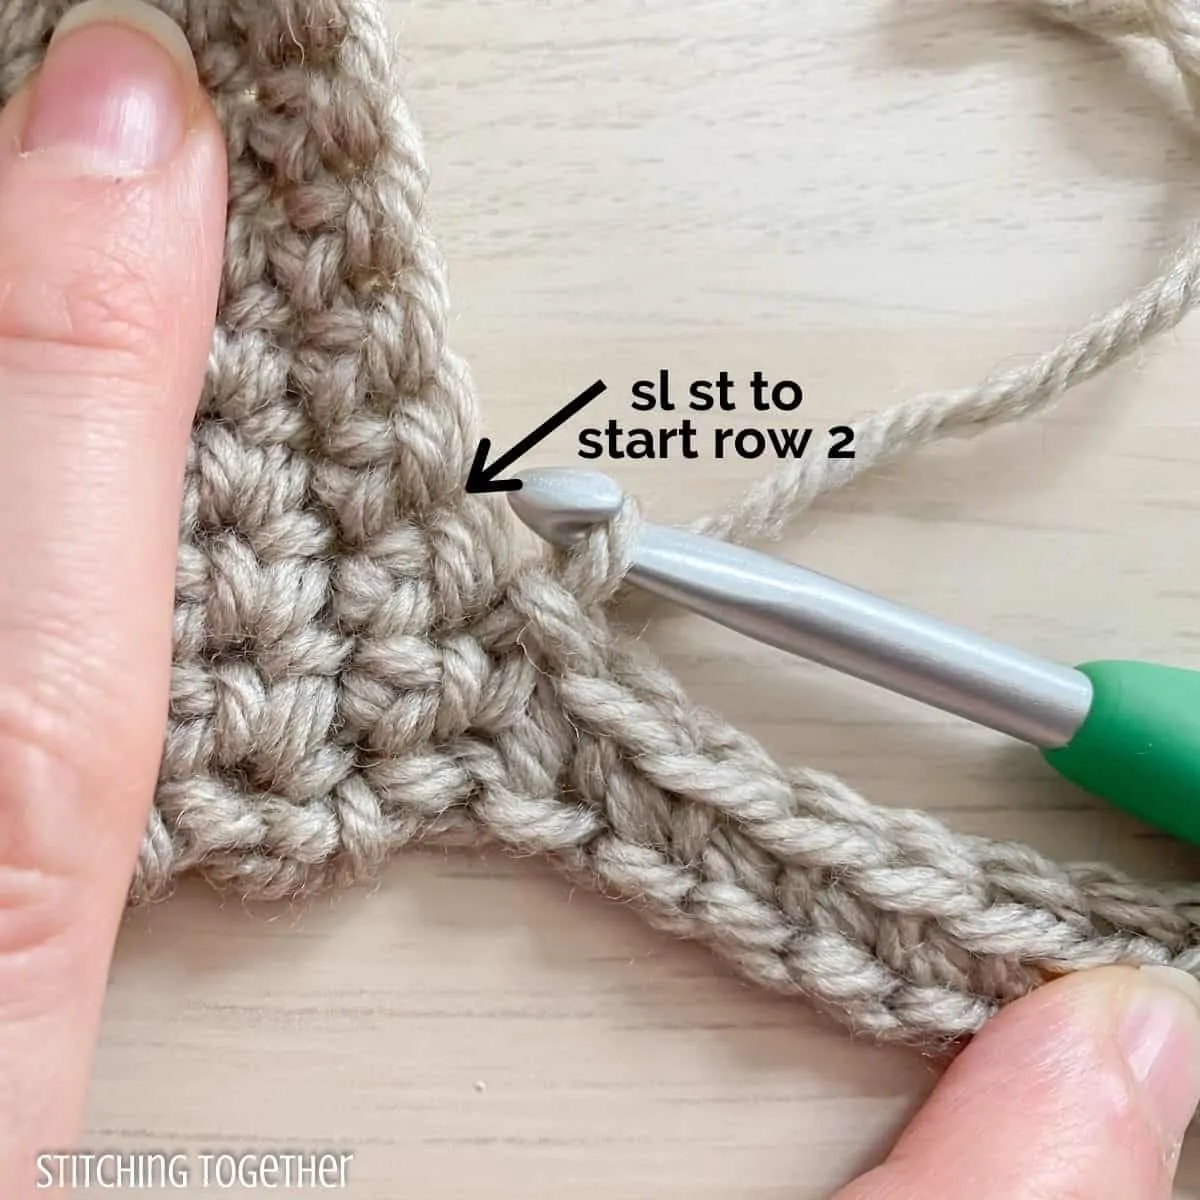
Sl st in the next sc of the border,
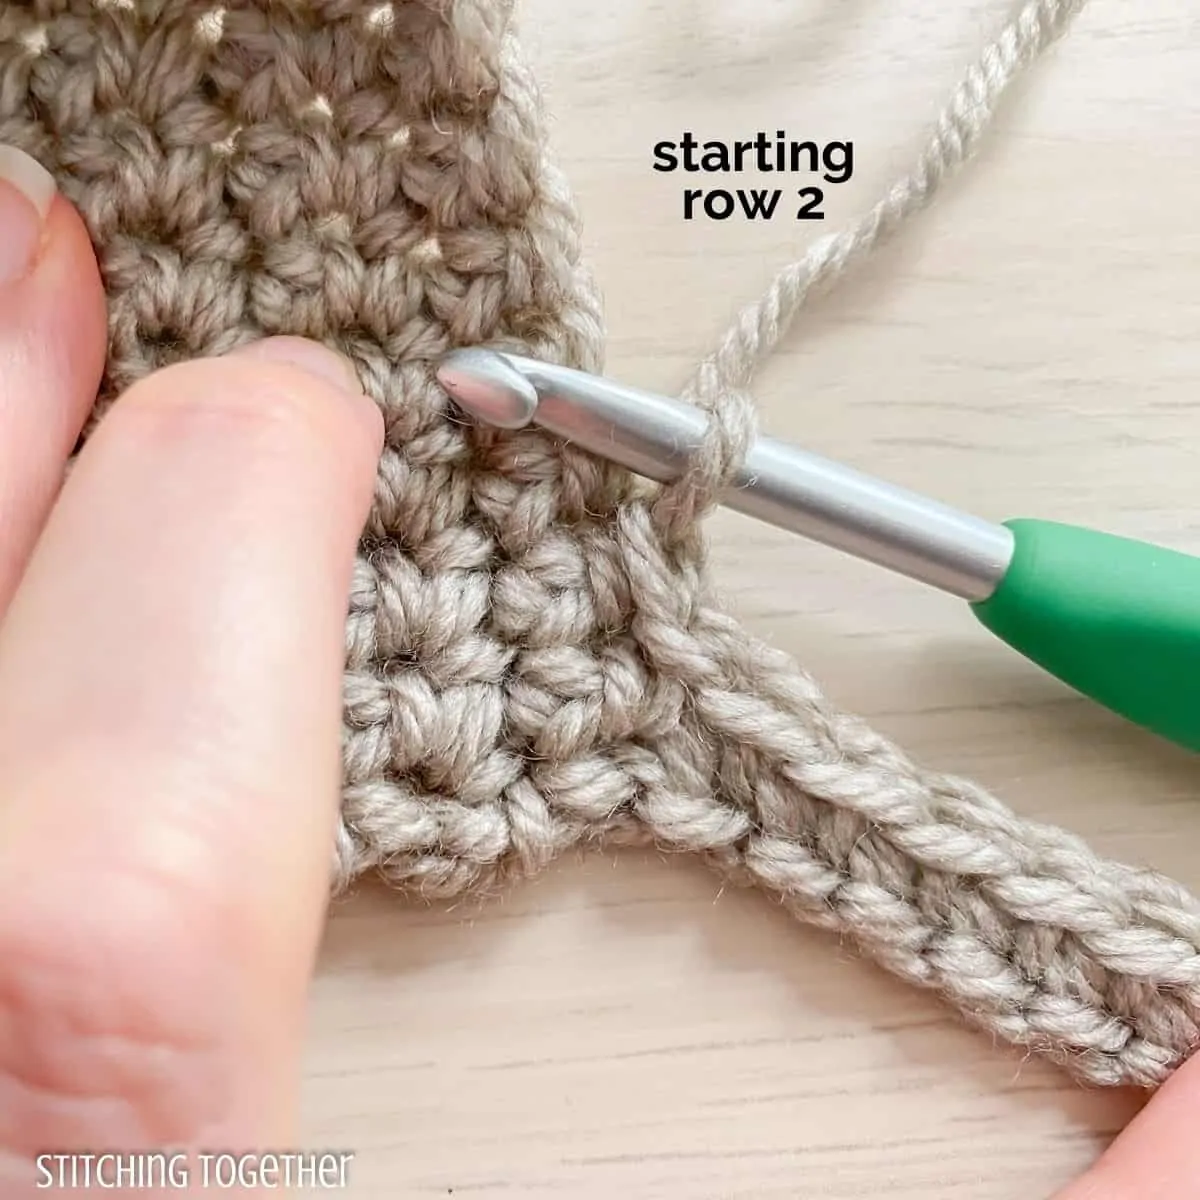
turn, sc BLO in each st, turn.
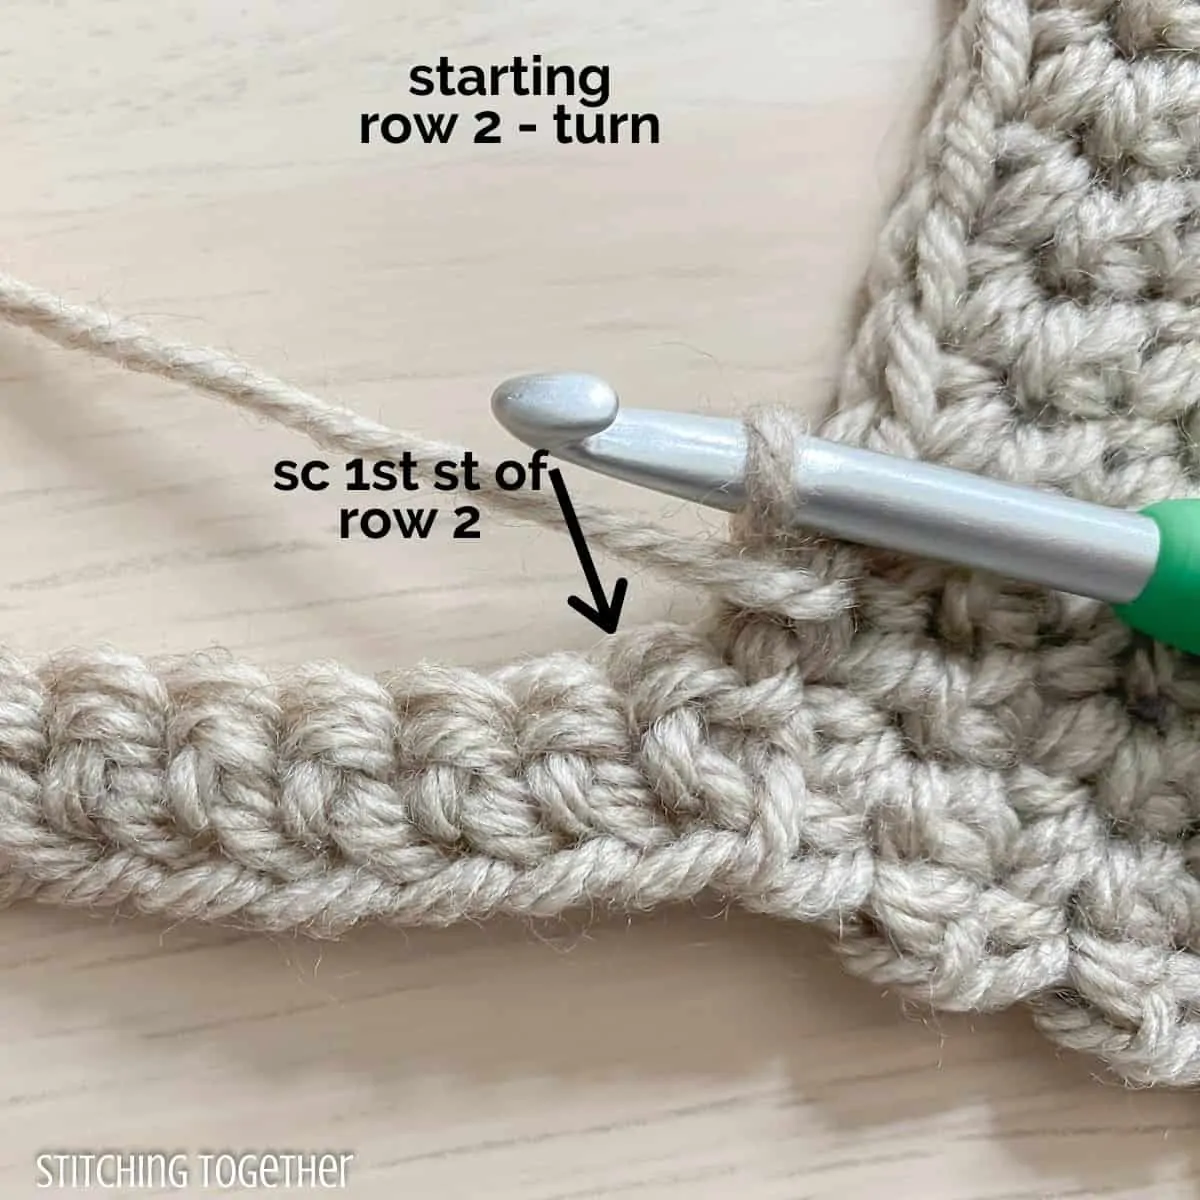
Note that the single crochets in row 2 in this photo are not worked in the back loop only.
.
If you like easy-to-print patterns,
this pattern can be purchased in the following places:
Thanks for your support!
.
I hope you love this Crochet Pocket Shawl Pattern. Will you share pictures of your finished projects?
- Tag Stitching Together on Instagram with @stitching_together and use the #stitchingtog
- Upload your picture to Pinterest in the Tried It section of this pin
- Share your work in the Stitching Together Community Facebook Page.
Don’t miss these other great patterns: