Christmas Towel Topper Crochet Pattern
Disclosure: This post may contain affiliate links. As an Amazon Associate, I earn from qualifying purchases. Please visit my Privacy Policy for disclosures and more information.
What type of gift is better than one that is thoughtful, useful, and adds a handmade holiday touch to the home?
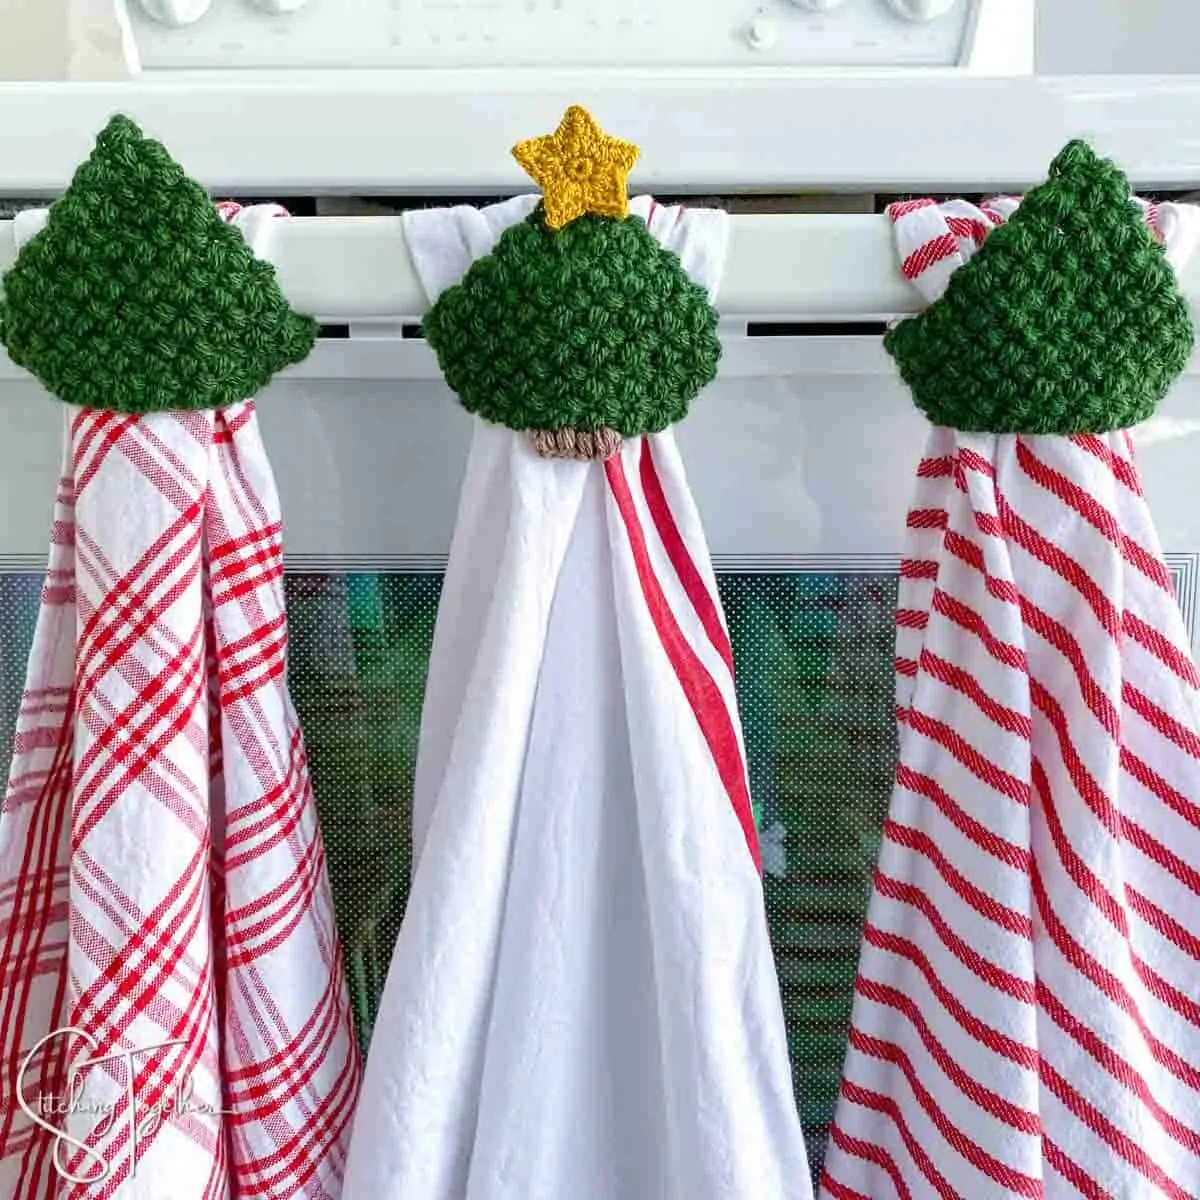
When you need a quick Christmas gift or just want to add more holiday decor to your own home, this Crochet Christmas Tree Towel Topper is just what you’re looking for.
Are you ready to get started? This post has a lot of information, instructions and pictures to set you up for success. You’ll have a stack of cute Christmas tree towel toppers in no time!
How do you make a Crochet Christmas Tree Towel Topper?
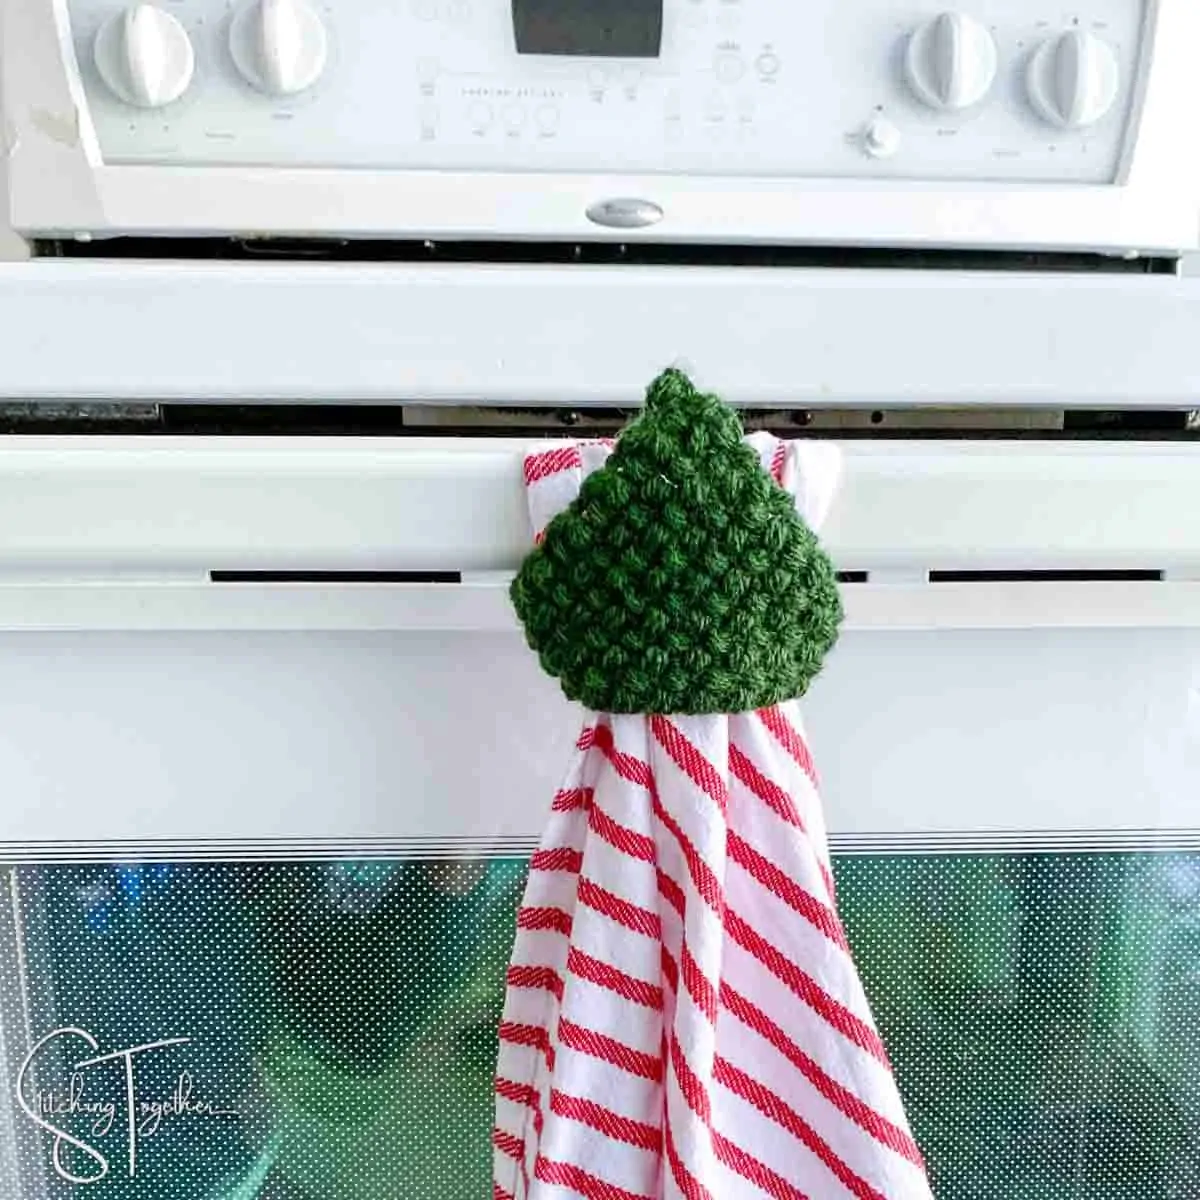
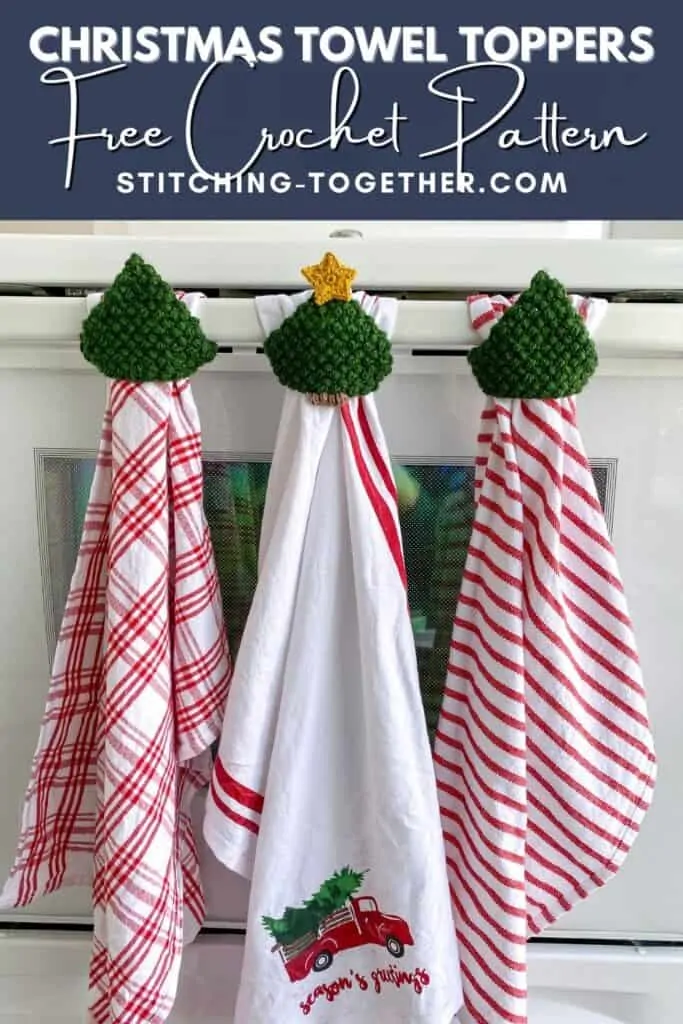
Like the Modern Crochet Towel Topper, this topper is made by crocheting a triangle and sewing it to the corner of your dishtowel. You’ll leave both the top and bottom of the triangle unattached which allows you to pass the towel through and hang it securely.
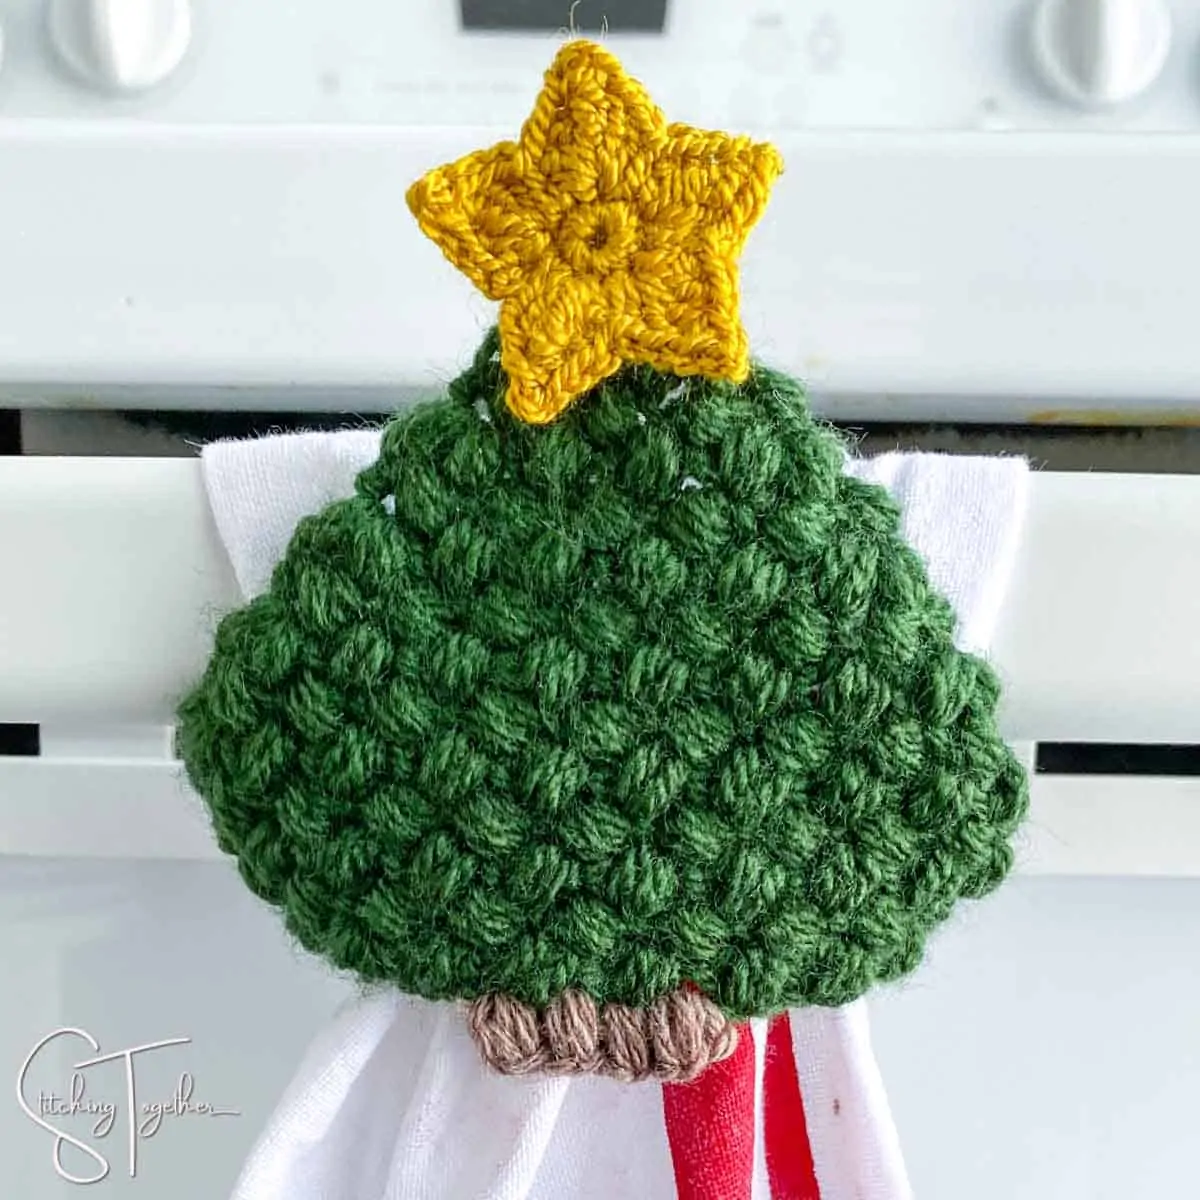
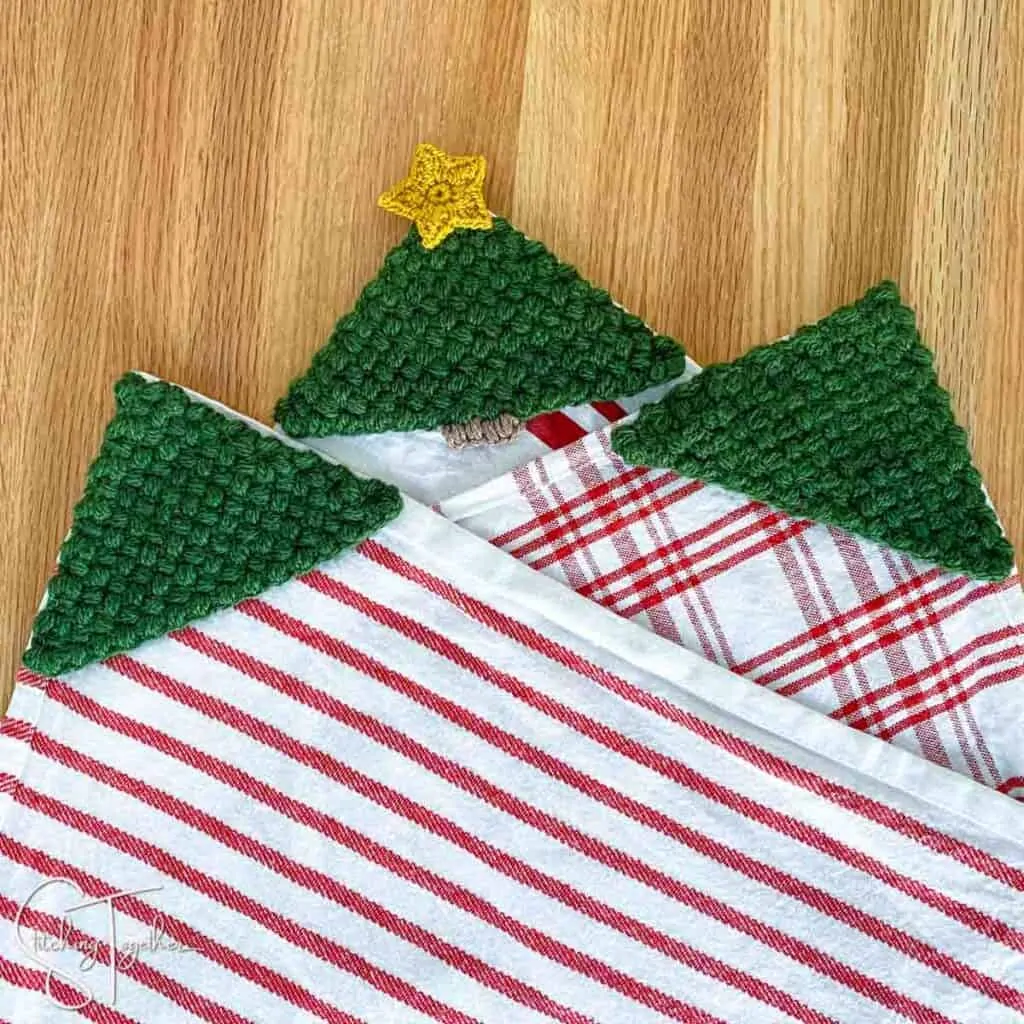
If you prefer a more subtle look, you can just make a triangle and attach it to your favorite towels or you can fancy it up for Christmas with a crochet star and little tree trunk.
I’m more in the subtle camp where people might give it a second or third look and then declare “oh for cute, they’re little trees!” But I want you to do you and YOU might like more flare!
Related: Crochet Cable Christmas Trees
What Yarn Should I Use?
For crochet in the kitchen, I almost always choose cotton yarn since it is absorbant and durable.
For the modern towel hanger, I used 100% cotton because I envisioned those towels as your daily sidekicks in the kitchen, not only there to dry your hands, but also to wipe up a quick spill or scrub up a stubborn spot stuck to the counter. I wanted the crochet towel hanger part to add to your cleaning power and not just be purely decorative.
Christmas towels are another story altogether. They’re around for a solid month or two if you tend to let Christmas décor linger like I do. Their main job: cuteness.
Don’t get me wrong, they are still functional and useful, but they just don’t need the extra cleaning power like an everyday towel.
Which means, you can use pretty much any yarn you want with one caveat: make sure it can be washed and dried in the same conditions as the towels you use.
You do not want to be handwashing a set of Christmas towels or have your precious gift deform because it was tossed in the wash.
To make these adorable trees, I used Simply DK from Paintbox Yarns. It’s a Category 3, Light yarn that’s 100% acrylic.
If you decide to use a thicker yarn, still choose a crochet hook that is a couple of sizes smaller than suggested for the yarn. (Example: if the yarn suggests a size I/9, 5.5 mm hook, try using a G/6, 4.0 mm hook.)
Related: Christmas Pillows
Those Stitches Look Cute!
You only need to know one type of stitch pattern to make this basic adorable tree: the bean stitch!
If you haven’t worked with the bean stitch, I’d suggest working through the bean stitch tutorial first so you get a clear understanding of how the stitch pattern works.
There are lots of photos, not only in the tutorial but also included with this pattern so you can have the best success making the trees.
The trunk of the tree is made using puff stitches and there are instructions for how to do those too.
Do you love that little star on top? I do too. Head to the Simple Star Pattern to learn how to make it.
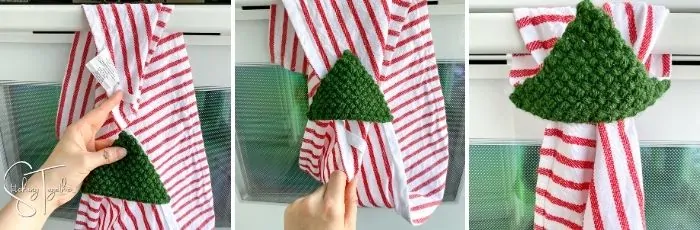
Where do I attach the tree to the towel?
You may be wondering exactly where you sew that cute green triangle on the towel.
If you have a design on one side of the towel that you would like to have facing out then sew the triangle on the same side as the design (the front of the towel) and in the opposite corner.
So, for the cute towel with a truck, since the design is on the front bottom, I sewed my triangle to one of the front top corners. For all the other towels I sewed the triangle on the back of the towel because it didn’t matter to me which side was facing out once they were hanging.
You can see from the images below, these towels are hung opposite to how the modern towels are hung. (FYI: the Modern Towel Toppers look adorable hung this way too and would also make cute trees!)
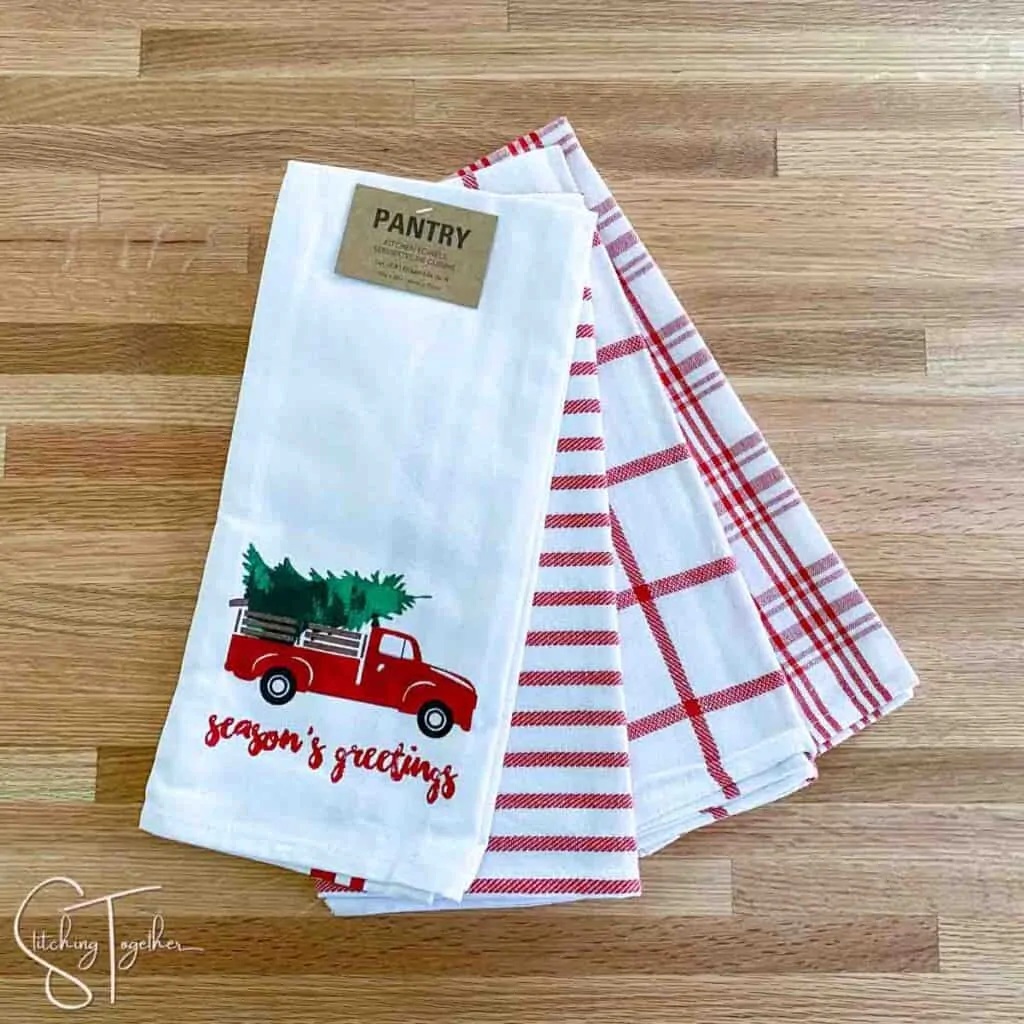
The cutest Christmas Towels
Let’s have a little heart to heart about these towels I ordered from Amazon.
First off, they are ADORABLE. Perfect Christmas themed towels.
BUT I’d be remiss if I didn’t tell you about my experience with them.
Before using them I washed them per the instructions (cold and tumble dry low). The listing mentioned that they will shrink a bit, as one would expect; however, they didn’t all shrink the same amount.
Not that big of a deal, but not what I expected. Also, I didn’t verify that they were all identical in size before I washed them.
The towel with the truck had a little color bleeding. It was as if parts of the towel became stuck together in the wash and pressed the color off and onto another part of the towel. The other 3 towels are woven and not printed so I think the issue here is the printed colors.
I have one of those washers that doesn’t agitate much so it’s very likely parts of the towel folded in on itself and stayed that way while washing.
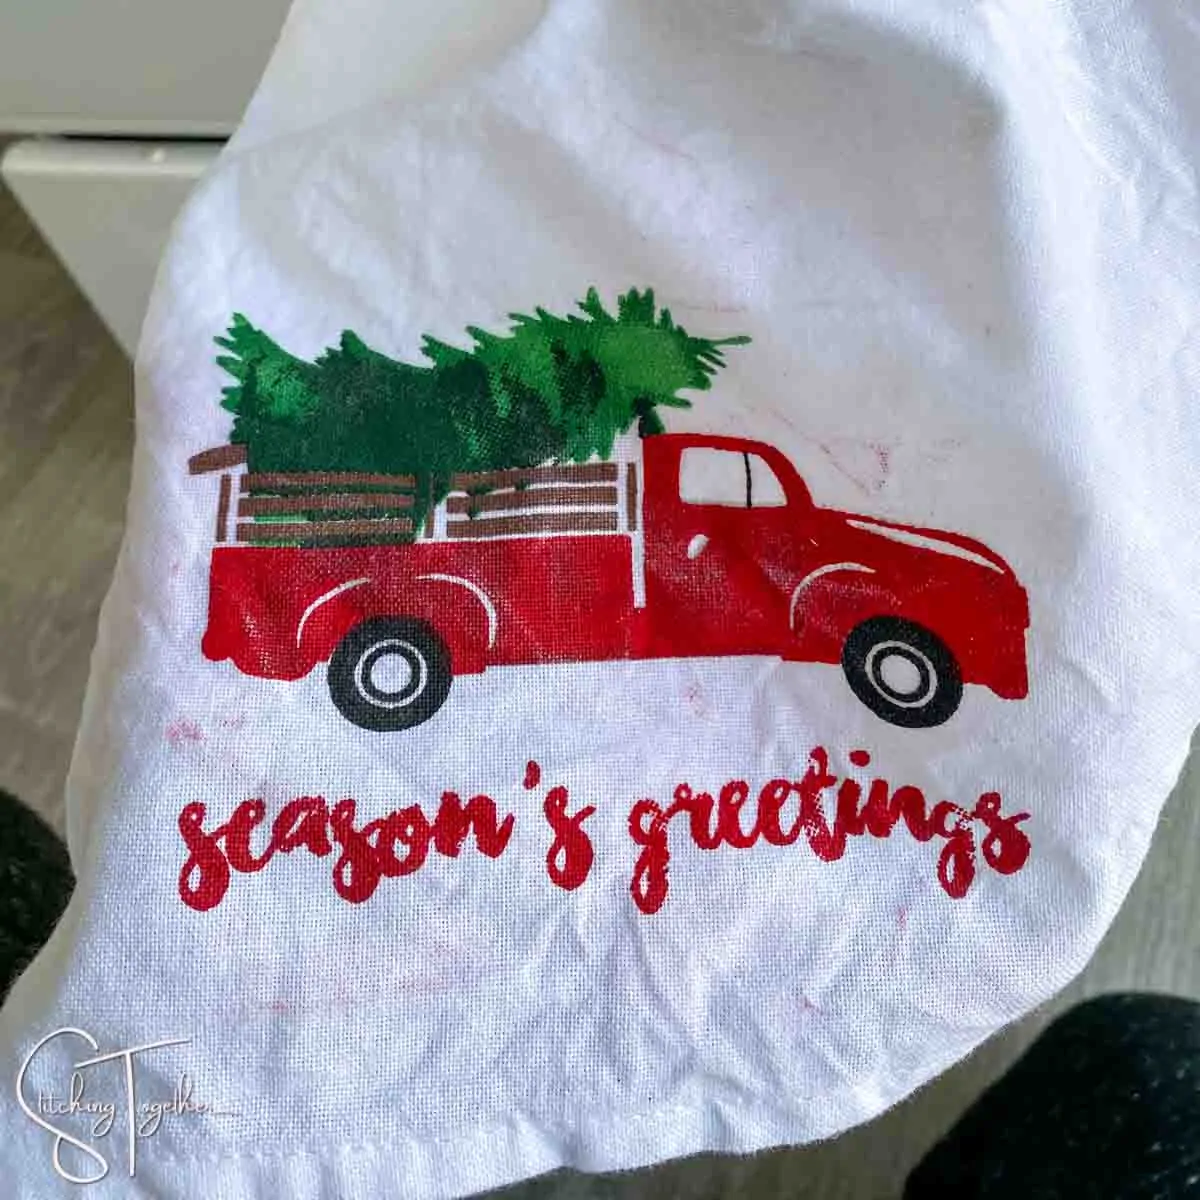
Last issue: The truck towel was hard to iron! Now, I am not an expert ironer (is that a word?) and I generally try to avoid the task, but I like a good crisp towel especially for pictures (honestly I don’t care so much when they are just hanging in my own kitchen).
I set my iron to warm, as instructed, but those wrinkles were fierce. Because I didn’t want to chance ruining the towel before I took pictures, I didn’t turn my iron hotter and press for longer.
I did eventually try a hotter iron and it worked better but it still seems like there are some stubborn wrinkles. Maybe I am being too picky and again, I’m not a professional ironer, so this could all be user error on my part.
All that to ask and now answer the question: Would I recommend that you buy these towels…?
Yes…. with caution.
It would be good to soak the printed towel first to prevent bleeding in the wash (the google has some good suggestions of how to do this) and then machine wash all the towels AND the towel toppers before attaching them.
Of course, there are many, many cute Christmas towel options out there so you don’t have to get these, but you will want to wash them before gifting/using no matter what you choose.
Christmas Towel Topper Crochet Pattern
Would you prefer the PDF version? You can find that here!
Skill Level: Easy
Materials:
US size D/3, 3.25 mm crochet hook
Light Category 3 yarn
- 17 yds (.21 oz) of Paintbox Yarns Simply DK in Racing Green
Large Eye Yarn Needle
Hand Needle and Thread
Dish Towels
Optional:
- scrap amount of brown yarn for trunk
- size B/1, 2.25 mm crochet hook and scrap yarn for star
.
Everything you need for this project can be ordered right on online.
Save time and shop from home!
Paintbox Simply DK yarn (LoveCrafts)
.
Abbreviations:
ch: chain
st(s): stitch(es)
bean st: bean stitch (see notes)
puff st: puff stitch (see notes)
Gauge: gauge is not critical
Finished Size: sides- 4.25” bottom-6”
Notes and Special Stitch Instructions
Bean Stitch: insert hook into st and pull up a loop (2 loops on the hook), yarn over, insert hook into the same st and pull up a loop (4 loops on the hook), yarn over, insert hook into the same st and pull up a loop (6 loops on the hook), yarn over and pull through all 6 loops, ch 1 to close the stitch. To work subsequent rows, the bean stitch is worked in the bean stitch below, skipping the chain 1 that secured each stitch.
Puff stitch: [yo, insert hook into st, pull up a loop] 3 times in the same st (7 loops on the hooks), yo, pull through all 7 loops on the hook, ch 1 to close the stitch.
Once you’ve finished the triangles, you may want to send them through a wash and dry cycle before sewing them to the towels. (It’s a good idea to wash your new dish towels first too.)
The star was made using the Simple Crochet Stars version 1 with Lion Brand’s Beautiful You yarn in Arrowwood and a size B 2.25 mm crochet hook.
Christmas Towel Topper Crochet Pattern Instructions:
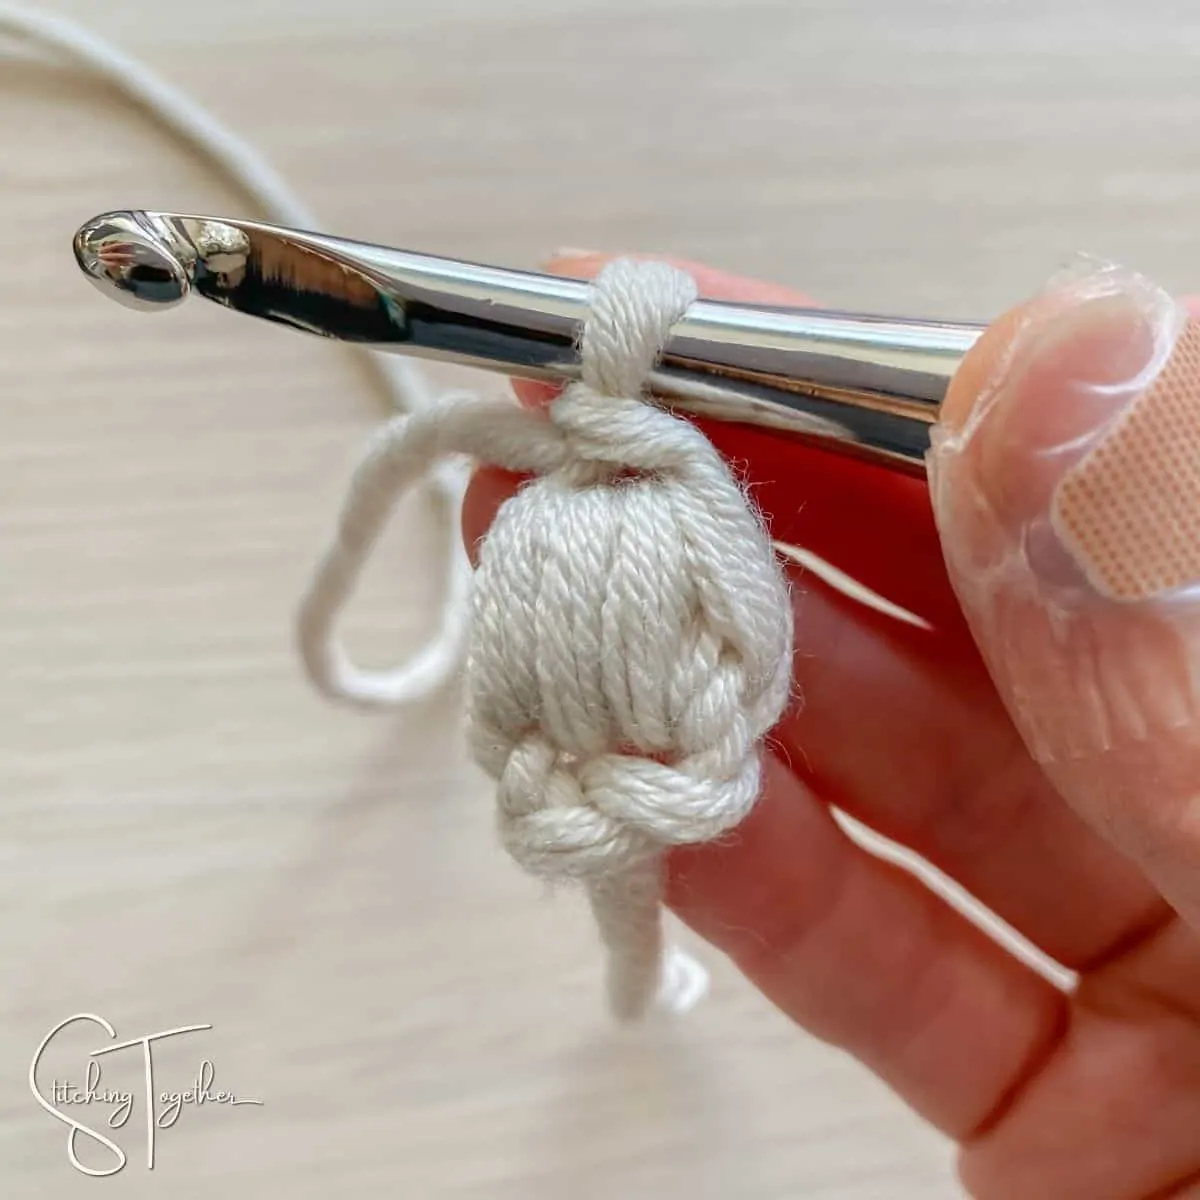
Ch 2,
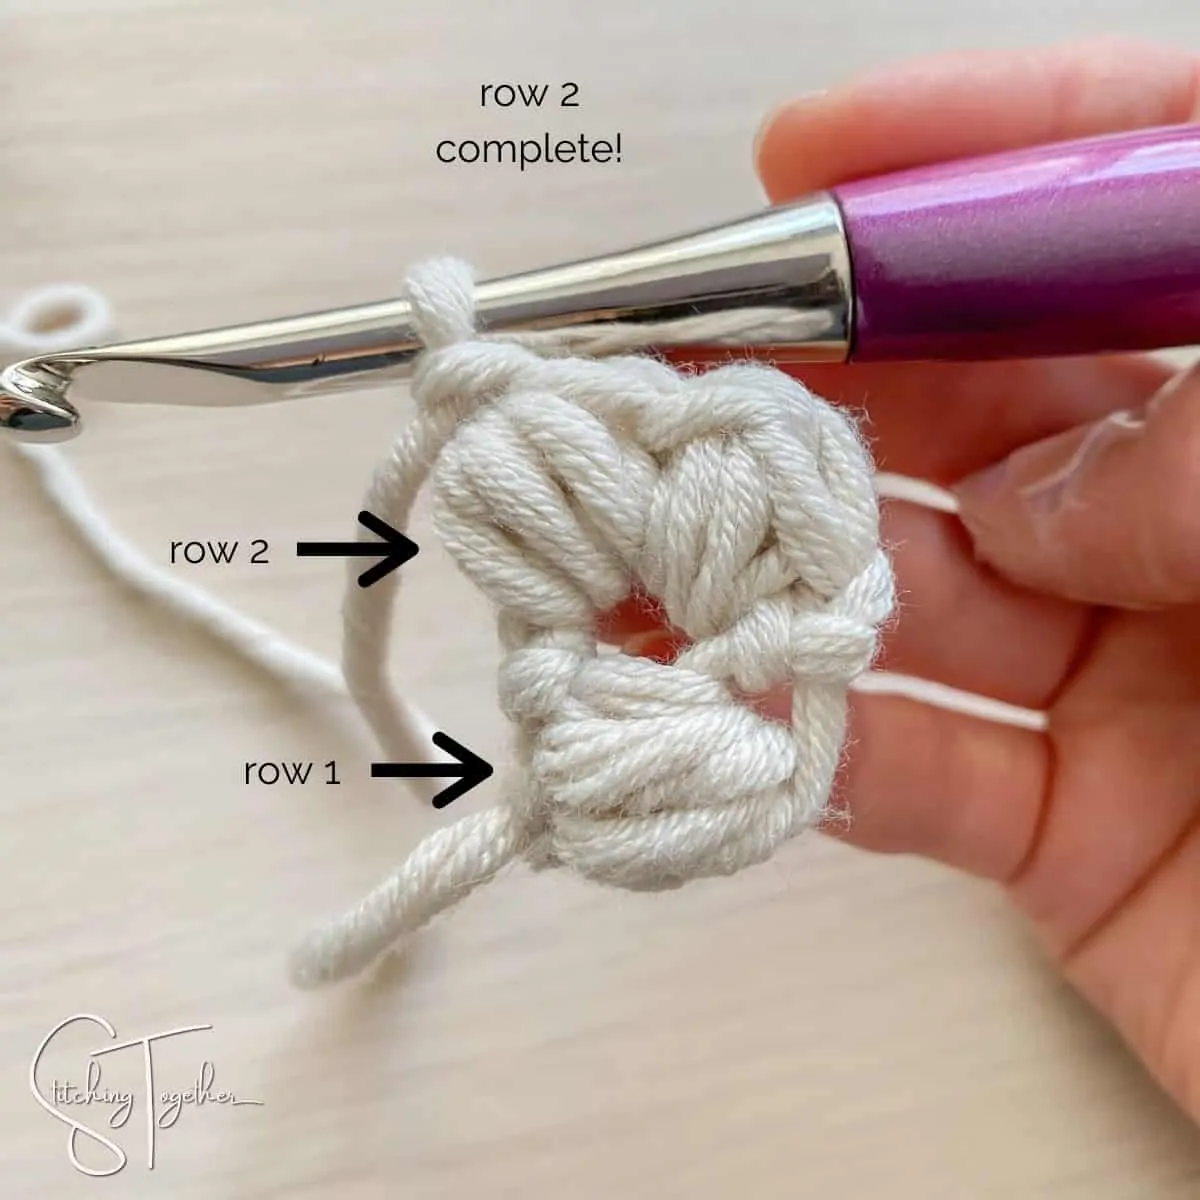
Row 1: Bean st in the 2nd ch from hook, turn (1 bean)
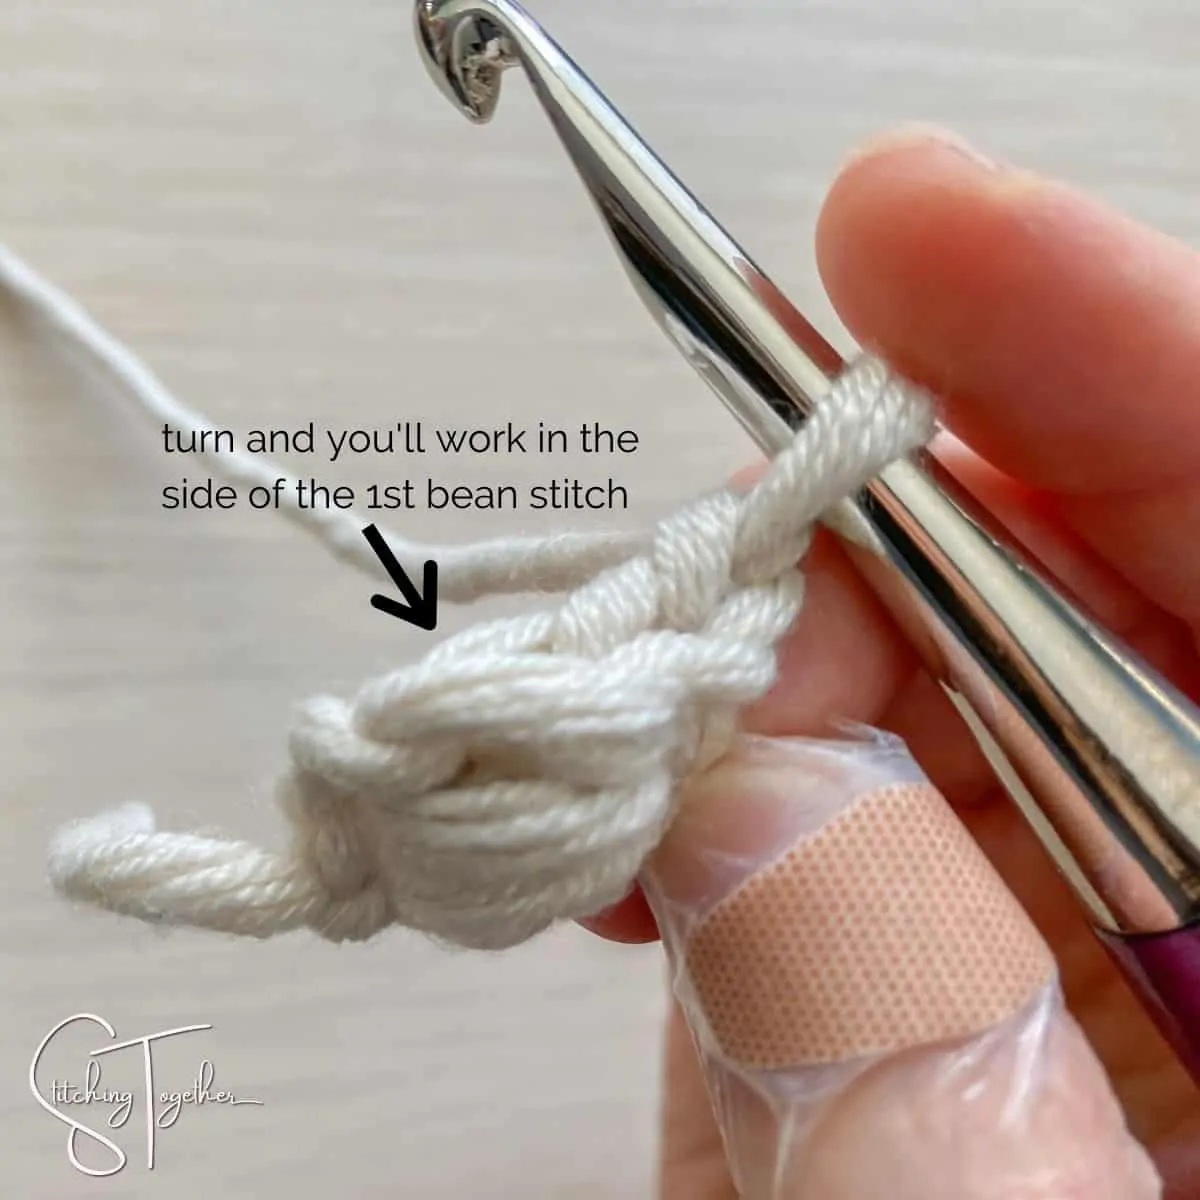
Row 2: ch 1, 2 bean sts on the side of the bean st in row 1, turn (2 beans)
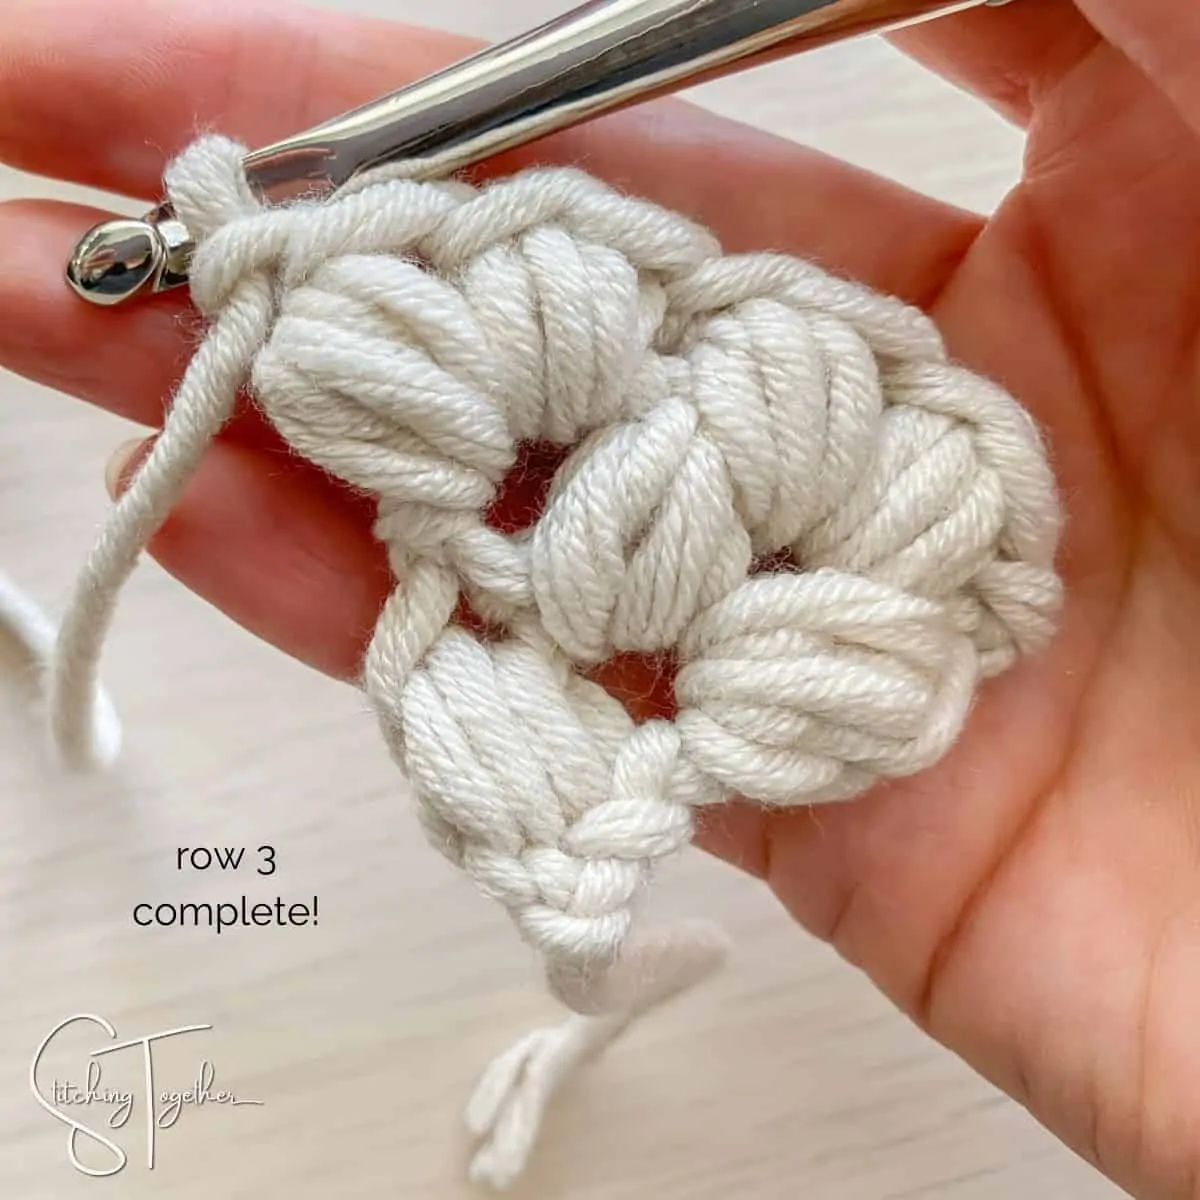
Row 3: ch 1, 2 bean sts in each bean st of the row below, turn (4 beans)
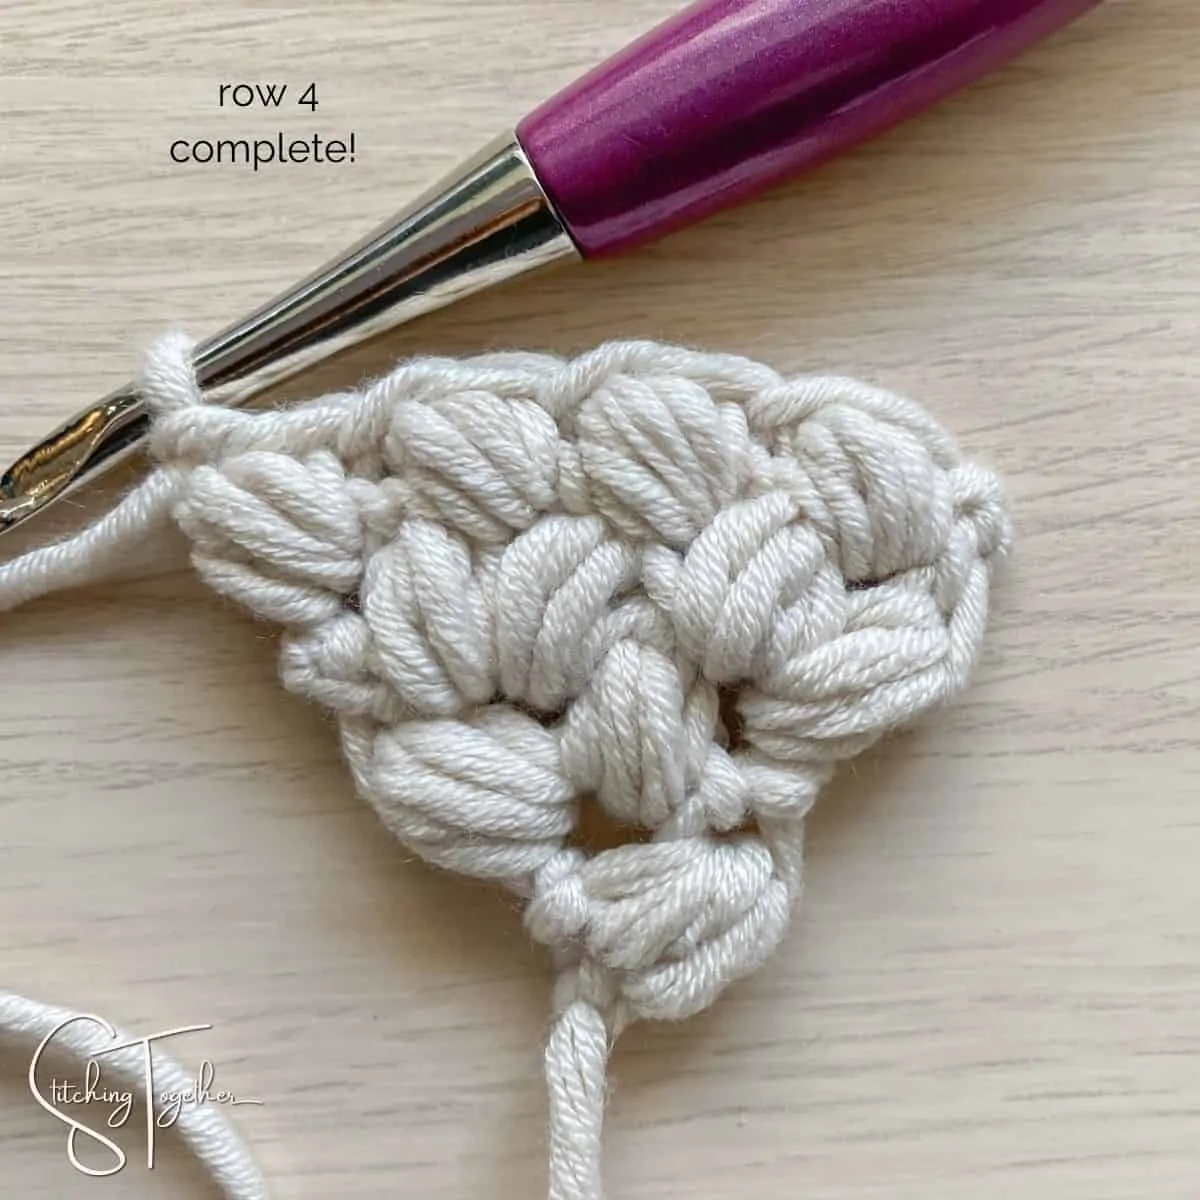
Row 4: ch 1, bean st in each bean st of the row below, turn (4 beans)
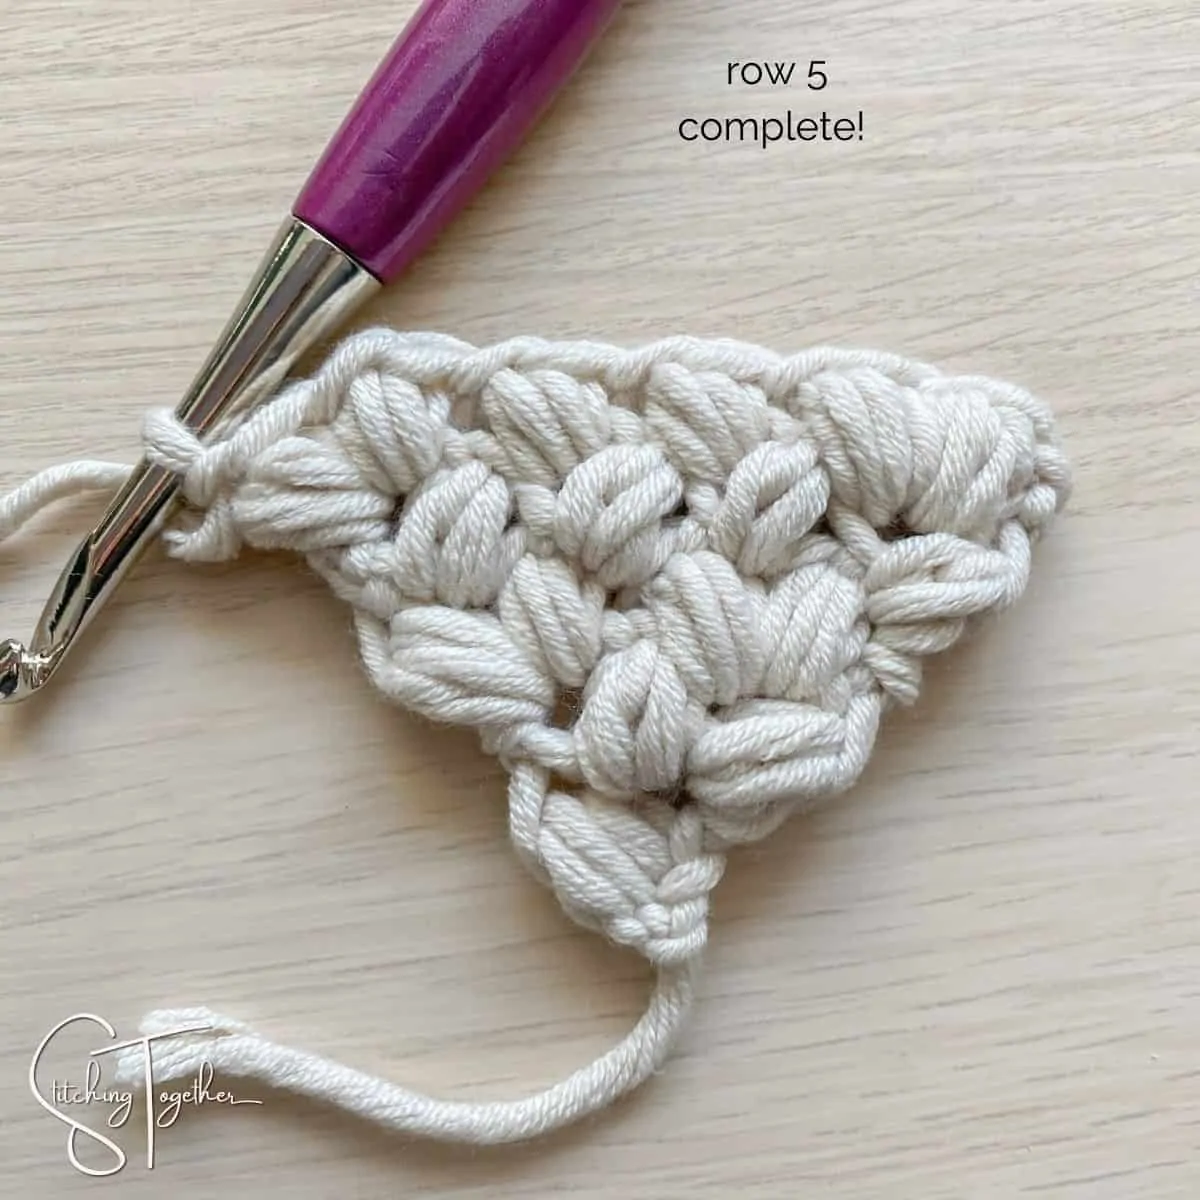
Row 5: ch 1, 2 bean sts in the 1st bean st of the row below, bean st in each of the next 2 bean sts, 2 bean sts in the last bean stitch, turn (6 beans)
Row 6: ch 1, bean st in each bean st of the row below, turn (6 beans)
Row 7: ch 1, 2 bean sts in the 1st bean st of the row below, bean st in each of the next 4 bean sts, 2 bean sts in the last bean stitch, turn (8 beans)
Row 8: ch 1, bean st in each bean st of the row below, turn (8 beans)
Row 9: ch 1, 2 bean sts in the 1st bean st of the row below, bean st in each of the next 6 bean sts, 2 bean sts in the last bean stitch, turn (10 beans)
Row 10: ch 1, bean st in each bean st of the row below, turn (10 beans)
Row 11: ch 1, 2 bean sts in the 1st bean st of the row below, bean st in each of the next 8 bean sts, 2 bean sts in the last bean stitch, turn (12 beans)
Row 12: ch 1, bean st in each bean st of the row below, turn (12 beans)
Row 13: ch 1, 2 bean sts in the 1st bean st of the row below, bean st in each of the next 10 bean sts, 2 bean sts in the last bean stitch, turn (14 beans)
Row 14: ch 1, bean st in each bean st of the row below, turn (14 beans)
Row 15: ch 1, 2 bean sts in the 1st bean st of the row below, bean st in each of the next 12 bean sts, 2 bean sts in the last bean stitch, turn (16 beans)
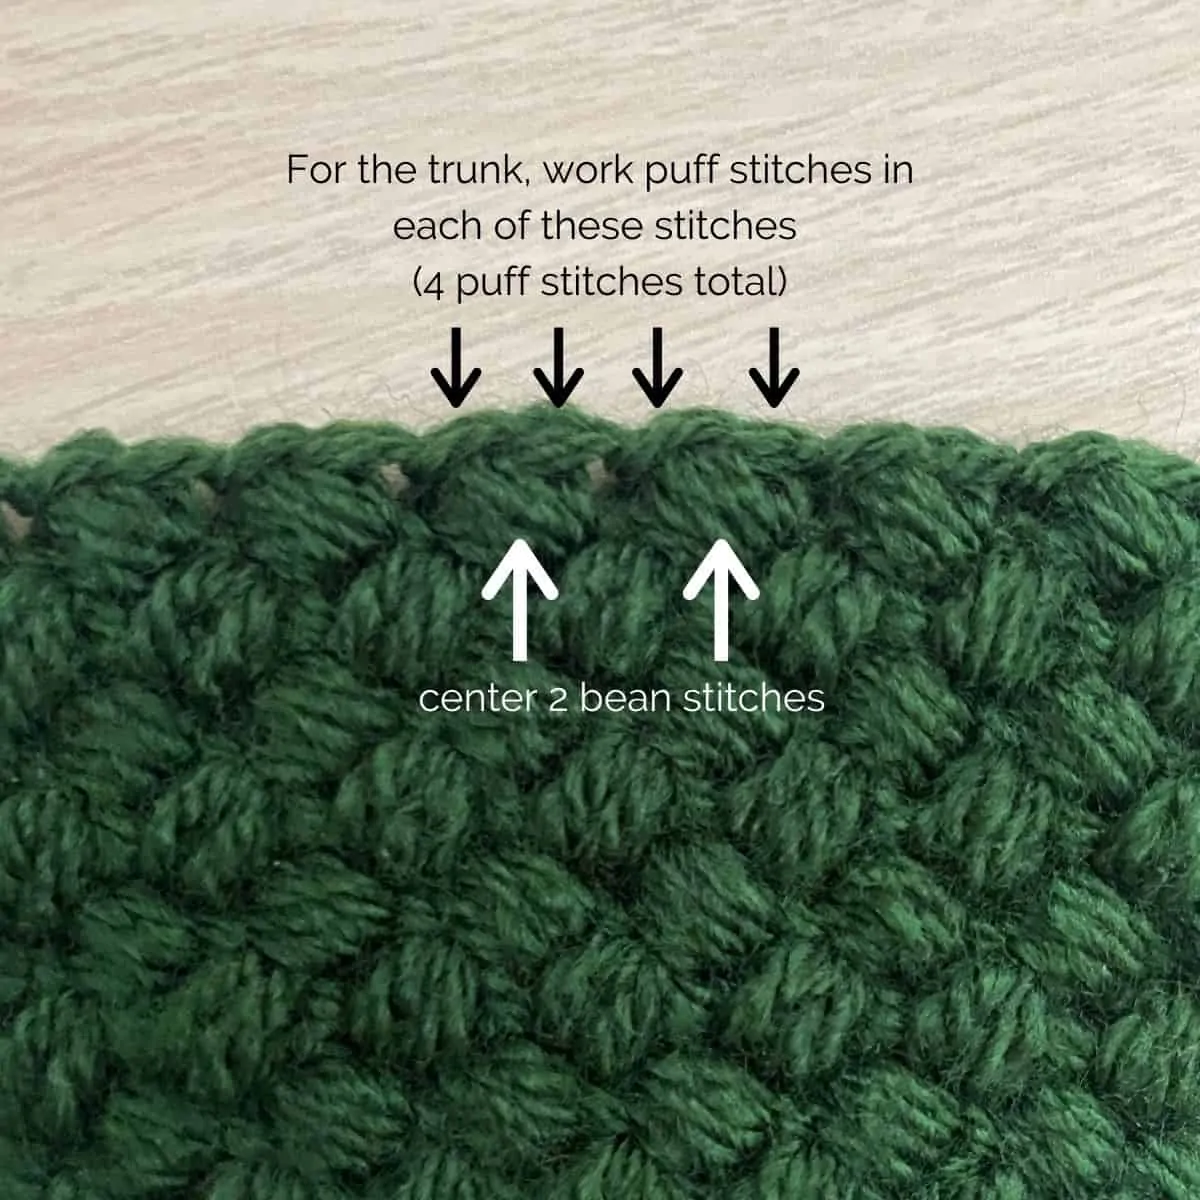
To work the trunk
Find the center 2 bean sts join yarn on the right of the center bean sts (so between bean 7 and 8 if you worked 15 rows) – you’ll work the trunk over the 4 sts (the bean sts and ch 1 that closed the bean stitches) of those 2 bean sts. Puff st in each st (4 puff sts). Fasten off and weave in ends.
Place triangle on your dishtowel so the corners line up. On each side, attach by sewing approximately 1 inch from the bottom of the triangle towards the corner.
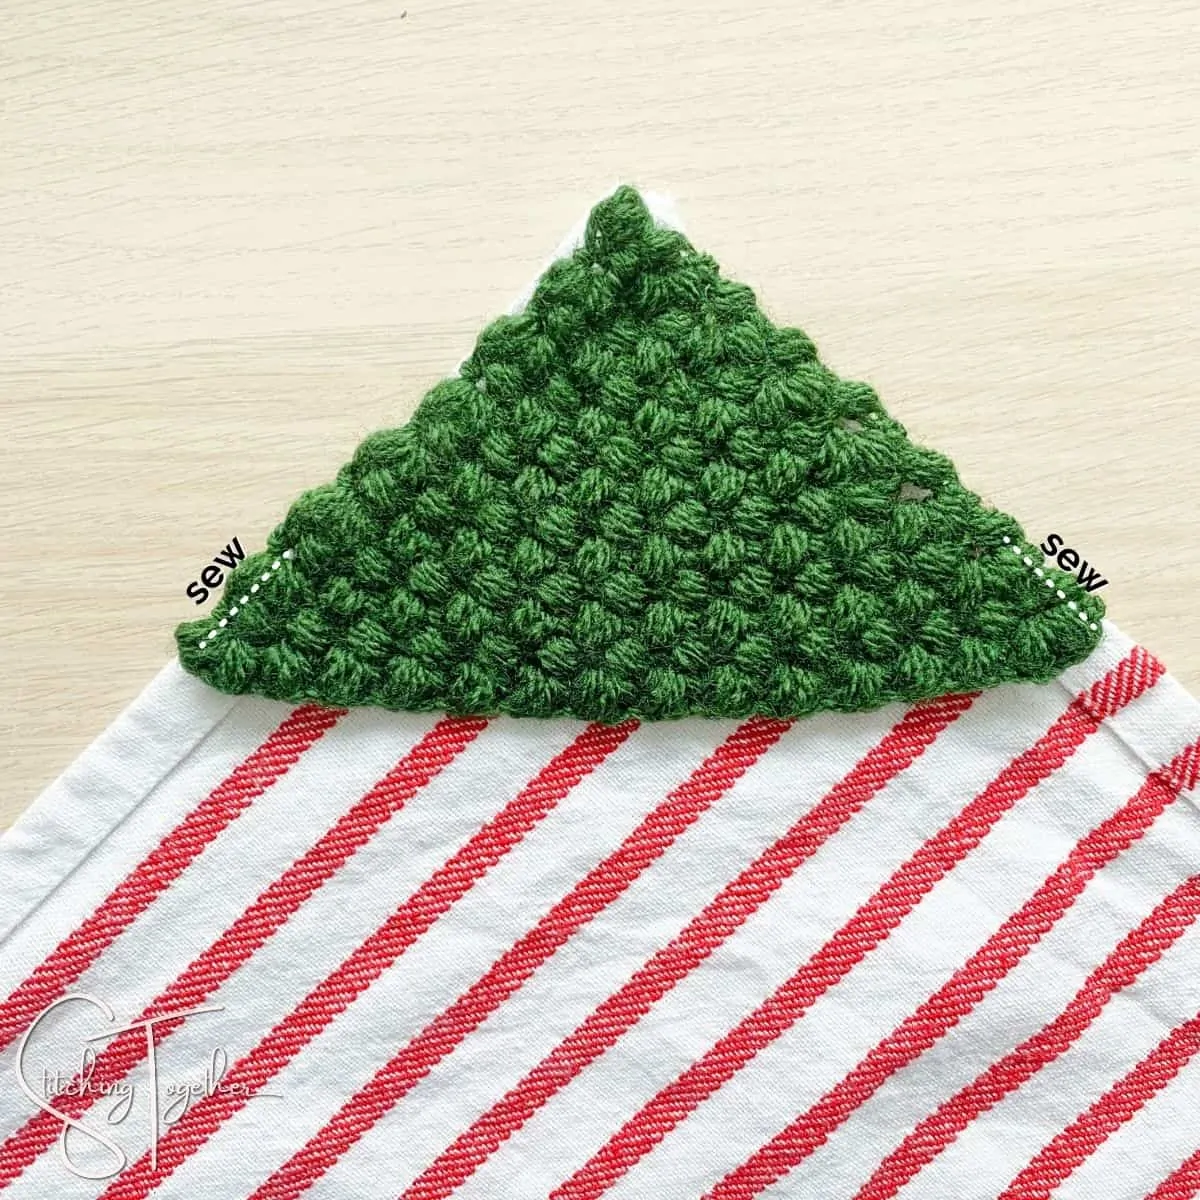
Photo Tutorial for the Christmas Tree Towel Topper Crochet Pattern
Ch 2, Row 1: Bean st in the 2nd ch from hook, turn (1 bean)
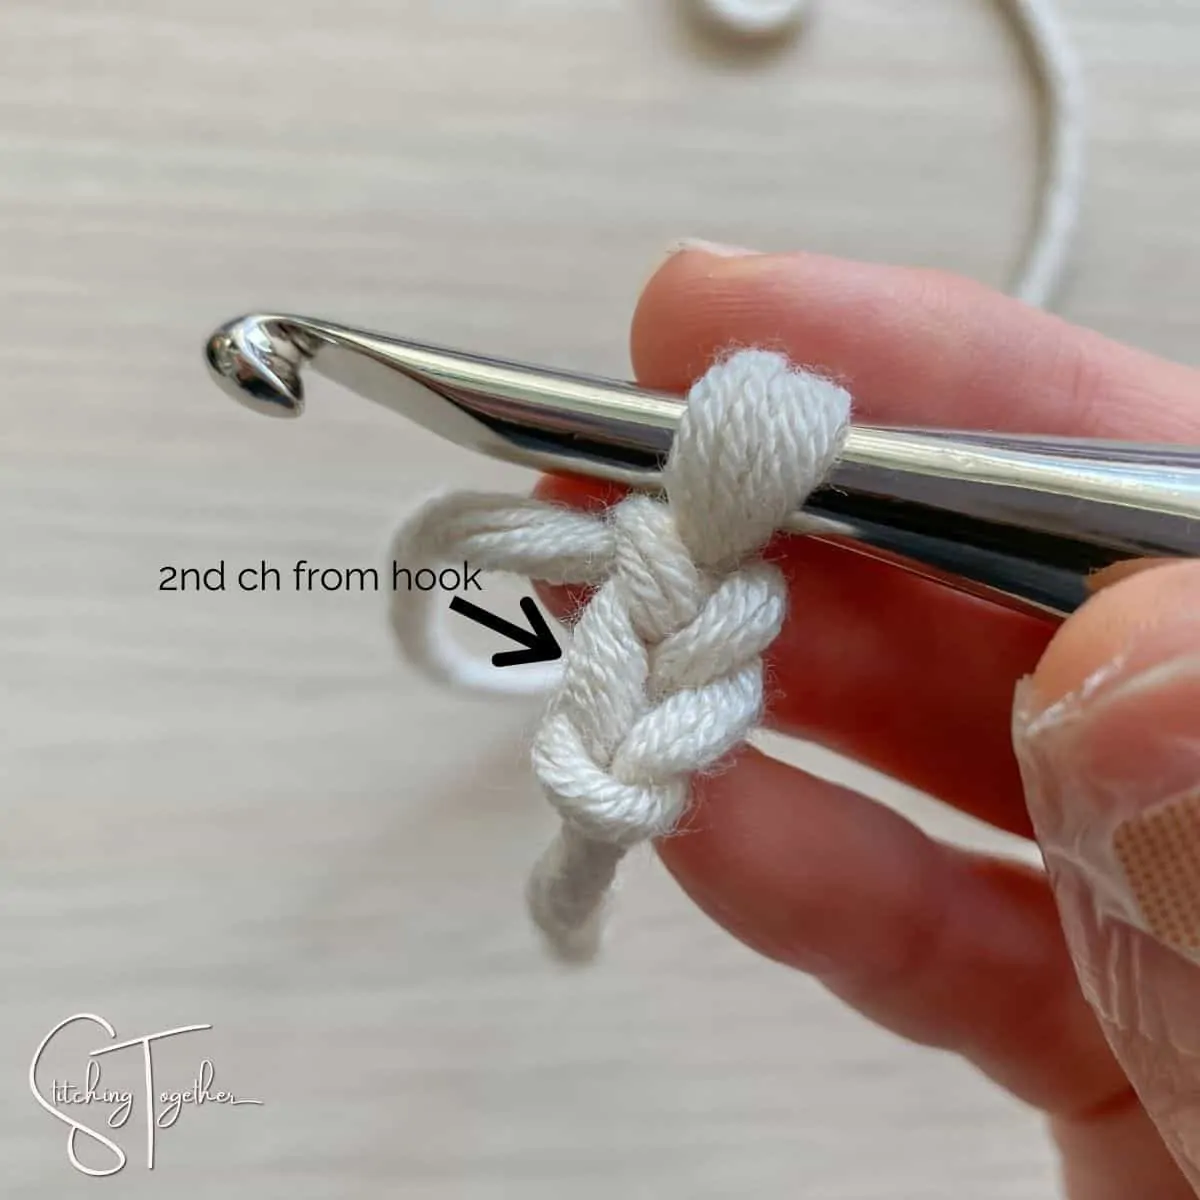
1st completed bean stitch for Row 1. (Don’t forget to chain 1 to close each bean stitch.)
Row 2: Ch 1, 2 bean sts on the side of the bean st in row 1, turn (2 beans)
Look at you go!
Row 3: ch 1, 2 bean sts in each bean st of the row below, turn (4 beans)
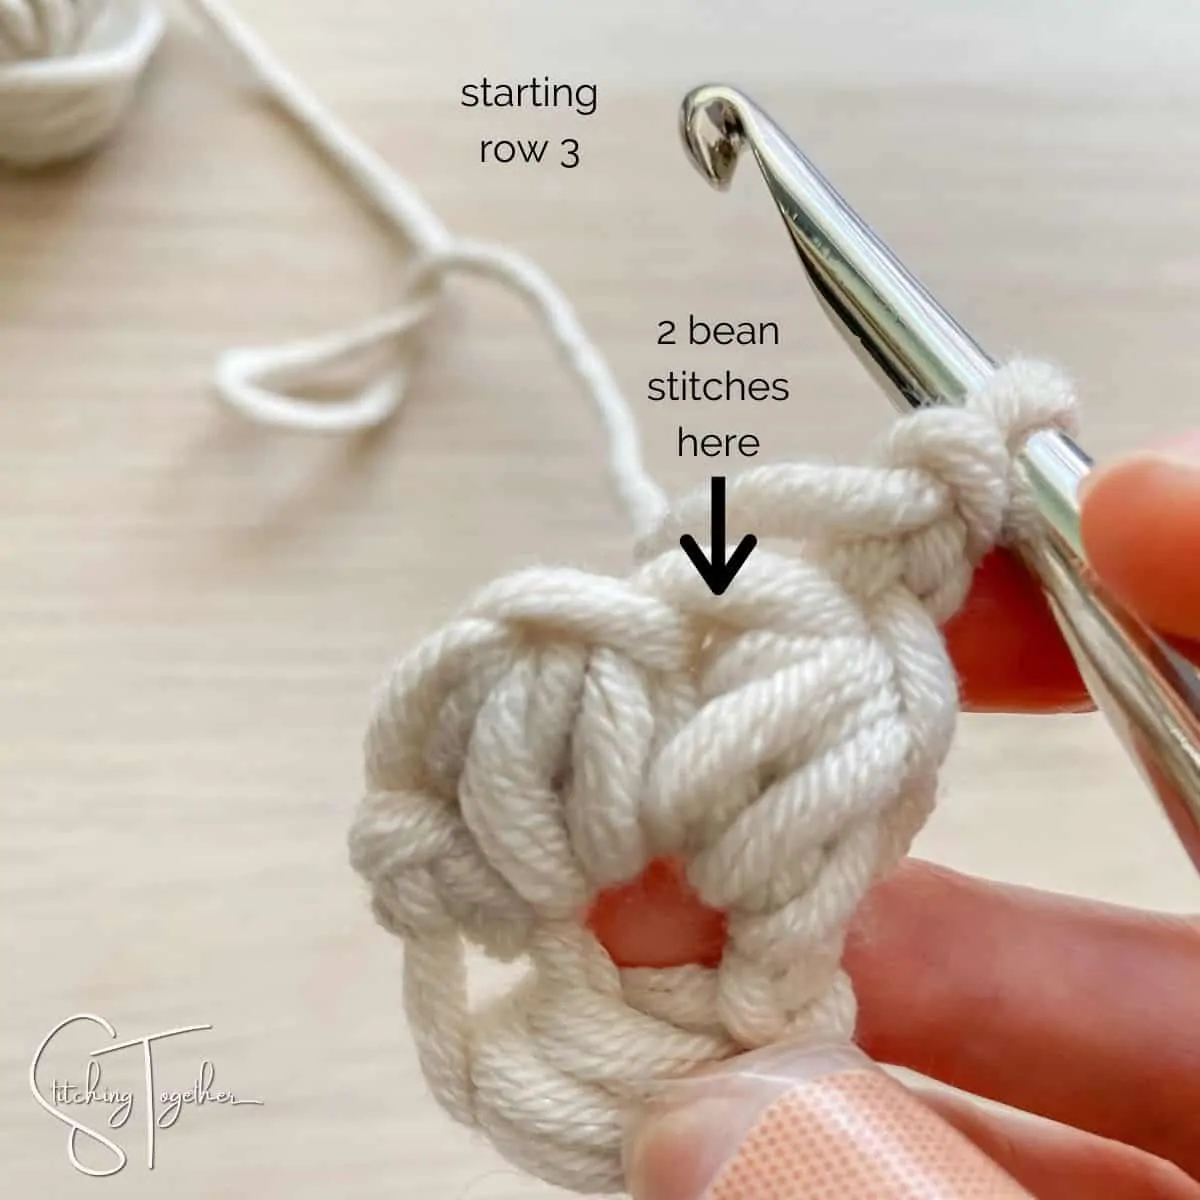
Once again, you’re working almost on the side of the stitch. Don’t worry, it’s correct!
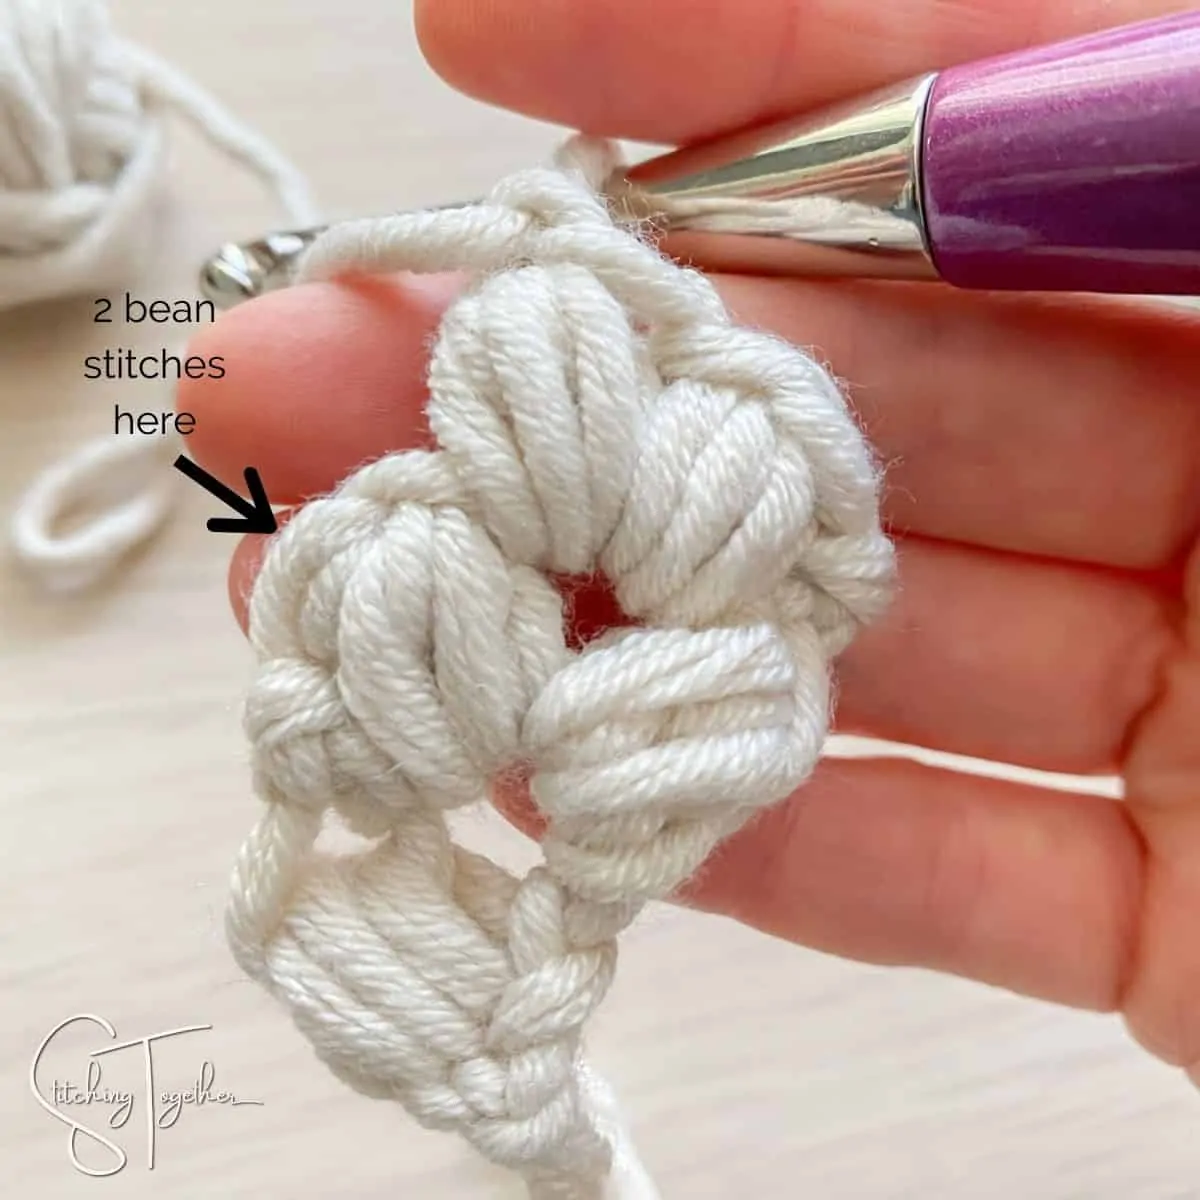
You’ve increased to four bean stitches. From now on, you’ll increase every other row.
Row 4: ch 1, bean st in each bean st of the row below, turn (4 beans)
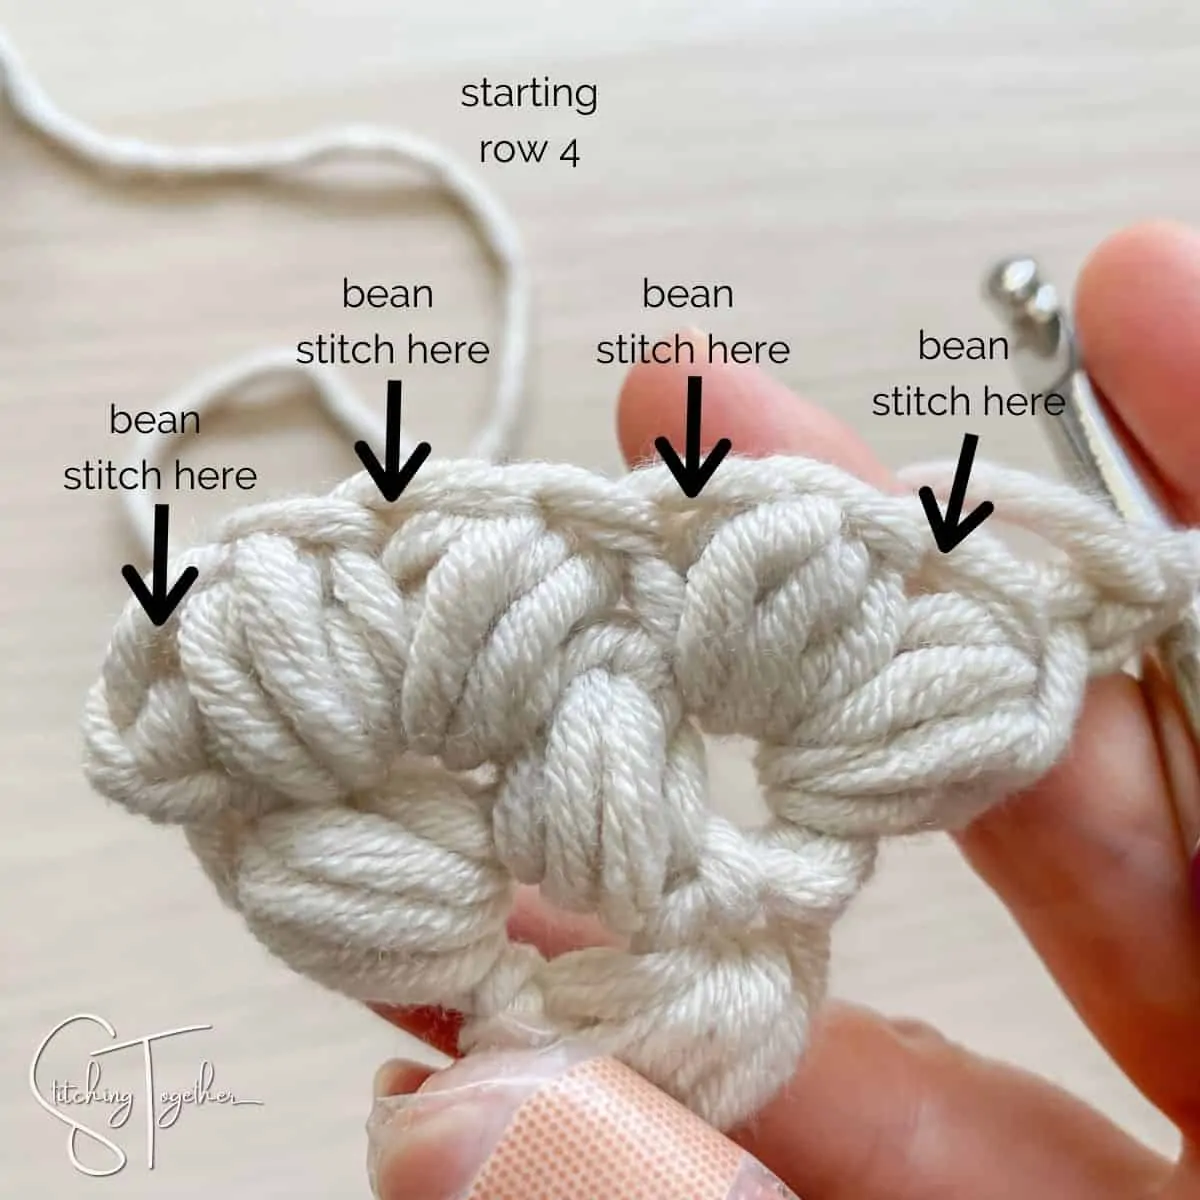
You didn’t increase in this row.
Row 5: ch 1, 2 bean sts in the 1st bean st of the row below, bean st in each of the next 2 bean sts, 2 bean sts in the last bean stitch, turn (6 beans)
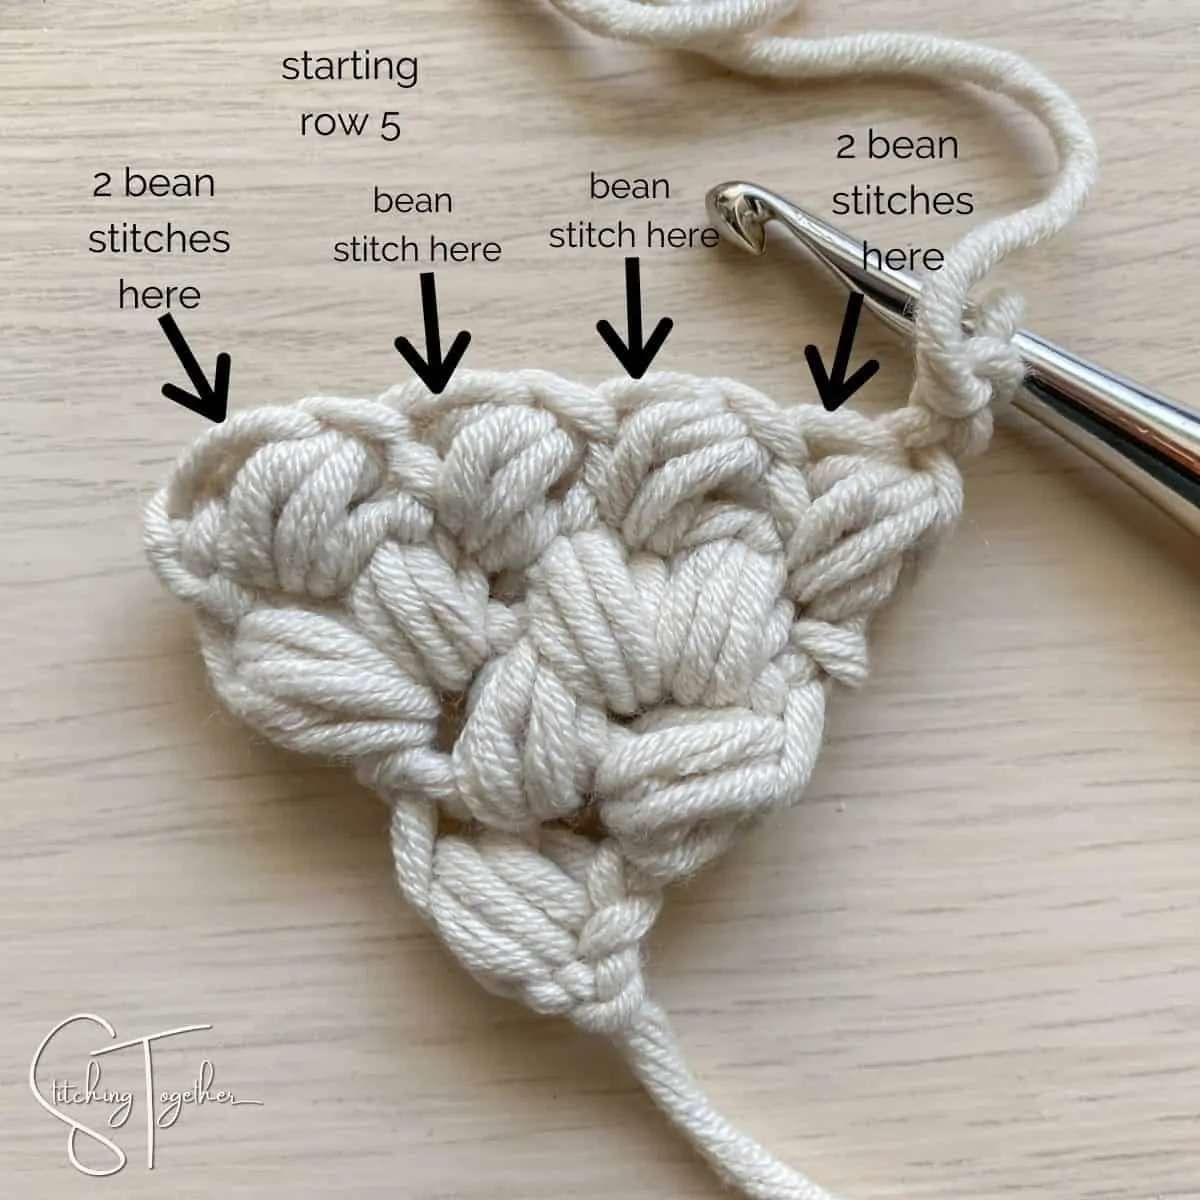
Now you’ll continue working as above, increasing every other row until your triangle is as large as you’d like it to be.
Will you share pictures of your finished projects?
- Tag Stitching Together on Instagram with @stitching_together and use the #stitchingtog
- Upload your picture in the Tried It section of this pin
- Share your work in the Stitching Together Community.
.
If you like easy to print patterns, this pattern can be purchased in the following places:
Thanks for your support!
.
