Buffalo Plaid Crochet Pillow Cover
Disclosure: This post may contain affiliate links. As an Amazon Associate, I earn from qualifying purchases. Please visit my Privacy Policy for disclosures and more information.
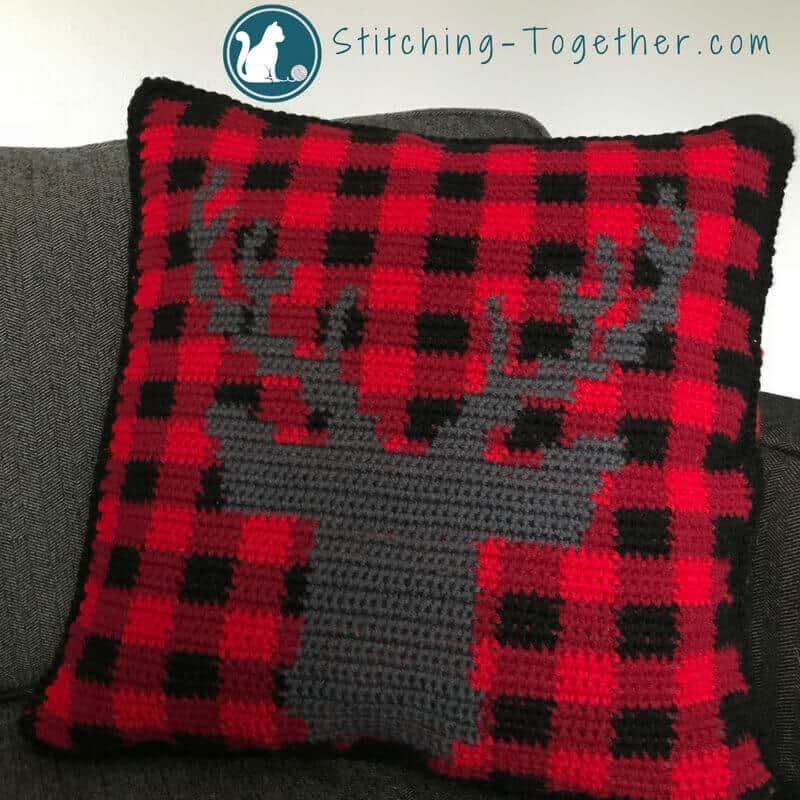
A stag + buffalo check — this buffalo plaid crochet pillow cover could not get any more amazing or trendy. Every time I see it sitting on my couch I get excited. This was the largest tapestry crochet project I have tackled so far! It was challenging until I found my groove but it was also fun and I enjoyed watching my skill level increase as I worked my way up the pattern.

You do not have to do this as a tapestry crochet project though, so don’t be afraid of it if you aren’t ready to try tapestry crochet. Please make sure to read through the pattern notes and email me if you have any questions!
Buffalo Check Crochet Pillow Cover
Materials:
1 skein Red Heart Super Saver in Cherry Red
1 skein Red Heart Super Saver in Burgundy
1 skein Red Heart Super Saver in Charcoal
1 skein Red Heart Super Saver in Black
Red Heart Super Saver 7 oz (198g), 364 yds (333 m) – See color options on Amazon
I/5.5 mm crochet hook
J/6.0 mm crochet hook
You can see my favorite hooks right on Amazon
20” x 20” Pillow
Abbreviations:
sc: single crochet
dc: double crochet
fdc: foundation double crochet
ch: chain
Notes:
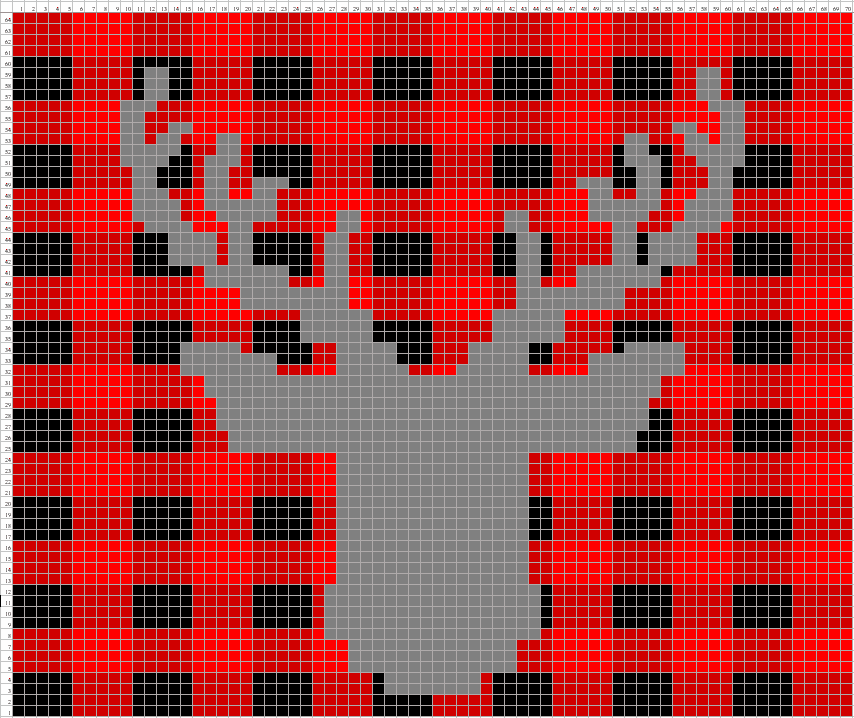
Each square on the graph represents one sc.
The intention of the pattern is to be worked as a flat tapestry crochet project, carrying the yarn all the way through. Some quick tips:
- Since the pillow cover will have a back, instead of carrying the yarn directly on top of the row below, carry the yarn toward the wrong side and you will have less show through.
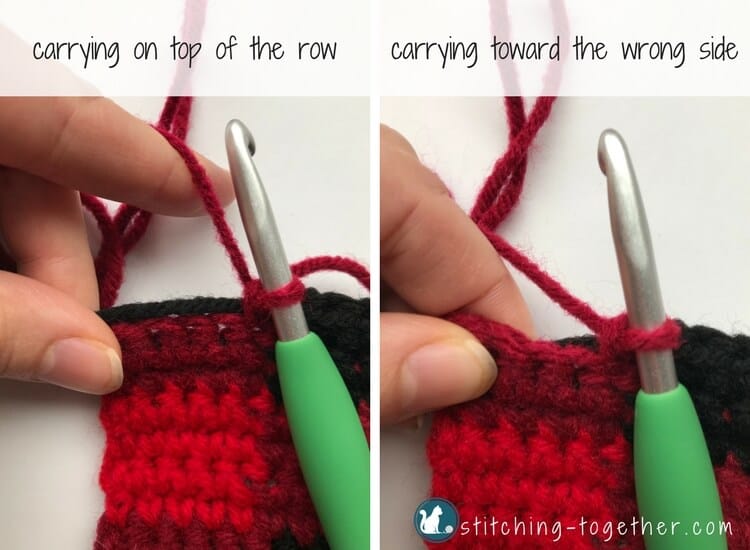
- The charcoal color shows through the worst, so try to carry it toward the backside of your project. (I tried to keep black or burgundy toward the front.)
- It is best to start carrying at least three of the colors from row one. The color not used at all in that section (black or cherry red) can be left and then pulled up when needed in the next section. (If you don’t carry the same amount of yarn all the way through, your rows will not be even.)
- Do a gauge swatch, or two! How you carry the yarn through will affect the final height of the pillow cover so make sure your swatch is representative of how you will crochet the final piece
- Please check out this post for further tapestry crochet tips!
You do not have to do this as a tapestry crochet piece – pick a side to be the wrong side pull you yarn along the back and you still don’t have to worry about weaving in any ends! Your final cover will be smaller but you can add a couple of rows of scs in black around the entire edge to make it bigger. (Honestly, it would probably be faster to do this way but not as fun or challenging!)
When working the back panels, the goal is to match the width of the front panels. You may need to add or subtract dcs to match the width of your front panel.
Gauge:
Front – 4” x 4”: 15 sc by 14 rows (size I hook)
Back – 4” x 4”: 10 dc by 7 rows (size J hook)
Front of pillow:
5.5mm (size I/9) hook
With black chain 72,
Row 1: sc in 2nd chain from hook to start row one
Follow graph to create the front of the pillow – each square is one sc
When the graph is complete, sc around the entire edge of the front panel with black.
Back of Pillow:
6.0mm (size J/10) hook):
Panel 1 (shorter panel)
Row 1: with Cherry Red fdc 55
Row 2- 18: ch 2, dc in each st, turn(55)
Panel 2 (longer panel)
Row 1: with Cherry Red fdc 55
Rows 2-24: ch 2, dc in each st, turn (55)
Joining:
Place panel 1 on top of the wrong side of the front panel lining it up with the top of the front panel. Place panel 2 on top of panel 1 and the front panel lining it up with the bottom of the front panel. Sc around the entire edge of pillow cover with black, attaching the back panels to the front panel. Bind off.
Insert pillow and fluff!
Check out the other Christmas Pillows in this series
Christmas Tree Pillow Cover
Joy Christmas Pillow Cover
Noel Christmas Pillow Cover
I love this pattern and would and love to make this for my daughter and her family. Would you happen to have a video tutorial??
I am glad you like it! I’m sorry to say I don’t have a video tutorial. Maybe someday!
I just came across this pattern a few weeks ago. We are a family of hunters and fell in love with this pillow!! I want to make it for my grandson!! I am having an issue with the yarn tangling, PLEASE HELP!!! I have started and frogged so many times i have almost worn the yarn out. Any help would be so appreciated. I am determined to make this!!! Thank you for any help you can give me!!!!!!!!!!
I feel you! It takes a bit to get in a grove and not tangle the yarn. What worked for me was to keep the skeins side by side on a table and reorder them at the end of each row so the yarn was not wrapped around each other at all. Until you get the feel for it, you may want to rearrange the skeins sooner, maybe halfway through the row. It gets easier! I have a friend working on a gingham blanket and she mentioned that her yarn never tangles. I think she must have magical powers…. (So glad you like the pattern!)
Came across this lovely pillow today on Pinterest. Yeah for me. I read the pattern but not sure I quite understand. I’ve done check pattern before but it was done for a hat. My question is….do you have to turn your work? Asking because you said you have to pick a wrong side. Or are you cutting your yarn at the end of each row?
Hi Debbra! Sorry for the confusion! I did turn at the end of each row. The wrong side refers to the side where you will carry the yarn not in use instead of carrying it all along the top of the stitch! This isn’t necessary, but I found it helpful. So when the “wrong side” is facing you, you will pull the carried yarn more toward you. I hope that helps! You could cut the yarn at the end of each row and not turn – you would for sure get a cleaner and more true tapestry crochet piece.
Is there a way that I can just print off the graph part for this pattern?
Hi Melanie,
If you click on the picture of the graph, it should open in a new browser window. You should be able to print it from your browser window. (I say “should” because I haven’t tried it!).
Love the buffalo check and colourwork!
Thanks Stephanie!
My husband would love this… maybe it would make up for me storing his deer heads when we combined households?
Haha Cheryl! Maybe you should feature it under a deer head!
Oh don’t even let him hear you suggest it! (Glad he doesn’t read blogs….LOL)
He’d have to find it first!
I love this!!! It will be perfect for my guest room.
Fun idea!