Crochet Flower Square and Crochet Flower Pillow Pattern
Disclosure: This post may contain affiliate links. As an Amazon Associate, I earn from qualifying purchases. Please visit my Privacy Policy for disclosures and more information.
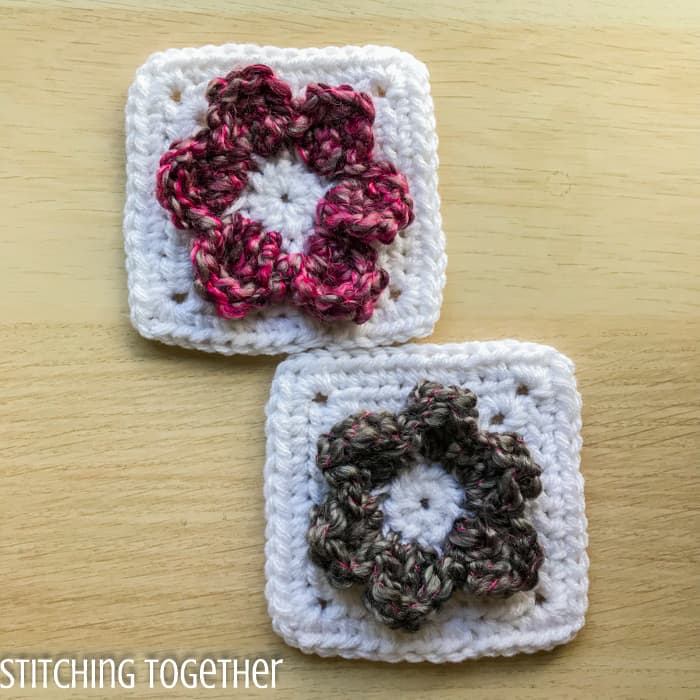
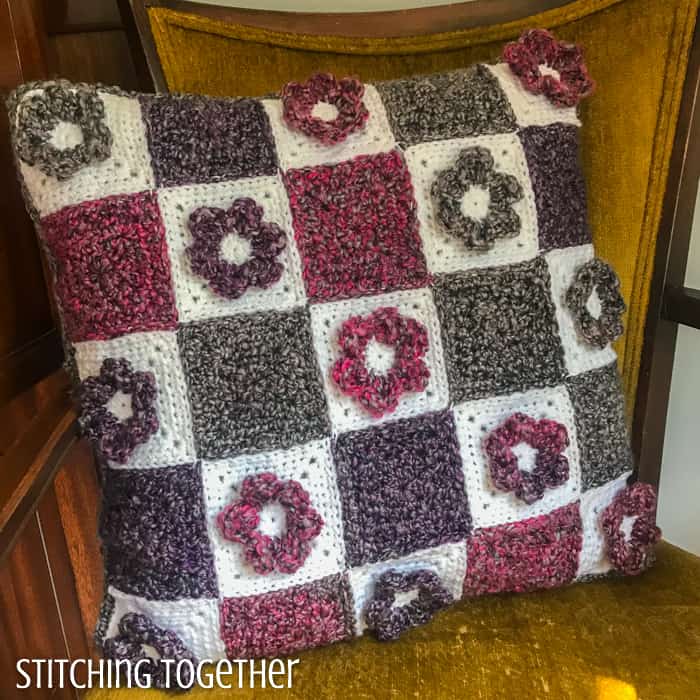
What will you make with these adorable crochet flower squares? Scroll down for the free pattern and a pillow pattern made just for these squares. You can also purchase the ad-free PDF of the flower square pattern right here! (The CAL is over but the patterns are still free!)
The details for the Choose your own Adventure Crochet Along
You’ll want to bookmark this page, pin it, or save it somehow because all the information for the crochet along will be added right here instead of on multiple pages!
This is and isn’t a mystery CAL all at the same time. You’ll be given the basic pattern (a crochet granny square with flower center) but what you do with the squares is totally up to you!
That’s why I think calling it a choose your own adventure CAL fits better than a mystery CAL.
Once you decide what you want to make, you’ll gather your materials and get excited! Then we will be making all the squares together! These little squares whip up so quickly and are mindless after a few of them. Remember, the number of squares you need will depend on what you are making.
Related: Grandview Granny Square Crochet Pattern Free
Next we will add the flowers. You may want your project to look like a field of wild flowers or you may not want to add a flower to every square. It is up to you! (How fun!)
After that we will join our squares. I’ll show you what I’ve done to join mine, but you can get as fancy as you’d like with joins.
As we finish our projects, we will show them off in the fb group and on Instagram. Some projects may require more finishing, like a border on a blanket, or a back for a pillow cover so I anticipate we will all be finishing up at different times.
Don’t you think this will be so fun? You get to be part of the design process! The square is done for you but the yarn, colors, and final layout choices will all be yours. I absolutely cannot wait to see what you come up with!
You have THREE jobs this week (you thought this was going to be the easiest week, didn’t you?)
-
Plan your final design and calculate how much yarn you’ll need. What are you going to make? a pillow? a throw? something else fabulous? Check out the section below called “How much yarn do I need?” for some yarn totals and equations to help you calculate your unique needs.
-
Gather your materials! I’ll let you know in the materials section what I am using but your choice may be completely different.
-
SPREAD the WORD! Let’s get as many crochet friends joining us this week for this fun crochet along! The more the merrier. Don’t forget to join the FB group yourself and invite your crocheting buddies.
Optional task: Head to the crochet flower patterns and practice the 6 petal crochet flower. The flower on the squares is based on this flower. Once you get the hang of the flower on its own, the flower/square combo will be a breeze!
Related: Delphi Crochet Granny Square
How much yarn do I need for the crochet flower squares?
Since this is a choose your own adventure crochet along and the end product is totally up to you, your yarn needs are going to be completely dependent on what you decide to make.
My flower squares measured 4″ by 4″ before blocking using Loops and Threads Impeccable yarn and an I/9, 5.5 mm hook. Each solid square, without the flower took approximately 0.24 oz of yarn.
The flowers were made with Lion Brand Homespun yarn and used between 0.1-0.14 oz for each flower. My original plan was to use scraps for my flowers and make this a super unique scrapghan, BUT my scraps would be better suited for a desert scene (neutrals) than a blooming flower field.
Below are some ideas of what you can do with your squares with approximate yarn amounts for the squares without the flowers. The measurements provided do not take into consideration the extra width added by joining, which may be negligible or significant depending on the type of join you choose.
Pillow 16″ x 16″: 16 squares per side – 3.84 oz of yarn (with an 18″ x 18″ pillow form)
Pillow 20″ x 20″: 25 squares per side – 6 oz of yarn (with a 22″ x 22″ pillow form)
Baby Blanket 30″ x 34″: 72 squares – 17.28 oz of yarn
Crib Blanket 44″ x 60″: 165 squares – 39.6 oz of yarn
Throw 52″ x 60″: 195 squares – 46.8 oz of yarn
Other ideas: purse, trivet, scarf….
Related: Spring Crochet Patterns
Materials:
-
US-Size I/9 5.5 mm Crochet Hook – You can grab my favorite hook set right on Amazon
-
US-Size K 6.5 mm Crochet Hook
-
#4 worsted weight yarn
-
Sample used approximately 0.25 ounces Loops and Threads Impeccable Yarn in white (4.5 oz /127.5 g, 285 yd/260 m) for each square – You can get this yarn from Michaels
-
-
#5 bulky weight yarn or other contrasting yarn for flowers
-
-
Sample used approximately 0.14 oz of Lion Brand Homespun yarn in Gemstone Stripes (6 oz / 170 g, 185 yd / 169 m) for each flower – Looks like Lion Brand discontinued this color but it is still available on Amazon
-
-
-
Large Eye Tapestry Needle
Abbreviations:
hdc(s): half double crochet(s)
sl st: slip stitch
FLO: Front Loop Only
st(s): stitch(es)
ch: chain
sp: space
BLO: Back Loop Only
dc: double crochet
tr: treble crochet
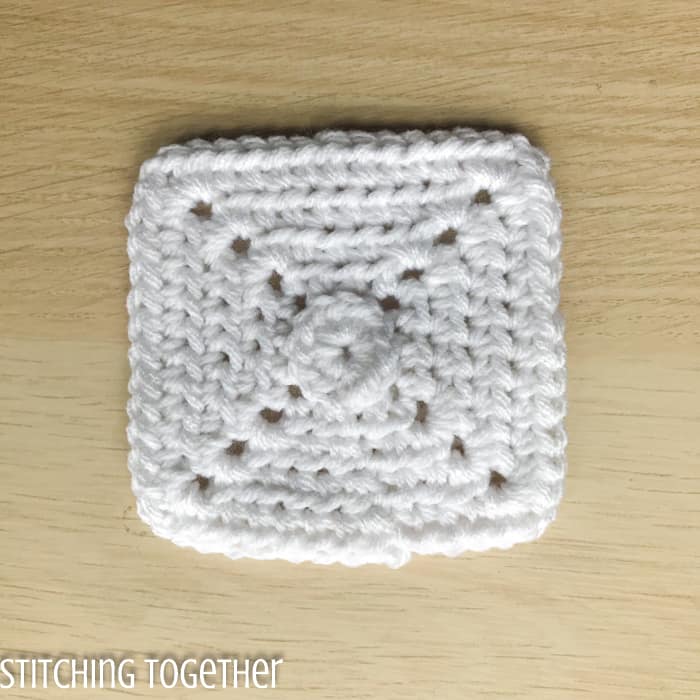
Gauge and Finished Size:
Gauge can be measured on a finished square which should measure 4” by 4” before blocking with the Impeccable yarn and a size I/9 hook.
Crochet Flower Square Pattern Instructions
Start with a magic ring using #4 worsted weight yarn and I hook
R1: 12 hdcs in ring, tighten to close, join with a sl st to the first hdc.
Alternatively, ch 4, join with a sl st to form a ring, 12 hdc in the ring, join with a sl st to the first hdc.
R2: working in the FLO, ch 1, hdc in the first st, [(hdc, ch 1, hdc) in the next st, hdc in the next 2 sts] 3 times, (hdc, ch 1, hdc) in the next st, hdc in the next st, join with sl st to the first hdc.
R3: ch 1, hdc in the next 2 sts, [(2 hdc, ch 1, 2 hdc) in ch-1 sp, hdc in the next 3 sts] 3 times, (2 hdc, ch 1, 2 hdc), in ch-1 sp, hdc in the next st, join with sl st to the first hdc.
R4: ch 1, hdc in the next 4 sts, [(2 hdc, ch 1, 2 hdc), in ch-1 sp, hdc in the next 6 sts] 3 times, (2 hdc, ch 1, 2 hdc), in ch-1 sp, hdc in the next 2 sts, join with sl st to the first hdc.
R5: ch 1, hdc in the next 6 sts, [(2 hdc, ch 1, 2 hdc), in ch-1 sp, hdc in the next 9 sts] 3 times, (2 hdc, ch 1, 2 hdc), in ch-1 sp, hdc in the next 3 sts, join with sl st to the first hdc. Fasten off
Adding the crochet flower to the square
Turn the square over to work on the wrong side.
Flower Round: Using #5 bulky yarn and K hook, work in the BLO, join yarn in the BLO of one hdcs of round 1 of the square, (dc, 2 tr, dc) in the same st, sl st to the next st, *(dc, 2 tr, dc) in the next st, sl st to the next st, repeat from * around, join with a sl st to the first dc, fasten off and weave in ends.
Adding the Crochet Flower Step by Step
(yarn used for step by step photos was #4 worsted weight for both the square and the flower.)
Turn the square over and work on the wrong side
join yarn in the BLO of one hdcs of round 1 of the square
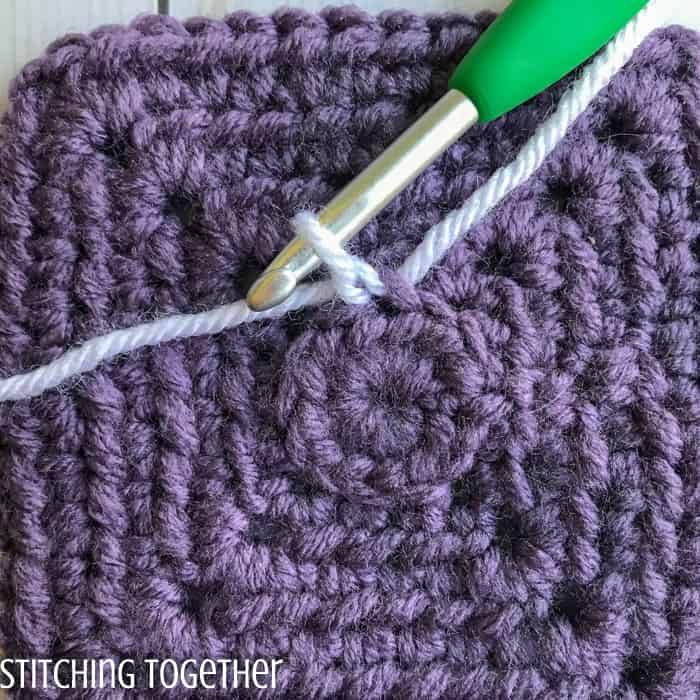
*dc in the same st
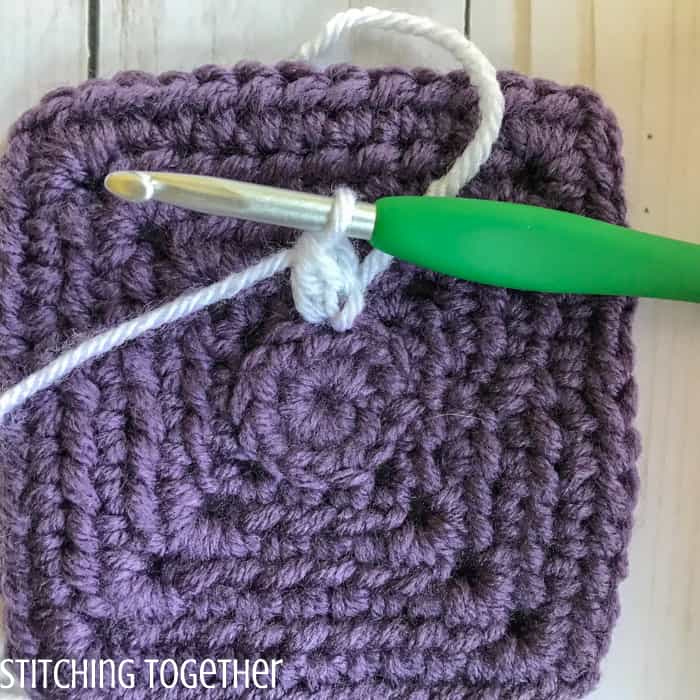
2 tr in the same st
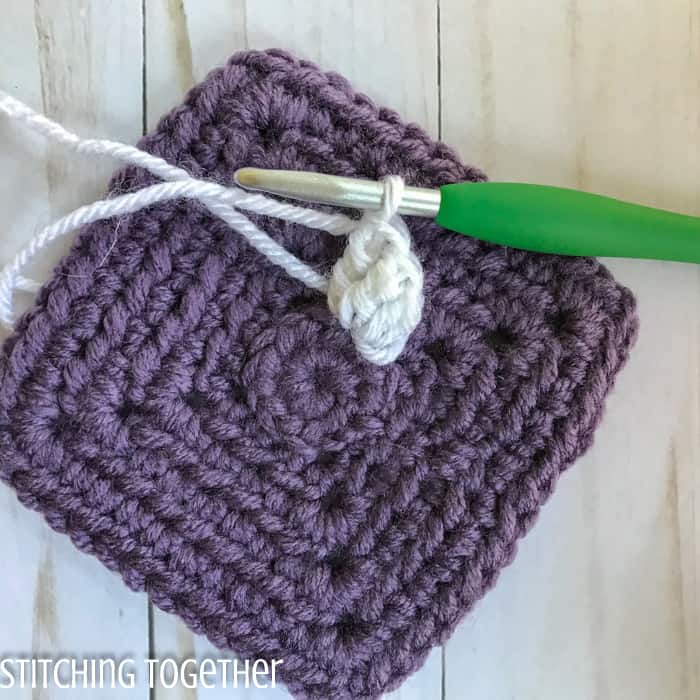
dc in the same st
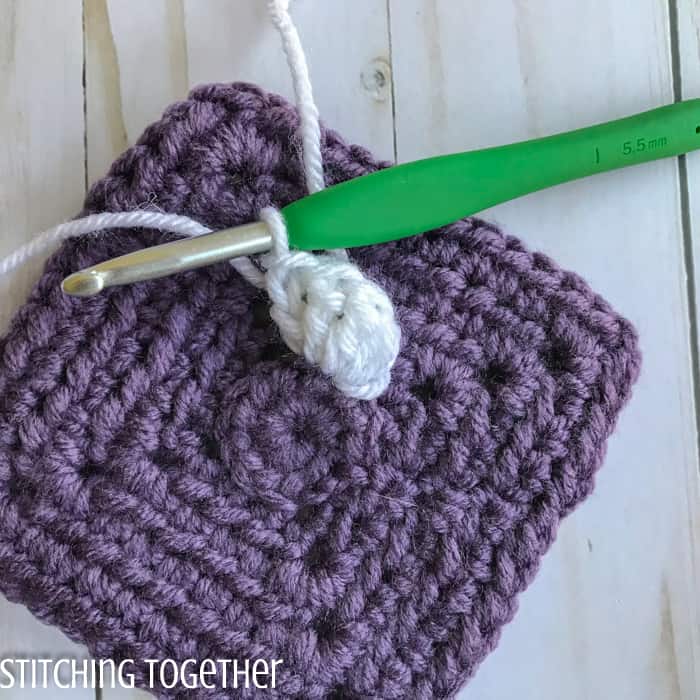
sl st to the next st
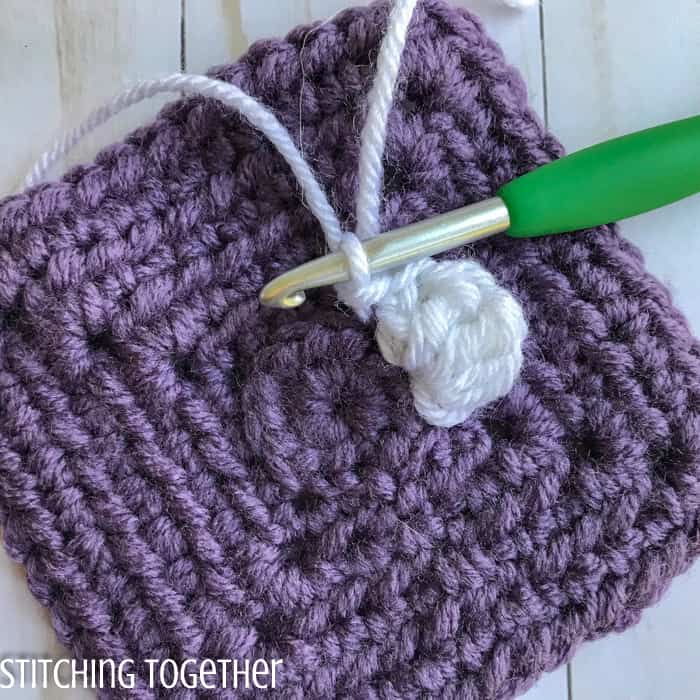
Repeat from * around. You may find it helpful to fold the square back as you work on adding the petals.

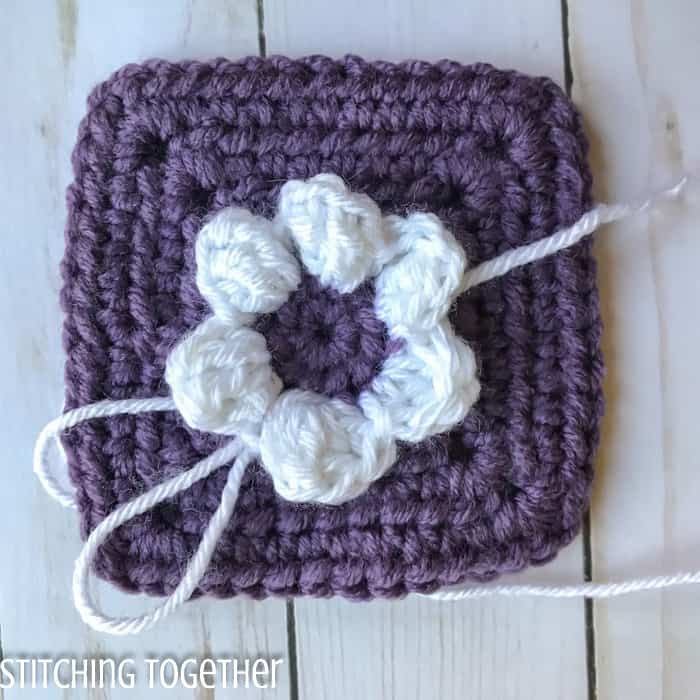
Blocking your squares after finishing up your flowers will probably be a good idea if your squares look anything like mine. (A little pulled and wonky!)
Grab the PDF of the solid square with instructions for the flower!
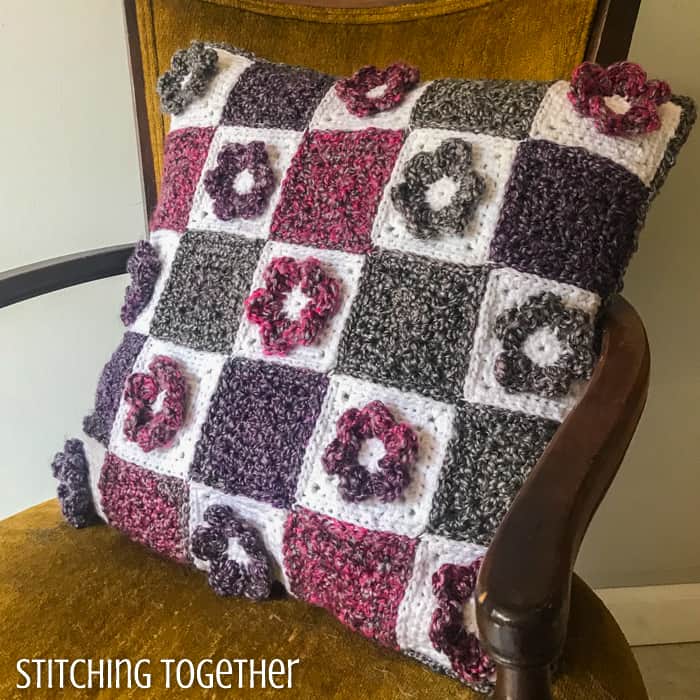
Crochet Flower Pillow Pattern
Additional Materials:
- An additional skein of Lion Brand Homespun yarn (I used every bit of the 2nd skein so you may want to grab a third skein.)
- 20″ by 20″ pillow form
Notes:
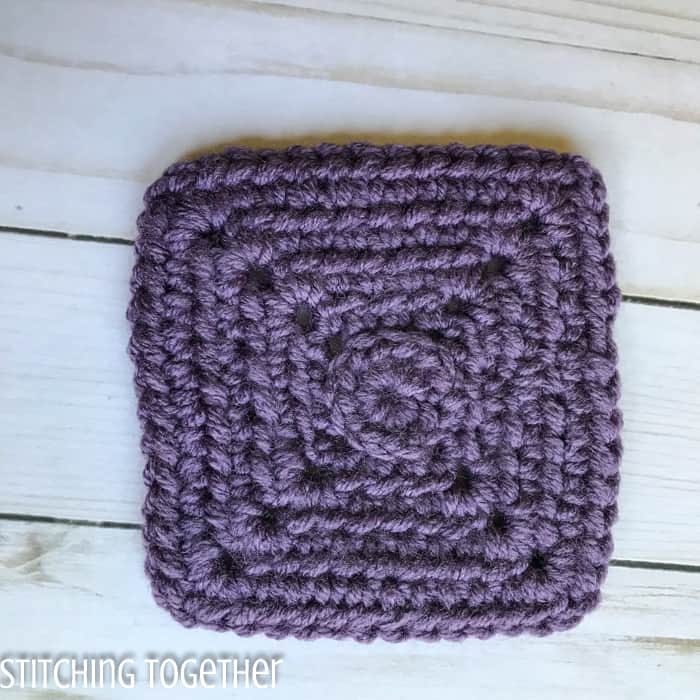
The solid squares measure 4″ by 4″ but have one less round than the flower squares.
Solid Crochet Granny Square
Using a US-Size K 6.5 mm Crochet Hook start with a magic ring
R1: 12 hdcs in ring, tighten to close, join with a sl st to the first hdc.
Alternatively, ch 4, join with a sl st to form a ring, 12 hdc in the ring, join with a sl st to the first hdc.
R2: ch 1, hdc in the first st, [(hdc, ch 1, hdc) in the next st, hdc in the next 2 sts] 3 times, (hdc, ch 1, hdc) in the next st, hdc in the next st, join with sl st to the first hdc.
R3: ch 1, hdc in the next 2 sts, [(2 hdc, ch 1, 2 hdc) in ch-1 sp, hdc in the next 3 sts] 3 times, (2 hdc, ch 1, 2 hdc), in ch-1 sp, hdc in the next st, join with sl st to the first hdc.
R4: ch 1, hdc in the next 4 sts, [(2 hdc, ch 1, 2 hdc), in ch-1 sp, hdc in the next 6 sts] 3 times, (2 hdc, ch 1, 2 hdc), in ch-1 sp, hdc in the next 2 sts, join with sl st to the first hdc.
Fasten off and weave in ends.
Make 12 solid granny squares and 13 solid crochet granny squares with flowers.
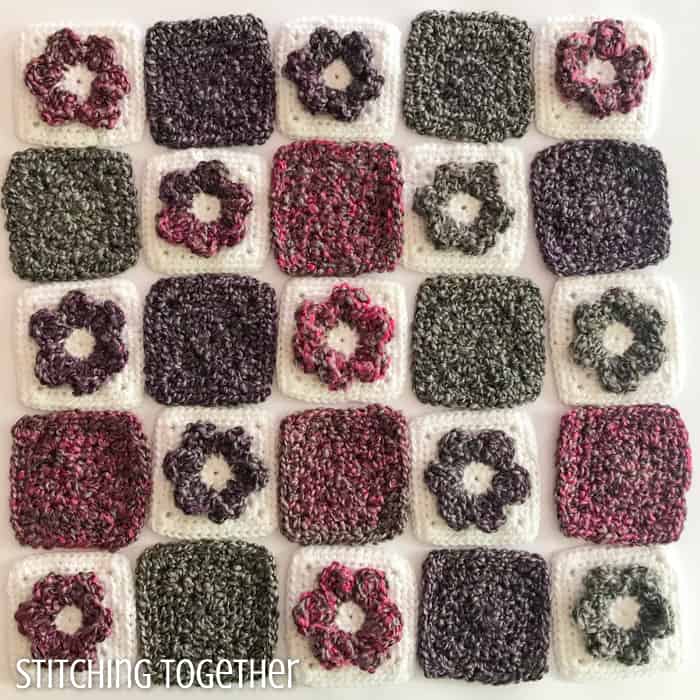
Joining the Squares
The squares were joined together using a variation of the running stitch which is an easy back and forth stitch that mostly hides around the post of the stitch when viewed from the front.
If you are using worsted weight yarn for the flower squares and Homespun yarn for the solid squares, it will look best to stitch through both loops of the flower square and only the front loop of the solid square.
If you are using the same weight of yarn for both types of squares, you can go through both loops of the squares or just the front loops on one of them for a less bulky join. Test it out and see what looks better for your squares!
The instructions below show a join going through both loops of one square and one loop of the other square.
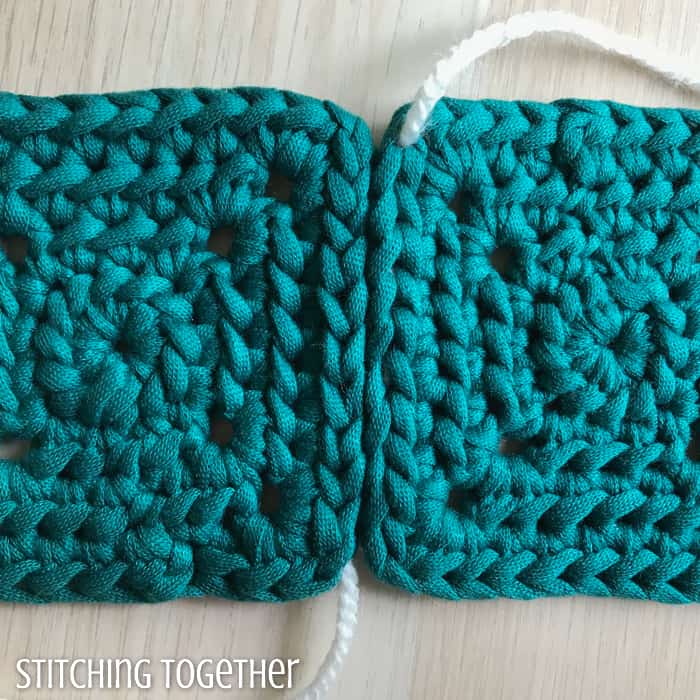
Hold the wrong sides of two squares together. With a tapestry needle and coordinating yarn (I used white on my actual squares), weave yarn through both loops on the flower square and the front loop of the solid square.
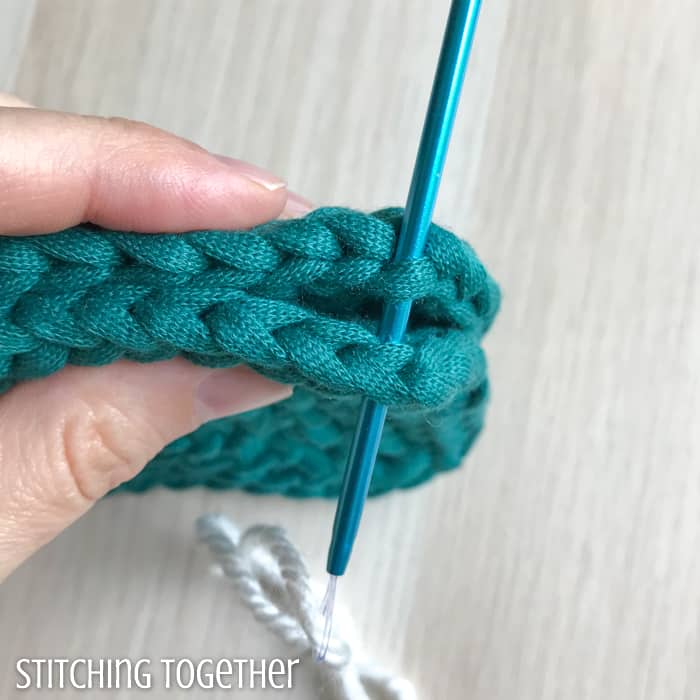
Move one stitch to the left and weave through the loops of both squares.
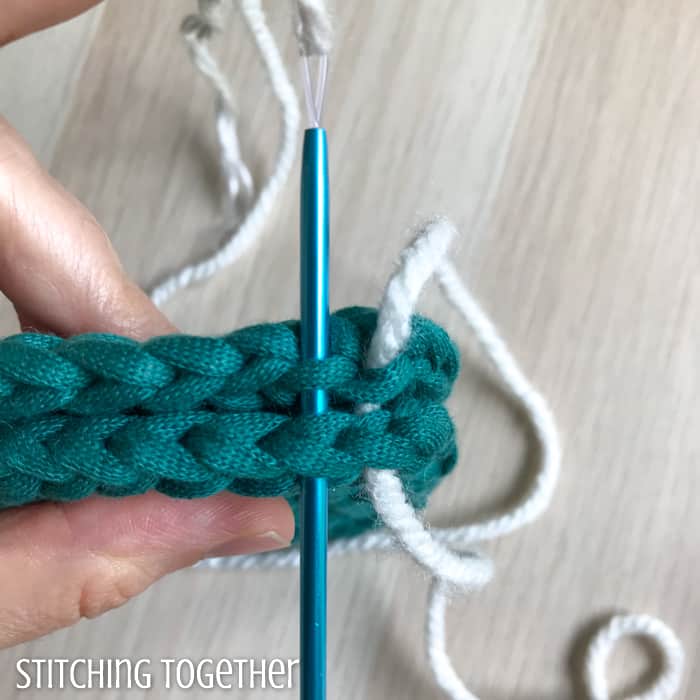
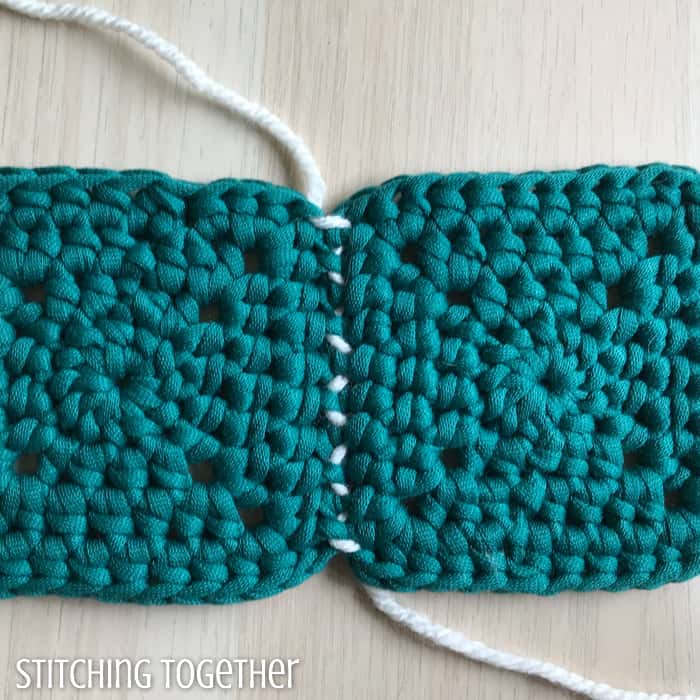
Continue to weave back and forth until you reach the end of the square (pull the yarn tight as you go – the yarn is left loose in the pictures to show how it is woven in and out of the stitches)
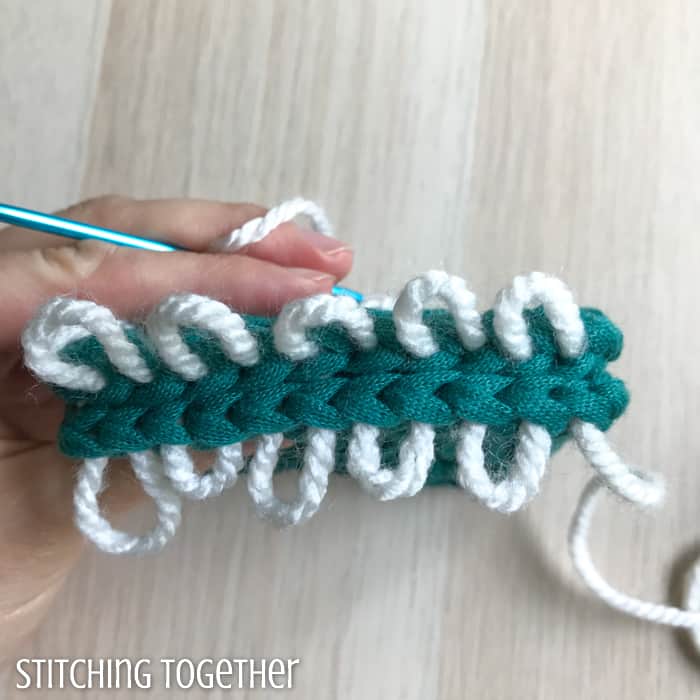
Once pulled tight the stitches are barely visible.
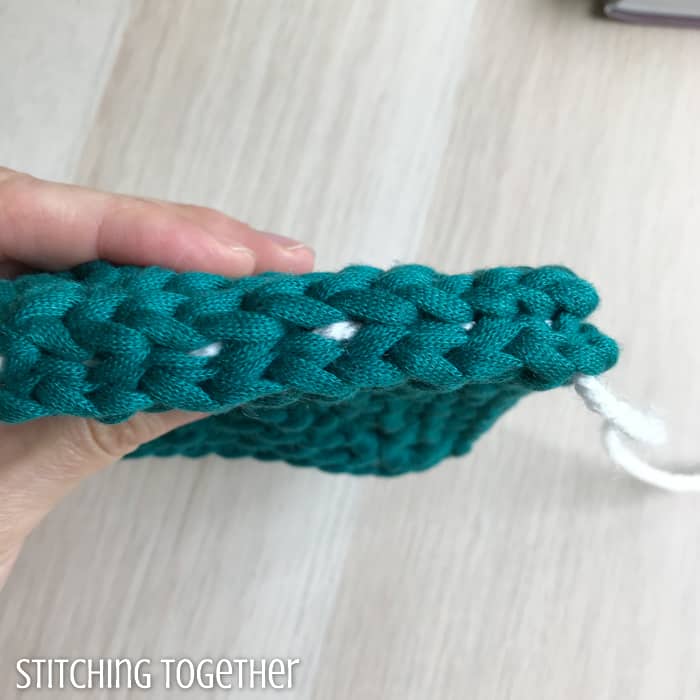
The stitches are almost completely hidden on the front when the squares are flattened.
The join is a little more obvious from the back side but this side will be on the inside of the pillow cover!
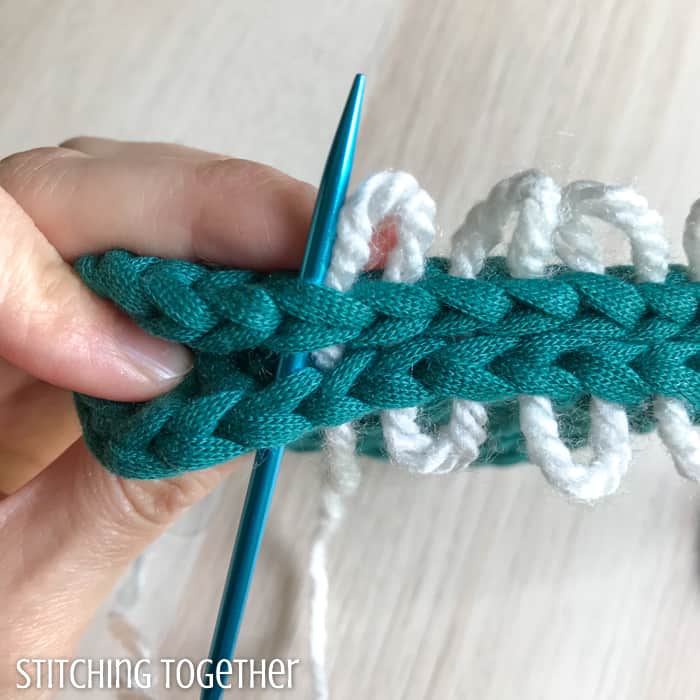
Because the solid square with the bulky Homespun yarn had one less round to make it the same size as the flower squares, there are three less stitches on each side of the solid squares. The two squares cannot be evenly joined stitch for stitch.
As you join, there will be three different times where you will need move to the next stitch on the flower square but go back into the same stitch on the solid square.
The photo below show what it would look like to work back into the same stitch – the solid square would be the back square and the flower square would be the square in the front.
After your squares are joined you’ll start on the back of the pillow cover.
Pattern Instructions for the back of the Crochet Flower Pillow Cover
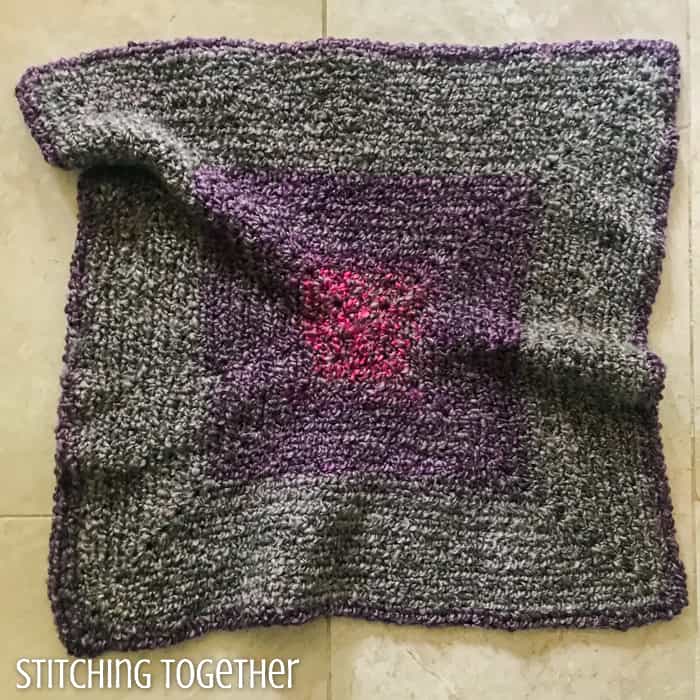
The back of the pillow is just one large granny square worked around until it is the same size as the front pillow cover. You’ll again be using Homespun yarn and a size K hook.
Start with a magic ring
R1: 12 hdcs in ring, tighten to close, join with a sl st to the first hdc.
Alternatively, ch 4, join with a sl st to form a ring, 12 hdc in the ring, join with a sl st to the first hdc.
R2: ch 1, hdc in the first st, [(hdc, ch 1, hdc) in the next st, hdc in the next 2 sts] 3 times, (hdc, ch 1, hdc) in the next st, hdc in the next st, join with sl st to the first hdc.
R3: ch 1, hdc in the next 2 sts, [(2 hdc, ch 1, 2 hdc) in ch-1 sp, hdc in the next 3 sts] 3 times, (2 hdc, ch 1, 2 hdc), in ch-1 sp, hdc in the next st, join with sl st to the first hdc.
R4: ch 1, hdc in the next 4 sts, [(2 hdc, ch 1, 2 hdc), in ch-1 sp, hdc in the next 6 sts] 3 times, (2 hdc, ch 1, 2 hdc), in ch-1 sp, hdc in the next 2 sts, join with sl st to the first hdc.
R5: ch 1, hdc in the next 6 sts, [(2 hdc, ch 1, 2 hdc), in ch-1 sp, hdc in the next 9 sts] 3 times, (2 hdc, ch 1, 2 hdc), in ch-1 sp, hdc in the next 3 sts, join with sl st to the first hdc.
R6: ch 1, hdc in the next 8 sts, [(2 hdc, ch 1, 2 hdc), in ch-1 sp, hdc in the next 12 sts] 3 times, (2 hdc, ch 1, 2 hdc), in ch-1 sp, hdc in the next 4 sts, join with sl st to the first hdc.
R7: ch 1, hdc in the next 10 sts, [(2 hdc, ch 1, 2 hdc), in ch-1 sp, hdc in the next 15 sts] 3 times, (2 hdc, ch 1, 2 hdc), in ch-1 sp, hdc in the next 5 sts, join with sl st to the first hdc.
R8: ch 1, hdc in the next 12 sts, [(2 hdc, ch 1, 2 hdc), in ch-1 sp, hdc in the next 18 sts] 3 times, (2 hdc, ch 1, 2 hdc), in ch-1 sp, hdc in the next 6 sts, join with sl st to the first hdc.
R9: ch 1, hdc in the next 14 sts, [(2 hdc, ch 1, 2 hdc), in ch-1 sp, hdc in the next 21 sts] 3 times, (2 hdc, ch 1, 2 hdc), in ch-1 sp, hdc in the next 7 sts, join with sl st to the first hdc.
R10: ch 1, hdc in the next 16 sts, [(2 hdc, ch 1, 2 hdc), in ch-1 sp, hdc in the next 24 sts] 3 times, (2 hdc, ch 1, 2 hdc), in ch-1 sp, hdc in the next 8 sts, join with sl st to the first hdc.
R11: ch 1, hdc in the next 18 sts, [(2 hdc, ch 1, 2 hdc), in ch-1 sp, hdc in the next 27 sts] 3 times, (2 hdc, ch 1, 2 hdc), in ch-1 sp, hdc in the next 9 sts, join with sl st to the first hdc.
R12: ch 1, hdc in the next 20 sts, [(2 hdc, ch 1, 2 hdc), in ch-1 sp, hdc in the next 30 sts] 3 times, (2 hdc, ch 1, 2 hdc), in ch-1 sp, hdc in the next 10 sts, join with sl st to the first hdc.
R13: ch 1, hdc in the next 22 sts, [(2 hdc, ch 1, 2 hdc), in ch-1 sp, hdc in the next 33 sts] 3 times, (2 hdc, ch 1, 2 hdc), in ch-1 sp, hdc in the next 11 sts, join with sl st to the first hdc.
R14: ch 1, hdc in the next 24 sts, [(2 hdc, ch 1, 2 hdc), in ch-1 sp, hdc in the next 36 sts] 3 times, (2 hdc, ch 1, 2 hdc), in ch-1 sp, hdc in the next 12 sts, join with sl st to the first hdc.
R15: ch 1, hdc in the next 26 sts, [(2 hdc, ch 1, 2 hdc), in ch-1 sp, hdc in the next 39 sts] 3 times, (2 hdc, ch 1, 2 hdc), in ch-1 sp, hdc in the next 13 sts, join with sl st to the first hdc.
R16: ch 1, hdc in the next 28 sts, [(2 hdc, ch 1, 2 hdc), in ch-1 sp, hdc in the next 42 sts] 3 times, (2 hdc, ch 1, 2 hdc), in ch-1 sp, hdc in the next 14 sts, join with sl st to the first hdc.
R17: ch 1, hdc in the next 30 sts, [(2 hdc, ch 1, 2 hdc), in ch-1 sp, hdc in the next 45 sts] 3 times, (2 hdc, ch 1, 2 hdc), in ch-1 sp, hdc in the next 15 sts, join with sl st to the first hdc.
R18: ch 1, hdc in the next 32 sts, [(2 hdc, ch 1, 2 hdc), in ch-1 sp, hdc in the next 48 sts] 3 times, (2 hdc, ch 1, 2 hdc), in ch-1 sp, hdc in the next 16 sts, join with sl st to the first hdc.
Before fastening off and weaving in the ends, lay the back pillow cover on top of the joined front cover and ensure they are relatively close to the same size. Add or remove rounds as needed from the back cover to get them the same size.
I lightly steamed blocked the back cover as I find it incredibly hard to maintain tension with Homespun yarn as you can see in the before picture below.
Hold the front cover, right side facing out and back cover together and with the Homespun yarn, sc crochet the covers together, insert the pillow before closing up the last side. Fasten off and weave in ends.
That pillow turned out cute. I like the colour combination 🙂
Thanks so much Marilyn!