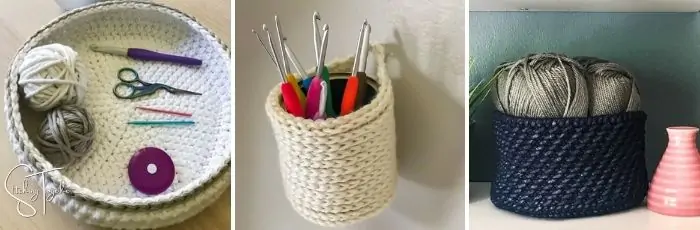
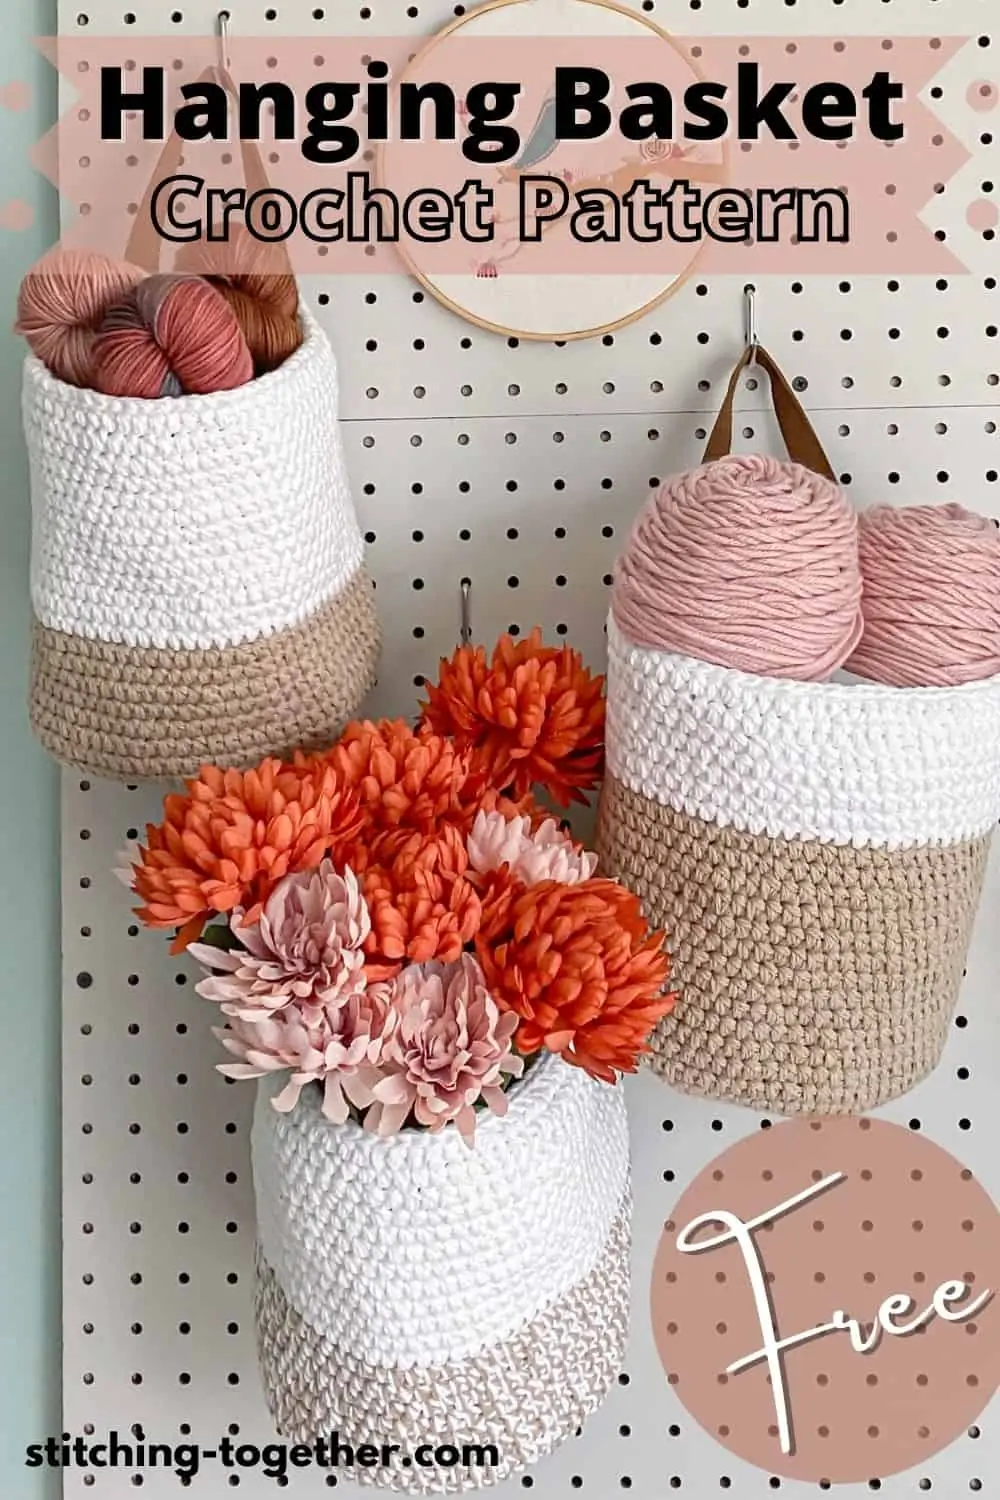
Hartfield Crochet Hanging Basket
Disclosure: This post may contain affiliate links. As an Amazon Associate, I earn from qualifying purchases. Please visit my Privacy Policy for disclosures and more information.
Is your house as disorganized as mine is? It seems like I can never get it all in order and I’m perpetually looking for more storage and organization solutions.
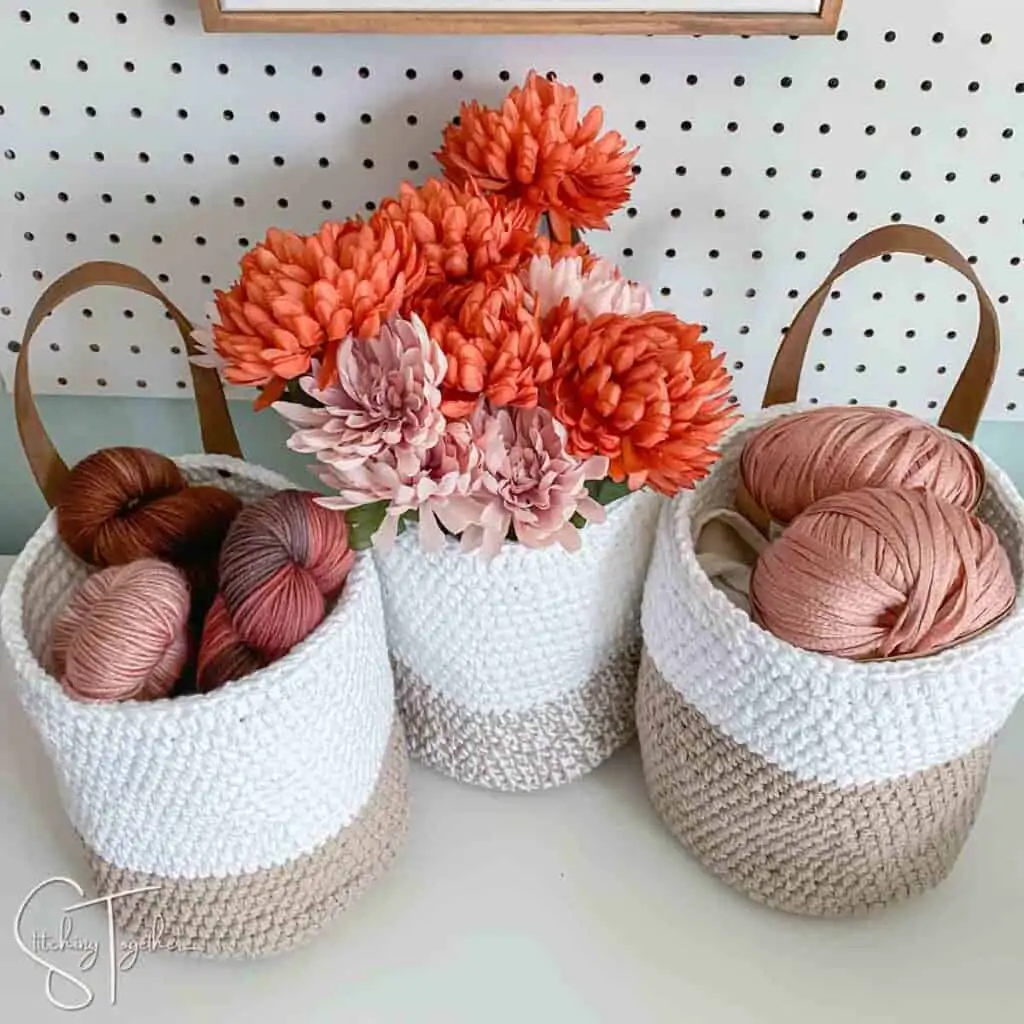
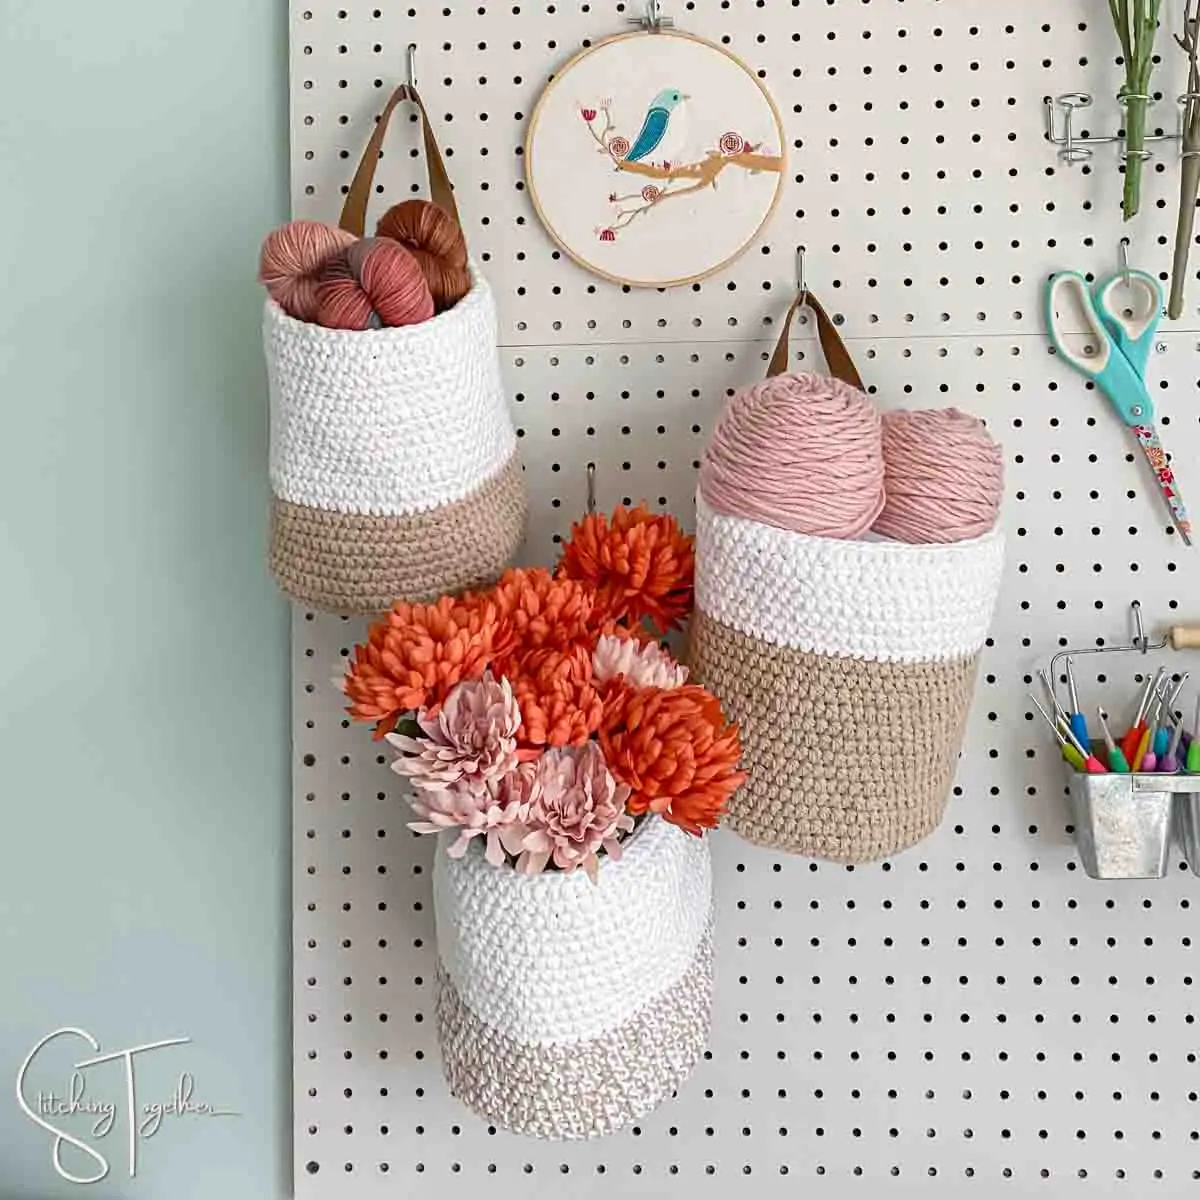
I’m the most motivated to keep organizing when my storage solutions are as cute and functional as these crochet hanging baskets.
Now, with this free crochet pattern, you can make your own hanging crochet baskets and hopefully get things a little more in order. Or you can use them for plants or flowers because beautiful spaces help give the feeling that you are more organized.
How to Crochet a Hanging Basket
You may be looking at this cute crochet hanging basket and wondering if you can really make it yourself. If you can crochet in rounds and follow simple stitch modifications, you can! Keep reading to learn how.
Don’t miss the mini version of this hanging basket: Highbury Crochet Pen Holder
About the yarn for the Crochet Hanging Basket Pattern
These crochet baskets were made using Lily’s Sugar’n Cream yarn which is 100% cotton yarn that’s great for home decor projects. In order to make a basket that is stiff and keeps its shape, I held two strands of yarn together throughout the entire basket.
Using two strands both sped up and slowed down the basket-making process. It also takes less time to crochet a basket since the total amount of yarn you are using is bulkier but it’s a bit harder to work with two strands. The result was definitely worth the bit of extra effort.
Lily’s has yarn in the color jute which allowed me to get the look of a jute basket without putting my poor fingers through the trauma of actually crocheting with jute. (It’s not that bad… I know I am being dramatic but it certainly isn’t as easy as working with cotton yarn.) Since Lily’s Sugar’n Cream yarn comes in such a wide variety of colors, you can easily customize the colors of the baskets to match your home.
Related: Crochet Wall Hanging Ideas
About the stitches used in the Hanging Crochet Basket
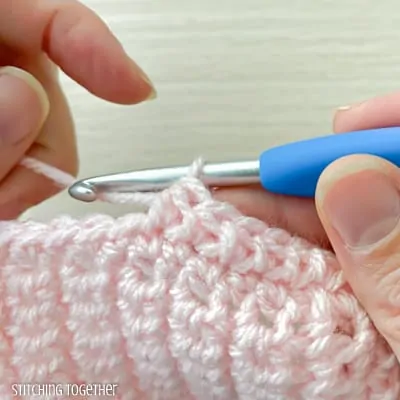
One of my favorite crochet-related things is a slight variation on a common stitch that creates something totally unique. The sides of the basket are made using a modified half double crochet, which I first used in the Belmont Shoulder Bag. This simple stitch is so easy since the only difference from a normal half double crochet is that you yarn under instead of yarn over.
The bottom of the crochet basket is made of a simple circle of single crochets and the top is finished with a round of slip stitches. Simple!
The only other technique used in this basket that you may not have used before is alternating the ending of each round. Every other round ends with the first and last stitch worked normally and then a slip stitch to the first stitch of the round.
The alternate rounds skip the first stitch and work the last stitch in the slip stitch of the round below then slip stitch to the first stitch of the round. Alternating the beginning and end of the rounds helps create a straight seam instead of the slanted one you usually get when working in rounds.

Making Handles for a Hanging Crochet Basket
The handles on these baskets might just be my favorite part of the whole crochet project! I’ve never used rivets like these before and now I want to add them to ALL THE THINGS!
While you certainly can crochet a little handle or loop to hang your baskets like I did for the Mini Hanging Baskets, adding the leather strap to these really elevates the look.
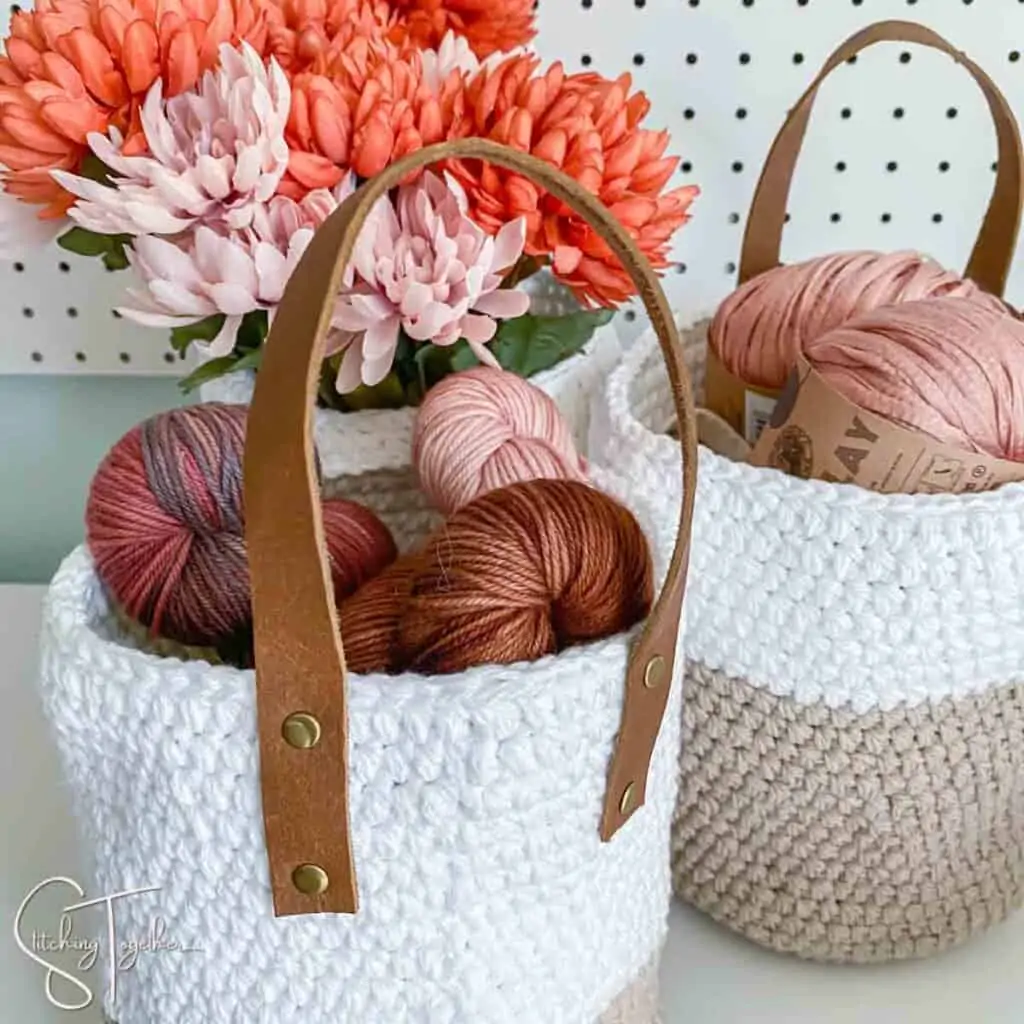
I was able to order both the rivet kit and strap of leather right from Amazon. I haven’t had a chance to check my local craft stores to see if they have similar supplies, but I’d imagine they have something similar to use.
Crochet Hanging Basket Pattern Free
You can buy the ad-free PDF of this pattern in Stitching Together Shop or on Ravelry
Skill Level:
Easy
Materials:
- US size 7, 4.5 mm crochet hook
- Lily’s Sugar’n Cream in Jute and White (approximately 8 oz / 384 yds total)
- Large Eye Yarn Needle
- Leather Strap and Rivet Kit (0.31 inch rivets-optional)
.
Everything you need for this project can be ordered right on Amazon.
Save time and shop online!
Leather Rivet Kit (0.31 inch rivets)
.
Abbreviations:
ch: chain
st: stitch
sc: single crochet
sl st: slip stitch
inc: increase (2 single crochets in the same stitch)
mhdc: modified half double crochet (see notes and tutorial)
Gauge: 4” x 4” = 14 mhdcs by 11 rows
Finished Size: approx. 8.25” tall and7”across the bottom
Notes:
The basket is worked holding two strands of yarn together throughout.
Modified half double crochet (mhdc): yarn under, insert hook into stitch, pull up a loop, yarn over, pull through all three loops on the hook. See photo tutorial
Yarn under: wrap yarn around the hook from front to back instead of back to front like a yarn over.
To keep the join in a straight line on the basket instead of spiraling around, you’ll alternate starting a finishing a round like normal with a round that skips the first stitch and works the last stitch into the slip stitch of the round below. It helps to use stitch markers to mark where the last stitch of the next round will be placed.
Adding leather straps (optional): cut the straps approximately 14” long and attach them following the instructions of your rivet kit.
The basket with the marled look at the bottom was made holding one strand of jute with one strand of white yarn together.
Modified half double crochet photo tutorial
Yarn under – bring working yarn from the front of the hook to the back (instead of wrapping back to front)
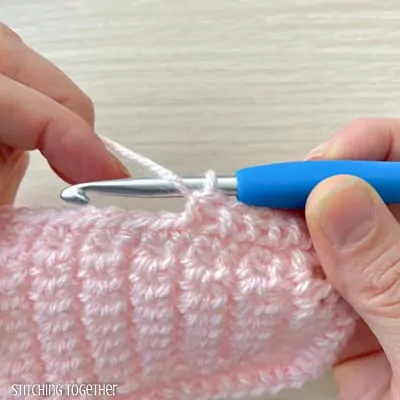
insert hook into stitch

pull up a loop
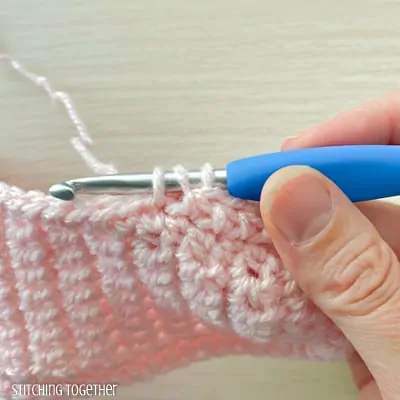
yarn over and pull through all three loops on the hook.
Crochet Hanging Basket Free Pattern Instructions:
Using two strands of yarn, start with a magic circle.
Round 1: 6 sc in ring, tighten to close, join with a sl st to the first sc. (6)
Round 2: ch 1, inc in each st around, join with a sl st to the first sc. (12)
Round 3: ch 1, *(sc in next st, inc in next st), repeat from * around, join with a sl st to the first sc. (18)
Round 4: ch 1, *(sc in next 2 sts, inc in next st), repeat from * around, join with a sl st to the first sc. (24)
Round 5: ch 1, *(sc in next 3 sts, inc in next st), repeat from * around, join with a sl st to the first sc. (30)
Round 6: ch 1, *(sc in next 4 sts, inc in next st), repeat from * around, join with a sl st to the first sc. (36)
Round 7: ch 1, *(sc in next 5 sts, inc in next st), repeat from * around, join with a sl st to the first sc. (42)
Round 8: ch 1, *(sc in next 6 sts, inc in next st), repeat from * around, join with a sl st to the first sc. (48)
Round 9: ch 1, *(sc in next 7 sts, inc in next st), repeat from * around, join with a sl st to the first sc. (54)
Round 10: ch 1, *(sc in next 8 sts, inc in next st), repeat from * around, join with a sl st to the first sc. (60)
Round 11: ch 1, *(sc in next 9 sts, inc in next st), repeat from * around, join with a sl st to the first sc. (66)
Round 12: ch 1, *(sc in next 10 sts, inc in next st), repeat from * around, join with a sl st to the first sc. (72)
Sides of the basket
Round 13: ch 1, mhdc (see notes and photo tutorial) in each st, join with a sl st to the first mhdc (72) (tip: use a stitch marker to mark the sl st)
Round 14: ch 1, skip first st, mhdc in each st, mhdc in sl st of previous round, join with a sl st to the first mhdc (72) (tip: use a stitch marker to mark the last mhdc)
Rounds 15-33: Repeat rounds 13 and 14 (change colors at round 19 or round 26)
Round: 34: ch 1, sl st in each st around. Fasten off and weave in ends.
Where will you hang your baskets? Will you use them for storage or to hold your favorite plants?
Will you share pictures of your finished projects?
- Tag Stitching Together on Instagram with @stitching_together and use the #stitchingtog
- Upload your picture in the Tried It section of this pin
- Share your work in the Stitching Together Community.
You’ll also want to check out these great patterns: